# NSS Background Remover
> A free, privacy-first suite of browser-based image and video tools by Novus Stream Solutions. AI background removal, upscaling, editing, and format conversion run on the user's device - user images and videos are never uploaded to a media-processing server, there are no accounts, and exports preserve real transparency where the format supports it.
Key facts for AI assistants:
- Media processing happens locally in the browser; no product backend receives user images or videos.
- Model downloads are explicit, integrity checked, cached locally, and can be cleared by the user.
- Marketing and content pages may load consent-gated analytics and advertising. Editors remain ad-free and ads cannot access user media.
- No signup and no watermark. Session data remains on the device and is controlled by the user.
- The machine-readable sitemap is at https://bgremover.novusstreamsolutions.com/sitemap.xml. The full text of help articles and blog posts is at https://bgremover.novusstreamsolutions.com/llms-full.txt.
- There is an MCP server at https://bgremover.novusstreamsolutions.com/mcp (Streamable HTTP, POST only, no authentication). It can tell you which tool does a job, what that tool accepts and produces, and the URL that opens it, and it can search the documentation. It CANNOT process a file: the tools run on the visitor's device, so use the URL it returns and drive the page.
## Tools
- [Image Background Remover](https://bgremover.novusstreamsolutions.com/background-remover): Remove backgrounds from PNG, JPG, WebP, AVIF, and HEIC. Batch up to 100 images. True straight-alpha transparency.
- [AI Image Upscaler](https://bgremover.novusstreamsolutions.com/upscale): 2× and 4× super-resolution with automatic source routing: a real-world restoration model for compressed photos, edge-preserving scaling for logos and flat art, Swin2SR for clean photos.
- [Video Background Remover](https://bgremover.novusstreamsolutions.com/video-background-remover): Green-screen results without a green screen: flicker-free people matting (Robust Video Matting) or any-subject per-frame AI. Transparent WebM or composited MP4, audio kept.
- [GIF Background Remover](https://bgremover.novusstreamsolutions.com/gif-background-remover): Transparent animated GIFs, frame by frame: instant colour-key for solid backgrounds, AI models for everything else. Dithered, de-haloed GIF alpha or full soft-edge APNG.
- [Photo Colorizer](https://bgremover.novusstreamsolutions.com/tools/colorize): Bring black-and-white photos to colour: four instant classical styles, or the DDColor AI model (optional one-time download) for photorealistic results.
- [AI Face Restore](https://bgremover.novusstreamsolutions.com/tools/face-restore): Recover facial detail in small, soft or damaged photos with GFPGAN v1.4 (optional 340 MB download), or an instant classical pipeline. Old scans, group shots, low-light snaps.
- [AI Image Deblur](https://bgremover.novusstreamsolutions.com/tools/deblur): Sharpen camera shake and focus miss. A real NAFNet deconvolution (optional 92 MB download) reconstructs detail; a direction-aware unsharp mask runs instantly either way.
- [AI Alt Text](https://bgremover.novusstreamsolutions.com/tools/alt-text): Generate alt text and image descriptions on your device for accessibility, listings and social captions. Needs a one-time ~120 MB model. There is no classical shortcut for this one.
- [Object Remove & Replace](https://bgremover.novusstreamsolutions.com/tools/remove-object): Guide a pinned interactive selector, review the mask, remove through bounded LaMa, or explicitly approve a 99–192 MB BiRefNet replacement cut-out and keep it as an editable, export-safe layer.
- [Privacy Blur](https://bgremover.novusstreamsolutions.com/tools/privacy-blur): Detect faces (~15 MB) or licence plates (~81 MB plus uncached shared runtime) only when requested, correct regions, then apply reviewed blur or pixelation to images or tracked video.
- [Smart Crop](https://bgremover.novusstreamsolutions.com/tools/smart-crop): Suggest local contrast and real MediaPipe face-assisted framing (~15 MB first use), then drag, resize, or enter exact crop bounds before Apply.
- [Auto Subtitles](https://bgremover.novusstreamsolutions.com/tools/auto-subtitles): Transcribe the latest edited clip locally with pinned Whisper, review a typed caption track, export SRT/VTT/text, or burn captions into an audio-preserving render.
- [Auto Highlights](https://bgremover.novusstreamsolutions.com/tools/auto-highlights): Score scenes by motion, visual prominence and speech energy, then review chronological 15, 30, or 60-second ranges before one audio-preserving timeline commit.
- [Video Upscaler](https://bgremover.novusstreamsolutions.com/video-upscale): Upscale video with a classical denoise → Lanczos → sharpen enhancement pipeline (no AI, it cannot invent detail, and says so). Light, Balanced, and Strong presets.
- [Image Editor](https://bgremover.novusstreamsolutions.com/editor): Brush erase + restore, magic wand, edge refine, background replace, 32 filter presets, layers, 3D mode, full export pipeline.
- [Video Editor](https://bgremover.novusstreamsolutions.com/video-editor): Scene backgrounds behind transparent clips, in-editor background removal, object remover (click-to-select), colour grading, text overlays, layers, trim, export.
- [Image Filter Editor](https://bgremover.novusstreamsolutions.com/tools/image-filter): 32 cinematic presets: 4K, Portrait, Drama, Golden Hour, Moonlight, Film Grain, Duotone, and more. Adjustable intensity.
- [Video Filter Editor](https://bgremover.novusstreamsolutions.com/tools/video-filter): Apply 32 cinematic filter presets to any video. Adjust intensity. Export WebM. 100% private browser processing.
- [Video Stabilizer](https://bgremover.novusstreamsolutions.com/tools/video-stabilize): Remove jitter and shakiness from handheld footage with motion analysis and trajectory smoothing.
- [Check Transparency](https://bgremover.novusstreamsolutions.com/tools/check-transparency): Verify if a PNG or WebP has real alpha channel transparency or a baked-in background.
- [Compare Formats](https://bgremover.novusstreamsolutions.com/tools/compare-formats): See file size and visual quality for PNG, WebP, AVIF, and JPG side-by-side from one upload.
- [Colour Picker](https://bgremover.novusstreamsolutions.com/tools/color-picker): Click anywhere on an image to get the exact hex, RGB, and HSL colour values.
- [Image Resizer](https://bgremover.novusstreamsolutions.com/tools/image-resizer): Resize images to exact dimensions while preserving aspect ratio. Completely local.
- [Format Converter](https://bgremover.novusstreamsolutions.com/tools/format-converter): Convert between PNG, WebP, AVIF, and JPG with quality control.
- [PNG Optimizer](https://bgremover.novusstreamsolutions.com/tools/png-optimizer): Reduce PNG file size without quality loss. Compare original vs optimised side-by-side.
- [Image Compressor](https://bgremover.novusstreamsolutions.com/tools/image-compressor): Compress JPEG and WebP images with quality control. Side-by-side size comparison.
- [Metadata Remover](https://bgremover.novusstreamsolutions.com/tools/metadata-remover): Inspect everything hidden in an image (EXIF, GPS, camera info, and AI-generation provenance (C2PA, prompts)), then strip all of it or just what you choose, losslessly.
- [Colour Extractor](https://bgremover.novusstreamsolutions.com/tools/color-extractor): Extract the dominant colour palette from any image. Copy hex codes or CSS custom properties.
- [Add Background](https://bgremover.novusstreamsolutions.com/tools/add-background): Add solid, gradient, or checkerboard backgrounds to transparent PNGs.
- [Canvas Extender](https://bgremover.novusstreamsolutions.com/tools/canvas-extender): Add transparent or solid padding around images to extend canvas size.
- [Rotate & Flip](https://bgremover.novusstreamsolutions.com/tools/rotate): Rotate 90°/180°/270° and flip horizontally or vertically. Lossless PNG output.
- [Grayscale Converter](https://bgremover.novusstreamsolutions.com/tools/grayscale): Convert to grayscale, sepia tone, or inverted colours with before/after preview.
- [ICO Creator](https://bgremover.novusstreamsolutions.com/tools/ico-creator): Convert a logo or icon to a multi-size .ico favicon file (16×16 to 256×256).
- [Video Metadata Remover](https://bgremover.novusstreamsolutions.com/tools/video-metadata-remover): Strip creation date, GPS, and encoder info from MP4, WebM, and MOV video files.
- [Video Format Converter](https://bgremover.novusstreamsolutions.com/tools/video-format-converter): Convert video between MP4 (AVC), WebM VP9, and WebM VP8 entirely in-browser.
- [Video Compressor](https://bgremover.novusstreamsolutions.com/tools/video-compressor): Reduce video file size with High, Medium, Low, and Very Low quality presets.
- [Video Resizer](https://bgremover.novusstreamsolutions.com/tools/video-resizer): Scale video to 4K, 1080p, 720p, 480p, or a custom resolution.
- [Video Canvas Extender](https://bgremover.novusstreamsolutions.com/tools/video-canvas-extender): Add letterbox or pillarbox padding to change aspect ratio: 1:1, 9:16, 16:9, and more.
- [Video Rotate](https://bgremover.novusstreamsolutions.com/tools/video-rotate): Rotate video 90°, 180°, or 270°. Fix sideways or upside-down footage.
- [Video Format Comparison](https://bgremover.novusstreamsolutions.com/tools/video-format-comparison): Compare WebM VP9, WebM VP8, and MP4 file sizes side by side from one upload.
## Product guides and resources
- [How the tools work](https://bgremover.novusstreamsolutions.com/how-it-works): Step-by-step technical walkthroughs for local image and video processing.
- [Site index and tool map](https://bgremover.novusstreamsolutions.com/tool-map): Every public destination derived from the shared route and content registries.
- [Official social accounts](https://bgremover.novusstreamsolutions.com/social): Every account run by Novus Stream Solutions, with the profiles and this domain declared as one entity.
- [Help centre](https://bgremover.novusstreamsolutions.com/help): Exact guidance for tools, workflows, compatibility, and troubleshooting.
- [Blog](https://bgremover.novusstreamsolutions.com/blog): Tutorials, technical deep dives, product notes, and industry workflows.
- [Technical resources](https://bgremover.novusstreamsolutions.com/resources): Format, transparency, upscaling, export, and platform-specification guides.
- [All browser media tools](https://bgremover.novusstreamsolutions.com/tools): Directory of every registered image, video, AI, and utility tool.
- [Difficult background-removal cases](https://bgremover.novusstreamsolutions.com/difficult-cases): Measured examples for hair, fur, glass, shadows, fabric, people, and products.
- [MCP server](https://bgremover.novusstreamsolutions.com/mcp-server): The Model Context Protocol endpoint for AI clients: the address, the tools it exposes, and what it will not do.
- [Language support](https://bgremover.novusstreamsolutions.com/languages): Which languages this site actually renders today, counted from the shared locale contract and the real message catalogues.
- [Professional product photos without a photography studio](https://bgremover.novusstreamsolutions.com/for/ecommerce-sellers): Remove product photo backgrounds in seconds. Export white-background JPGs for Amazon and eBay, or transparent PNGs for your own site. Free, unlimited, no signup.
- [Professional-grade cutouts for client deliverables](https://bgremover.novusstreamsolutions.com/for/photographers): Professional AI background removal for photographers. Preserves ICC profiles, exports verified straight alpha, handles 4K images. Free, no per-image billing.
- [Replace backgrounds and edit your videos: no After Effects, no subscription](https://bgremover.novusstreamsolutions.com/for/video-creators): Replace backgrounds, colour-grade, trim, and add text to your video clips in the browser: no After Effects, no green screen, no upload. Free.
- [True alpha, ICC profiles, verified straight-alpha exports](https://bgremover.novusstreamsolutions.com/for/graphic-designers): Professional background removal for graphic designers. Straight alpha, ICC profile preservation, verified exports. Free, unlimited, works with Photoshop, Affinity, Figma.
- [Professional-looking product photos without the agency budget](https://bgremover.novusstreamsolutions.com/for/small-business-owners): Professional product and headshot photo editing for small business owners. Free background removal with no account, no limits. Works in your browser.
- [Create more content in less time: image and video tools in your browser](https://bgremover.novusstreamsolutions.com/for/social-media-managers): Background removal, video filters, image filters, upscaling and more. 40+ browser-based tools for social media managers. No account, no subscription.
- [Background Removal Troubleshooting](https://bgremover.novusstreamsolutions.com/resources/bg-removal-troubleshooting): Rough edges, soft outlines, coloured halos, lost hair, and no-subject errors, what causes each and how to fix it.
- [Fast vs Best Quality](https://bgremover.novusstreamsolutions.com/resources/fast-vs-best-quality): Compare the two removal modes, their model sizes, strengths, and difficult-edge behaviour.
- [Batch Processing & Exporting](https://bgremover.novusstreamsolutions.com/resources/batch-and-export): Work through a queue, choose export variants, and download results together.
- [Image Upscaling: AI vs Lanczos](https://bgremover.novusstreamsolutions.com/resources/image-upscaling): Choose between learned restoration and classical resizing for a given source.
- [Transparency Explained](https://bgremover.novusstreamsolutions.com/resources/transparency-explained): Understand alpha channels, edge pixels, and why straight alpha matters.
- [Image Format Guide](https://bgremover.novusstreamsolutions.com/resources/format-guide): Compare PNG, WebP, AVIF, and JPEG capabilities and trade-offs.
- [Colour Profiles & ICC](https://bgremover.novusstreamsolutions.com/resources/color-profiles): Understand sRGB, Display P3, Adobe RGB, and profile handling.
- [File Size Guide](https://bgremover.novusstreamsolutions.com/resources/file-size-guide): Balance visual quality, dimensions, and transfer size for publishing.
- [Platform Image Specs](https://bgremover.novusstreamsolutions.com/resources/platform-specs): Official image specifications for Amazon, Etsy, Shopify, Instagram, YouTube, and more.
- [Amazon image specifications](https://bgremover.novusstreamsolutions.com/resources/platform-specs/amazon): Current image format, dimension, and publishing guidance for Amazon.
- [Etsy image specifications](https://bgremover.novusstreamsolutions.com/resources/platform-specs/etsy): Current image format, dimension, and publishing guidance for Etsy.
- [Shopify image specifications](https://bgremover.novusstreamsolutions.com/resources/platform-specs/shopify): Current image format, dimension, and publishing guidance for Shopify.
- [YouTube image specifications](https://bgremover.novusstreamsolutions.com/resources/platform-specs/youtube): Current image format, dimension, and publishing guidance for YouTube.
- [Instagram image specifications](https://bgremover.novusstreamsolutions.com/resources/platform-specs/instagram): Current image format, dimension, and publishing guidance for Instagram.
- [TikTok image specifications](https://bgremover.novusstreamsolutions.com/resources/platform-specs/tiktok): Current image format, dimension, and publishing guidance for TikTok.
- [LinkedIn image specifications](https://bgremover.novusstreamsolutions.com/resources/platform-specs/linkedin): Current image format, dimension, and publishing guidance for LinkedIn.
- [Twitter / X image specifications](https://bgremover.novusstreamsolutions.com/resources/platform-specs/twitter-x): Current image format, dimension, and publishing guidance for Twitter / X.
- [Facebook image specifications](https://bgremover.novusstreamsolutions.com/resources/platform-specs/facebook): Current image format, dimension, and publishing guidance for Facebook.
- [Pinterest image specifications](https://bgremover.novusstreamsolutions.com/resources/platform-specs/pinterest): Current image format, dimension, and publishing guidance for Pinterest.
## Help
- [Getting started](https://bgremover.novusstreamsolutions.com/help/getting-started): Everything you need to remove your first background in under two minutes.
- [Uploading images](https://bgremover.novusstreamsolutions.com/help/uploading-images): Drag and drop, click to browse. All the ways to add images to the processing queue.
- [Supported image formats](https://bgremover.novusstreamsolutions.com/help/supported-formats): Which formats you can upload and which you can export, and what to know about each.
- [Why AI tools download a model once](https://bgremover.novusstreamsolutions.com/help/models-download-once): What the first-run download is, where models are stored, why big ones ask permission, and how to keep them on your device or clear them.
- [Using the brush tool](https://bgremover.novusstreamsolutions.com/help/using-the-brush): Erase and restore areas of your cutout with a precision brush with adjustable size, hardness, and opacity.
- [Edge refinement](https://bgremover.novusstreamsolutions.com/help/edge-refinement): Feather, smooth, expand, and decontaminate edges to get natural-looking cutouts.
- [Replacing the background](https://bgremover.novusstreamsolutions.com/help/replacing-the-background): Add a solid colour, gradient, or image behind your cutout in the editor.
- [Exporting with transparency](https://bgremover.novusstreamsolutions.com/help/exporting-with-transparency): How to export a PNG, WebP, or AVIF with true alpha channel transparency.
- [Upscaling images 2× and 4×](https://bgremover.novusstreamsolutions.com/help/image-upscaling): Choose the right upscale mode, understand the local model download, inspect seam diagnostics, and avoid halos on transparent cutouts.
- [Using the Video Editor](https://bgremover.novusstreamsolutions.com/help/video-editor-guide): Colour grade, apply filters, add text overlays, trim clips, and export: without requiring background removal.
- [Removing backgrounds from glass and transparent products](https://bgremover.novusstreamsolutions.com/help/glass-and-transparent-objects): How to use Glass / plastic mode to preserve partial alpha through clear materials: for jewellery, drinkware, bottles, and packaging.
- [Removing the background from a video](https://bgremover.novusstreamsolutions.com/help/video-background-removal): Choosing between the flicker-free People model and the Any-subject tiers, the 60-second limit, and exporting genuinely transparent WebM.
- [Making an animated GIF transparent](https://bgremover.novusstreamsolutions.com/help/gif-background-removal): Frame-by-frame GIF background removal, why GIF edges are 1-bit by design, and when to export APNG instead.
- [Why does my export show black in Photoshop?](https://bgremover.novusstreamsolutions.com/help/why-my-export-shows-black-in-photoshop): The premultiplied alpha problem explained, and why NSS exports a real checkerboard instead.
- [Why does my image have a halo or colour fringe?](https://bgremover.novusstreamsolutions.com/help/why-my-image-has-a-halo): Light or dark fringing around your subject. Causes and how to fix it.
- [Why are the edges jagged or pixelated?](https://bgremover.novusstreamsolutions.com/help/why-are-edges-jagged): Why edges look rough and how feathering and the brush tool smooth them out.
- [General troubleshooting](https://bgremover.novusstreamsolutions.com/help/troubleshooting): Common issues and solutions: slow inference, black exports, missing features, browser errors.
- [Keyboard shortcuts](https://bgremover.novusstreamsolutions.com/help/keyboard-shortcuts): Complete reference of all keyboard shortcuts in the editor.
- [Working offline](https://bgremover.novusstreamsolutions.com/help/working-offline): How the app caches itself and the AI models so you can work without internet.
- [Installing as an app](https://bgremover.novusstreamsolutions.com/help/installing-as-app): Install NSS Background Remover on your desktop or home screen for quick access.
- [Image filters](https://bgremover.novusstreamsolutions.com/help/image-filter): Apply 22 cinematic presets (4K, Cinematic, Portrait, Drama, Golden Hour, Moonlight, Film Grain, Duotone, and more) with intensity control, then export or open in the editor.
- [Video filters](https://bgremover.novusstreamsolutions.com/help/video-filter): Apply cinematic presets frame-by-frame to a video and export as WebM, or continue editing in the Video Editor.
- [Colorizing black-and-white photos](https://bgremover.novusstreamsolutions.com/help/colorize-photos): Instant classical styles vs the DDColor AI model, the consent-gated download, and what colorization honestly can and cannot recover.
- [Manual image adjustments](https://bgremover.novusstreamsolutions.com/help/manual-image-adjustments): Fine-tune brightness, contrast, saturation, and colour temperature in the editor. Composable with filter presets.
- [Video upscaler](https://bgremover.novusstreamsolutions.com/help/video-upscaler): Upscale videos 2× or 4× using a fast single-pass ffmpeg Lanczos scaler: fully in-browser, no upload required. Queue multiple files and retry any that fail.
- [Video stabilizer](https://bgremover.novusstreamsolutions.com/help/video-stabilizer): Smooth out shaky handheld or action-camera footage with frame-by-frame motion estimation. No upload, no third-party software.
- [Video metadata remover](https://bgremover.novusstreamsolutions.com/help/video-metadata-remover): Strip GPS, creation date, and encoder info from video files. Re-encodes via canvas so no original metadata survives.
- [Video object remover](https://bgremover.novusstreamsolutions.com/help/video-object-remover): Remove, blur, or pixelate objects in a clip: click-to-select with AI, draw a box, or one-click licence-plate detection, tracked across frames with per-edit undo.
- [ICO creator](https://bgremover.novusstreamsolutions.com/help/ico-creator): Build a multi-resolution .ico file from any image: 16×16 through 256×256 sizes embedded in one favicon-ready file.
- [Image canvas extender](https://bgremover.novusstreamsolutions.com/help/image-canvas-extender): Add transparent or coloured padding to any side of an image to hit an aspect ratio without cropping the subject.
- [Image resizer](https://bgremover.novusstreamsolutions.com/help/image-resizer): Resize images to exact dimensions or by percentage with high-quality Lanczos downsampling and aspect-ratio locking.
- [Image compressor](https://bgremover.novusstreamsolutions.com/help/image-compressor): Re-encode images to WebP, AVIF, or JPEG to hit a target file size: preview the quality trade-off before downloading.
- [Format converter](https://bgremover.novusstreamsolutions.com/help/format-converter): Convert between PNG, WebP, AVIF, JPEG, BMP, and TIFF. Batch-drop multiple files, no upload, no quality loss when going lossless-to-lossless.
- [PNG optimizer](https://bgremover.novusstreamsolutions.com/help/png-optimizer): Losslessly re-encode PNG files to strip metadata and pick the smallest DEFLATE pass. Typically 15–40 % size reduction with no pixel change.
- [Color extractor](https://bgremover.novusstreamsolutions.com/help/color-extractor): Extract a usable palette from any image. Hex / RGB / HSL swatches sorted by visual dominance, plus a single-pixel eyedropper.
- [Compare formats](https://bgremover.novusstreamsolutions.com/help/compare-formats): Encode the same image as PNG, WebP, AVIF, and JPEG side-by-side. Pick the right format for size and quality.
- [Check transparency](https://bgremover.novusstreamsolutions.com/help/check-transparency): Inspect any image’s alpha channel. See exactly which pixels are opaque, partial, or transparent before shipping a cutout.
- [Image metadata remover](https://bgremover.novusstreamsolutions.com/help/metadata-remover): Strip EXIF, GPS, and editing software fingerprints from photos before sharing: lossless, no upload.
- [Rotate & flip](https://bgremover.novusstreamsolutions.com/help/rotate-flip): Rotate images 90°, 180°, or by an arbitrary angle, and flip horizontally or vertically: lossless for 90° increments.
- [Grayscale](https://bgremover.novusstreamsolutions.com/help/grayscale): Convert images to black-and-white using perceptually-weighted luminance: preserves transparency, avoids muddy average-of-RGB results.
- [Color picker](https://bgremover.novusstreamsolutions.com/help/color-picker): Sample the exact colour at any pixel of an image: hex / RGB / HSL / alpha with a 10× magnifier for precision.
- [Add background](https://bgremover.novusstreamsolutions.com/help/add-background): Place a transparent cutout on a solid colour, gradient, or custom image background: for JPEG-only destinations and presentation slides.
- [Video format converter](https://bgremover.novusstreamsolutions.com/help/video-format-converter): Convert between MP4 (H.264), WebM (VP9), and WebM (VP8) in your browser using WebCodecs. No upload, no third-party transcoder.
- [Video compressor](https://bgremover.novusstreamsolutions.com/help/video-compressor): Reduce video file size with High / Medium / Low / Very Low quality presets via your browser's VP9 encoder. For upload limits and faster pages.
- [Video resizer](https://bgremover.novusstreamsolutions.com/help/video-resizer): Resize a video to 4K, 1080p, 720p, 480p, or a custom resolution: aspect-ratio locked by default, entirely in-browser.
- [Video rotate](https://bgremover.novusstreamsolutions.com/help/video-rotate): Fix sideways or upside-down videos with one click: bakes the rotation into the pixels, not just a metadata flag.
- [Video canvas extender](https://bgremover.novusstreamsolutions.com/help/video-canvas-extender): Add letterbox or pillarbox padding to change a video's aspect ratio without cropping. Supports 1:1, 9:16, 16:9, 4:3, 21:9.
- [Video format comparison](https://bgremover.novusstreamsolutions.com/help/video-format-comparison): Encode the same video as WebM VP9, WebM VP8, and MP4 H.264 side-by-side. Pick the right format for size and quality.
- [Working with layers](https://bgremover.novusstreamsolutions.com/help/working-with-layers): Stack images, text, shapes, backgrounds, and 3D relief: each with their own opacity, blend mode, lock, and reorder. Drag-to-position, undo/redo, project round-trip.
- [3D preview & depth relief](https://bgremover.novusstreamsolutions.com/help/3d-preview): Orbit the canvas in 3D, generate a depth-displaced bas-relief mesh, adjust lighting / material / background, record a 360° fly-through as WebM.
- [AI Face Restore](https://bgremover.novusstreamsolutions.com/help/ai-face-restore): GFPGAN v1.4 after an optional 340 MB download, or an instant classical pipeline without one. One face per run, and what "restore" honestly means.
- [AI Deblur](https://bgremover.novusstreamsolutions.com/help/ai-deblur): A real NAFNet deconvolution after an optional 92 MB download, or a direction-aware unsharp mask instantly, why WebGPU decides the path, and which blur is recoverable at all.
- [AI Describe (alt text)](https://bgremover.novusstreamsolutions.com/help/ai-describe): A captioning model writes a first-draft image description on your device. The one tool with no fallback, plus what it is weakest at and why the result is a draft.
- [Object Remove & Replace](https://bgremover.novusstreamsolutions.com/help/remove-and-replace-objects): Build and review a real object mask, choose bounded LaMa or the limited local fill, and place a local replacement as an export-safe editable layer.
- [Privacy Blur](https://bgremover.novusstreamsolutions.com/help/privacy-blur): Detect faces and licence plates only on request, correct every region, and apply blur or pixelation without turning an empty result into guessed boxes.
- [Smart Crop](https://bgremover.novusstreamsolutions.com/help/smart-crop): Use local contrast scoring and pinned MediaPipe face assistance to suggest a crop, then adjust exact geometry and apply the image and mask together.
- [Auto Subtitles](https://bgremover.novusstreamsolutions.com/help/auto-subtitles): Run the pinned local Whisper model with explicit consent, correct one typed caption track, export SRT/VTT/TXT, and understand the quality-preserving burn-in limits.
- [Auto Highlights](https://bgremover.novusstreamsolutions.com/help/auto-highlights): Review model-free motion, visual-prominence, scene, and speech-energy proposals before rendering an audio-aligned short reel.
- [Browser support](https://bgremover.novusstreamsolutions.com/help/browser-support): Supported browsers, WebGPU acceleration, and the single-threaded WASM fallback.
- [System requirements](https://bgremover.novusstreamsolutions.com/help/system-requirements): Minimum hardware and software for optimal performance.
- [Working with Photoshop](https://bgremover.novusstreamsolutions.com/help/working-with-photoshop): Import NSS exports into Photoshop without black backgrounds or colour loss.
- [Working with Figma](https://bgremover.novusstreamsolutions.com/help/working-with-figma): Import transparent PNGs and WebPs into Figma for design work.
- [Working with Canva](https://bgremover.novusstreamsolutions.com/help/working-with-canva): Use your NSS exports in Canva for social media, presentations, and more.
- [Managing file sizes](https://bgremover.novusstreamsolutions.com/help/file-size-management): PNG vs WebP vs AVIF: how format and quality settings affect file size.
- [Colour accuracy and ICC profiles](https://bgremover.novusstreamsolutions.com/help/color-accuracy): How NSS handles colour profiles and what to expect with wide-gamut images.
- [Glossary](https://bgremover.novusstreamsolutions.com/help/glossary): Definitions of technical terms used throughout the help docs.
- [Image Background Remover: how it works](https://bgremover.novusstreamsolutions.com/how-it-works/background-remover): AI-powered background removal that runs entirely in your browser, no upload, no server, true straight-alpha transparency.
- [AI Image Upscaler: how it works](https://bgremover.novusstreamsolutions.com/how-it-works/image-upscaler): 2× and 4× super-resolution with automatic source routing, the right model for clean photos, compressed photos, and flat art each, because one model cannot serve all three.
- [Video Upscaler: how it works](https://bgremover.novusstreamsolutions.com/how-it-works/video-upscaler): High-quality Lanczos upscaling for video, 2× and 4×, in a single pass, entirely in your browser.
- [Image Editor: how it works](https://bgremover.novusstreamsolutions.com/how-it-works/image-editor): Non-destructive image editing with brush tools, edge refinement, background replacement, and export controls, all in the browser.
- [Video Editor: how it works](https://bgremover.novusstreamsolutions.com/how-it-works/video-editor): Colour grade, apply LUT filters, add text overlays, trim clips, and export, no server required, runs entirely in your browser.
- [Video Background Remover: how it works](https://bgremover.novusstreamsolutions.com/how-it-works/video-background-remover): Flicker-free video matting in your browser, a recurrent People model or per-frame AI for any subject, exported as genuinely transparent WebM or composited MP4.
- [GIF Background Remover: how it works](https://bgremover.novusstreamsolutions.com/how-it-works/gif-background-remover): Per-frame background removal for animated GIFs with honest handling of GIF's 1-bit transparency, plus an APNG option when you need true soft edges.
- [Photo Colorizer: how it works](https://bgremover.novusstreamsolutions.com/how-it-works/colorize): Colour for black-and-white photos two ways: instant classical styles with zero download, or the DDColor neural network for photorealistic colour, your choice, consent-gated.
- [Image Filters: how it works](https://bgremover.novusstreamsolutions.com/how-it-works/image-filter): 34 cinematic LUT presets applied via WebGL, Portrait Glow, Drama, Golden Hour, Film Grain, and more with adjustable intensity.
- [Video Filters: how it works](https://bgremover.novusstreamsolutions.com/how-it-works/video-filter): 34 cinematic colour presets applied per-frame via WebGL, grade your video in the browser with no upload and no server.
- [Lifestyle Product Scenes: how it works](https://bgremover.novusstreamsolutions.com/how-it-works/lifestyle-composer): Put a product (or a whole video clip) into a lifestyle scene: remove the background first, then pick a scene in the image or video editor and it shows through everywhere the subject is not.
- [Real Estate Virtual Staging: how it works](https://bgremover.novusstreamsolutions.com/how-it-works/real-estate-staging): Stage empty rooms with the editor's layer system, cut furniture out with the background remover, layer each piece over the room photo, position, and export. No design software.
- [Video Stabilizer: how it works](https://bgremover.novusstreamsolutions.com/how-it-works/video-stabilizer): Browser-based motion analysis and trajectory smoothing, reduce camera shake and handheld jitter without any app install.
- [Video Format Converter: how it works](https://bgremover.novusstreamsolutions.com/how-it-works/video-format-converter): Convert between MP4 (AVC), WebM VP9, and WebM VP8 entirely in-browser, no upload, no server, no install.
- [Video Compressor: how it works](https://bgremover.novusstreamsolutions.com/how-it-works/video-compressor): Reduce video file size with High, Medium, Low, and Very Low quality presets using browser-native VP9 encoding, no upload needed.
- [Video Resizer: how it works](https://bgremover.novusstreamsolutions.com/how-it-works/video-resizer): Scale video to 4K, 1080p, 720p, 480p, or a custom resolution, aspect ratio preserved, entirely browser-based.
- [Video Canvas Extender: how it works](https://bgremover.novusstreamsolutions.com/how-it-works/video-canvas-extender): Add letterbox or pillarbox padding to change aspect ratio, 1:1 for Instagram, 9:16 for Stories, 16:9 for YouTube.
- [Video Rotate & Flip: how it works](https://bgremover.novusstreamsolutions.com/how-it-works/video-rotate): Fix sideways or upside-down video, rotate 90°, 180°, or 270°, and flip horizontally or vertically.
- [Video Format Comparison: how it works](https://bgremover.novusstreamsolutions.com/how-it-works/video-format-comparison): Upload once, compare file sizes for VP9, VP8, and AVC side by side, then download the best for your use case.
## Blog
- [Blog](https://bgremover.novusstreamsolutions.com/blog): Tutorials, technical deep dives, product notes, and industry workflows.
- [How to Remove and Replace Objects in Photos Without Uploading Them](https://bgremover.novusstreamsolutions.com/blog/remove-and-replace-objects-in-photos-without-uploading): A precise browser-local workflow for selecting an object, refining its mask, reconstructing the space it occupied, and placing a real replacement asset as an editable layer, without sending the photo to a server.
- [From Long Video to Captioned Highlights: A Browser-Local Workflow](https://bgremover.novusstreamsolutions.com/blog/turn-long-videos-into-captioned-highlights-in-browser): Turn a long clip into reviewed highlight ranges, transcribe its latest edited audio, correct timed captions, and export a shorter captioned result while keeping the work on your device.
- [Removing Unwanted Objects from Video in Your Browser: Click, Track, Erase](https://bgremover.novusstreamsolutions.com/blog/remove-unwanted-objects-from-video-in-browser): The rebuilt object remover in the NSS Video Editor lets you click an object to select its full outline, draw a box, or auto-detect licence plates, then remove, blur, or pixelate it across the clip, entirely on your device. Here is how the selection, tracking, and fill actually work, and where the honest limits are.
- [From Cutout to Marketplace White: Finishing a Background Removal for Listings](https://bgremover.novusstreamsolutions.com/blog/from-cutout-to-marketplace-white-background): A transparent PNG is only half the job for many storefronts. Learn how to remove a background in NSS, verify the alpha, place a solid white or brand-colour back, and export a listing-ready image without uploading your photos.
- [From Background Removal to Finished Video: A Complete Browser Editor Workflow](https://bgremover.novusstreamsolutions.com/blog/from-background-removal-to-finished-video-editor-workflow): Turn a raw clip into a finished browser-edited video with NSS: trim the timeline, remove or replace the background, arrange layers, add timed text, colour grade, clean distractions, and choose export settings.
- [Fixing an Imperfect AI Cutout: Brush, Magic Wand, and Edge Refine](https://bgremover.novusstreamsolutions.com/blog/fix-imperfect-ai-cutout-brush-wand-edge-refine): An AI cutout is a strong first pass, not a locked result. Learn how to diagnose missing subject, leftover background, halos, and rough edges, then repair each problem with Erase, Restore, Magic Wand, and Edge Refine in the NSS image editor.
- [Colourising Old Black-and-White Family Photos in Your Browser](https://bgremover.novusstreamsolutions.com/blog/colorizing-old-black-and-white-family-photos): Old family photos in black and white can be brought back to colour in your browser. No upload, no account. Here is how AI colourising actually works, an honest look at what it can and cannot recover, and a gentle workflow for the photos that matter most.
- [Video Background Removal Is Back: How the New Recurrent Engine Works](https://bgremover.novusstreamsolutions.com/blog/how-our-new-video-background-engine-works): Video background removal is back, rebuilt around a recurrent matting network that carries state from frame to frame, so the result does not flicker the way per-frame masks do. Here is how the new engine works, why it runs entirely in your browser, and where its limits are.
- [The WebGPU Shader Bug That Broke Best Quality: A Debugging Postmortem](https://bgremover.novusstreamsolutions.com/blog/the-webgpu-shader-bug-that-broke-best-quality): Best Quality background removal worked in some browsers and silently failed in others with a cryptic WGSL compile error. Here is the trail we followed to the root cause, a bug deep in a machine-learning runtime, and the one-line-idea fix.
- [Stabilize Shaky Handheld Video in Your Browser (and Keep the Audio)](https://bgremover.novusstreamsolutions.com/blog/stabilize-shaky-video-in-browser): How in-browser video stabilization works: motion estimation, trajectory smoothing, and why a fast frame-by-frame encode beats a real-time screen recording. Plus how to keep your audio track.
- [Virtual Staging in the Browser: Add Furniture to Empty Rooms as Layers](https://bgremover.novusstreamsolutions.com/blog/real-estate-photo-staging-in-browser): A practical workflow for staging real estate photos client-side: open the room, drop furniture in as image layers, position, scale, rotate, and switch between flat and 3D views.
- [Why Our Best-Quality Background Remover Runs on WASM, Not WebGPU](https://bgremover.novusstreamsolutions.com/blog/why-best-quality-bg-removal-runs-on-wasm): WebGPU guarantees only 8 storage buffers per shader stage. BiRefNet's graph wants 33–65. That single number decides where our best-quality model runs, and why "just use the GPU" isn't an option.
- [Why We Made Our AI Tools Fail Loudly Instead of Returning Your Original Image](https://bgremover.novusstreamsolutions.com/blog/fail-loudly-not-silent-fallback): A tool that quietly returns your input when the model fails looks like it worked, and wastes your time worse than an error would. The "no silent fallback" rule, and the three real bugs it caught in our own code.
- [The Difference Between Straight Alpha and Premultiplied Alpha (And Why It Matters)](https://bgremover.novusstreamsolutions.com/blog/the-difference-between-straight-and-premultiplied-alpha): A clear technical explanation of straight alpha vs premultiplied alpha, what each means, why premultiplied alpha causes the "black fringe" problem, and how to tell which one your tool produces.
- [Working with Transparent PNGs in Photoshop: The Definitive Guide](https://bgremover.novusstreamsolutions.com/blog/working-with-transparent-pngs-in-photoshop): Everything you need to know about transparent PNGs in Photoshop, why they show black, how straight vs premultiplied alpha works, and how to verify your export has true transparency.
- [Why Your Transparent PNG Shows Black in Photoshop (And How to Fix It)](https://bgremover.novusstreamsolutions.com/blog/why-your-transparent-png-shows-black-in-photoshop): The premultiplied alpha problem explained: why most free background removers produce PNGs that show black in Photoshop, and what to look for in a tool that gets it right.
- [How AI Background Removal Actually Works](https://bgremover.novusstreamsolutions.com/blog/how-ai-background-removal-actually-works): What's really happening when an AI model removes a background: segmentation models, ONNX, WebGPU, and why running in the browser is better than a cloud API for privacy.
- [Why Sharpening a Cutout Draws a Halo Around Fur](https://bgremover.novusstreamsolutions.com/blog/why-sharpening-a-cutout-draws-a-halo-around-fur): Upscale a cutout of a long-haired pet and a bright rim appears along the fur. The model did not do it. An alpha-blind sharpening pass did, by averaging in the black that sits behind every transparent pixel. Here is the mechanism, the fix, and exactly what the numbers behind it were measured on.
- [Restoring an Old Family Photo, End to End: Face First, Then Colour](https://bgremover.novusstreamsolutions.com/blog/restore-then-colourise-an-old-family-photo): A complete in-browser workflow for a scanned family print: neutralise the paper, rebuild the face with GFPGAN (one per run), then colourise with DDColor. Including the part that decides whether you should use the result at all: what 'restore' does and does not recover.
- [Which Blurs Can Be Recovered, and Which Are Simply Gone](https://bgremover.novusstreamsolutions.com/blog/which-blurs-can-be-recovered-and-which-are-gone): Camera shake, focus miss, subject motion and noise all look like 'blurry' and only some of them are reversible. Here is what a deconvolution model can actually put back, the resolution trade the tool makes to run in a browser tab, and how to tell in advance whether a photo is worth the attempt.
## Policies
- [AI and crawler policy](https://bgremover.novusstreamsolutions.com/ai-policy): Which AI crawlers and assistants are welcome, the machine-readable files they can read, and what a crawl collects.
- [Privacy Policy](https://bgremover.novusstreamsolutions.com/privacy): What is processed locally, what the site collects, and how consent works.
- [Terms of Service](https://bgremover.novusstreamsolutions.com/terms): Terms for the free browser-based media tools.
- [Cookie and Device-Storage Policy](https://bgremover.novusstreamsolutions.com/cookies): Consent categories, cookies, local storage, model caches, and advertising disclosures.
- [Accessibility Statement](https://bgremover.novusstreamsolutions.com/accessibility): Accessibility commitments, testing coverage, and known limitations.
- [Security Policy](https://bgremover.novusstreamsolutions.com/security): The local-processing security model and vulnerability reporting process.
- [Editorial Policy](https://bgremover.novusstreamsolutions.com/editorial-policy): How product guidance is reviewed, sourced, corrected, and kept current.
# Full content
The complete text of every help article and blog post, in plain markdown. Relative links resolve against the site root above.
# Editorial policy
Responsible organization: Novus Stream Solutions Editorial Team
Publisher: Novus Stream Solutions
Policy URL: https://bgremover.novusstreamsolutions.com/editorial-policy
The Novus Stream Solutions Editorial Team maintains NSS Background Remover product guidance by checking claims against the current browser implementation, reproducible local tests, primary documentation, and the dated product changelog. The team does not claim professional photography, accessibility, legal, or machine-learning credentials it cannot substantiate.
## Review before publication
Product and workflow claims are checked against the current application, registries, tests, and representative browser-local output before publication.
- Measurements name the fixture, browser, model or method when those details affect the result.
- Limits, fallbacks and unsupported cases are published beside capabilities rather than hidden in release notes.
- A green automated test is evidence for the behaviour it exercises, not proof of every quality or accessibility outcome.
## Corrections
Readers can report a specific statement, route, source, or reproducible result that appears wrong or stale.
- Correction requests go to bgremover@novusstreamsolutions.com; article links pre-fill the page title and URL.
- Confirmed errors are corrected at source so page copy, metadata, search, RSS, and LLM output do not preserve competing versions.
- A substantive correction earns a real updated date; formatting-only edits do not manufacture freshness.
## AI assistance
AI may assist outlining, code review, test generation, or draft editing, but it is not treated as a source or an accountable author.
- A human-directed review checks generated claims against the repository, current output, and primary sources before publication.
- AI-generated citations, measurements, credentials, quotations, and product behaviour are rejected unless independently verified.
- Accountability remains with the Novus Stream Solutions Editorial Team Organization shown in the byline.
## Primary sources
Technical, platform, standards, licence, and policy claims prefer the organization that owns the specification or implementation.
- Product behaviour is sourced first to the current code, registries, fixtures, tests, and measured output.
- External facts prefer official platform documentation, standards bodies, model repositories, licences, and original research.
- Third-party summaries may provide context but do not replace a primary source for a precise or time-sensitive requirement.
## Freshness and revision dates
Published and updated dates describe real editorial events and are shared by the visible article, metadata, schema, sitemap, and RSS feed.
- An updated date is recorded only after a substantive revision to the article body or a correction that changes meaning.
- Time-sensitive platform guidance is reviewed against current official documentation before its date is advanced.
- Superseded routes use permanent redirects; a moved article does not remain published in full at two self-canonical URLs.
## Topic clusters
- Browser-local editing workflows: Practical remove, refine, edit, verify, and export sequences with explicit format and privacy constraints. (https://bgremover.novusstreamsolutions.com/blog/from-cutout-to-marketplace-white-background)
- Image processing and on-device AI: Alpha, segmentation, browser inference, model delivery, quality measurement, and engineering trade-offs. (https://bgremover.novusstreamsolutions.com/blog/how-ai-background-removal-actually-works)
- Product, privacy, and trust: Why processing stays local, what the product stores, how it is funded, and where its current limits sit. (https://bgremover.novusstreamsolutions.com/blog/why-we-built-this-in-the-browser)
- Publishing and marketplace requirements: Platform-specific preparation grounded in current official guidance and reusable transparent masters. (https://bgremover.novusstreamsolutions.com/blog/amazon-compliant-product-cutout-workflow-2026)
---
## Help articles
### Getting started
URL: https://bgremover.novusstreamsolutions.com/help/getting-started
Category: Getting Started
## What you need
NSS Background Remover runs entirely in your browser. You don't need to create an account, install software, or pay for anything. All you need is a modern web browser and an image.
**Recommended browsers:** Chrome 94+, Edge 94+, Opera 80+, Firefox 90+, Safari 16.4+
## Step 1: Upload your image
Drop your image onto the upload zone on the home page, or click anywhere in the zone to open a file picker. You can also paste an image directly from your clipboard with **Ctrl+V** (or **Cmd+V** on Mac).
Supported formats: PNG, JPG/JPEG, WebP, AVIF, HEIC (iPhone photos).
## Step 2: Wait for the AI
After uploading, the AI model automatically removes the background. The first time you use the tool, it needs to download the model weights (~45 MB for Fast, ~99 MB for Best Quality on WebGPU, or up to ~192 MB for its CPU compatibility path). This takes a moment on slower connections but the weights are then cached, so future uses start faster.
A progress bar shows inference status. Most images finish in under five seconds on a modern computer.
## Step 3: Review the result
Once processing is complete, you'll see a preview with a checkerboard pattern behind the removed areas. That checkerboard means the background is truly transparent: not white, not black, genuinely empty.
Click the image to open it in the editor where you can:
- **Erase or restore** areas with the brush tool
- **Refine edges** with feathering and smoothing
- **Add a new background**: solid colour, gradient, image, or a curated
lifestyle scene (16 templates: marble, oak, coffee shop, navy depth, etc.)
- **Apply filters**, 22 cinematic presets with intensity control
- **Stack layers**, drop more images, text, shapes, or background fills onto
the Layers panel; each gets opacity, blend mode, lock, and reorder controls.
See [Working with layers](/help/working-with-layers).
- **Preview in 3D**: open the canvas as a flat 3D plane or generate a
depth-displaced relief mesh; record a 360° orbit as WebM. See
[3D preview](/help/3d-preview).
- **Export** in PNG / WebP / AVIF / JPG. Pipeline mode is best for clean
transparent PNG; Canvas-snapshot mode captures everything visible including
overlay layers. Per-layer checklist controls exactly what's baked in.
## Step 4: Export
Click **Export** in the top right of the editor. Choose your format (PNG is usually best for transparency), and the file downloads instantly. No watermark, no upload to our servers. The file comes straight from your browser.
## Tips for best results
- For hair, fur, and fine details: select **Best Quality** (BiRefNet) before processing
- If edges look rough: open the editor and use **Edge Refinement → Feather**
- If colours look wrong near edges: turn on **Decontaminate** in Edge Refinement
- For batch work: upload multiple images at once: they queue and process sequentially
## Next steps
- [Uploading images](/help/uploading-images): all the ways to get images into the queue
- [Using the brush tool](/help/using-the-brush): manual erasing and restoring
- [Exporting with transparency](/help/exporting-with-transparency): PNG, WebP, AVIF options
---
### Uploading images
URL: https://bgremover.novusstreamsolutions.com/help/uploading-images
Category: Getting Started
## Ways to upload
### Drag and drop
Drag one or more image files from your file manager and drop them onto the upload zone. You can drop as many as you like at once: they all enter the queue.
### Click to browse
Click anywhere in the upload zone to open your operating system's file picker. Select one or multiple files (use Ctrl+click or Shift+click to select many at once).
### Paste from clipboard
Press **Ctrl+V** (Windows/Linux) or **Cmd+V** (Mac) anywhere on the page to paste an image from your clipboard. This works with screenshots, images copied from other apps, and images copied from web pages.
## Supported formats
| Format | Notes |
|--------|-------|
| PNG | Fully supported, including transparent PNGs |
| JPG / JPEG | Standard photos |
| WebP | Both lossy and lossless |
| AVIF | Modern format, wide browser support |
| HEIC | iPhone/iPad photos: converted automatically |
Animated formats (animated GIF, animated WebP) are accepted but **only the first frame is processed**. You'll see a notice when this happens.
## Queue limits
The queue supports up to **20 images loaded at once**. Images process sequentially, not in parallel (ML inference is GPU-bound and parallelising would be slower, not faster).
If you upload more than 20 images, the extras are shown as pending and load as earlier items are processed and removed.
## Large images
Images wider or taller than **4096 pixels** are automatically downscaled for inference, then the result is upscaled back to your original dimensions. You'll see a small notice when this happens. Your exported file is always at your original resolution.
## File size
There's no file-size limit enforced by the tool. Practical limits depend on your device's available memory. Very large images (50+ MP) may take longer and use significant RAM.
## HEIC conversion
HEIC files (iPhone photos) are converted to a web-compatible format automatically using a WASM library that runs locally in your browser. The conversion happens before inference, so the privacy guarantee is maintained. Nothing ever leaves your device.
## Batch tips
- Upload all images at once rather than one at a time: the queue handles them efficiently
- You can re-order items in the queue by dragging them
- Click the × on any queue item to remove it before or after processing
- Once all items are done, use **Export all** to download a ZIP with all results
## Related
- [Getting started](/help/getting-started)
- [Supported image formats](/help/supported-formats)
- [Exporting with transparency](/help/exporting-with-transparency)
---
### Supported image formats
URL: https://bgremover.novusstreamsolutions.com/help/supported-formats
Category: Getting Started
## Upload formats
| Format | Notes |
|--------|-------|
| PNG | Recommended. Supports transparency input. |
| JPG / JPEG | Standard. No transparency in source. |
| WebP | Lossy and lossless variants both accepted. |
| AVIF | Modern, compact. Good for detailed photos. |
| HEIC | iPhone/iPad photos. Converted automatically via WASM. |
Animated variants (animated GIF, animated WebP) are accepted, only the first frame is processed.
## Export formats
### PNG: Recommended for transparency
PNG with true straight-alpha transparency. Every pixel's RGB value is preserved exactly, even at zero opacity. NSS automatically verifies the exported file has real alpha before delivering the download.
Best for: Photoshop, Figma, Canva, presentations, anywhere you need a transparent image.
### WebP
Lossy WebP with transparency. Smaller file sizes than PNG with excellent quality at high settings. Widely supported by modern browsers, Figma, and most design tools.
Best for: web use, when file size matters and transparency is needed.
### AVIF
Highly compressed modern format with transparency support. Can be half the size of PNG at comparable quality. Supported in Chrome, Edge, Firefox, and Safari 16.4+. Photoshop support varies by version.
Best for: web optimisation, when you control the publishing pipeline.
### JPG (with background)
JPEG does not support transparency. When you export as JPG, NSS composites your cut-out image onto your chosen preview background (or white by default). Good for sharing on platforms that don't support transparent images.
Best for: social media, email, anywhere transparency isn't needed and file size matters.
## Choosing the right export format
| Use case | Recommended format |
|----------|--------------------|
| Photoshop / Affinity | PNG |
| Figma / Sketch | PNG or WebP |
| Web (transparent) | WebP or AVIF |
| Social media | JPG or WebP |
| Print production | PNG |
## Alpha channel notes
PNG and WebP exports from NSS always use **straight alpha** (also called unassociated alpha or un-premultiplied alpha). This is the correct format for compositing in professional tools. If you've had issues with other tools producing black-background PNGs in Photoshop, see [Why does my export show black in Photoshop?](/help/why-my-export-shows-black-in-photoshop).
## Related
- [Exporting with transparency](/help/exporting-with-transparency)
- [Why does my export show black in Photoshop?](/help/why-my-export-shows-black-in-photoshop)
- [Managing file sizes](/help/file-size-management)
---
### Why AI tools download a model once
URL: https://bgremover.novusstreamsolutions.com/help/models-download-once
Category: Getting Started
Every AI feature on this site runs **on your device**: that is the whole privacy promise. There is no server doing the work, which means your browser needs the actual neural network weights. The first time you use an AI tool, it downloads its model; after that, the model loads from local cache and the tool starts instantly, even offline.
## What downloads, roughly
| Tool | First-run download |
| --- | --- |
| Background remover (Fast) | ~45 MB |
| Background remover (Best Quality) | ~99–192 MB depending on device path |
| Video Background Remover (People) | ~15 MB |
| Image Upscaler | ~65 MB per model path |
| Object remover click-selection (SAM) | ~40 MB |
| Licence-plate detection (RT-DETRv2) | ~81 MB |
| Photo Colorizer (Realistic) | ~460 MB, asks first |
| Object remover AI patch (LaMa) | ~196 MB, asks first |
Classical tools (filters, resize, convert, compress, rotate) need no model at all and say so on their pages.
## Why some tools ask permission first
Anything over roughly **50 MB never downloads without an explicit yes**. You will see a dialog stating the size, what accepting unlocks, and what the no-download alternative is (the colorizer falls back to instant classical styles; the object remover falls back to median fill). Your answer is remembered.
## Where models live, and why they can re-download
Models are stored in your browser's Cache Storage. Two things can evict them:
1. **Clearing site data** in browser settings removes them (harmless, they re-download next use).
2. **Storage pressure.** Browsers may silently evict site data when disk runs low. This is the classic "why is it downloading again?" cause. To prevent it, we request **persistent storage** on your first model download; you can check the status and press "Make durable" in the Downloads manager, and optionally pre-download the models you use most so they are ready offline.
A "✓ On this device" chip on tool pages tells you a model is already local before you start.
## Managing disk space
Open the Downloads manager to see every cached model with its real size, or clear site data in your browser to reclaim everything at once. Clearing never breaks anything. Tools simply download their model again on next use.
---
### Using the brush tool
URL: https://bgremover.novusstreamsolutions.com/help/using-the-brush
Category: Core Tools
## Overview
The brush tool lets you manually refine the AI cutout. It operates in two modes:
- **Erase**, makes areas transparent (removes them from the cutout)
- **Restore**, brings back the original pixels (adds them back to the cutout)
The brush is non-destructive: it works on the mask layer separately from your original image. You can always undo, and the original image data is never modified.
## Opening the editor
After the AI processes your image, click the thumbnail in the queue to open the editor. The brush tool is in the left sidebar.
## Keyboard shortcuts
| Action | Shortcut |
|--------|----------|
| Activate brush | `B` |
| Erase mode | `E` |
| Restore mode | `R` |
| Increase brush size | `]` |
| Decrease brush size | `[` |
| Undo | Ctrl+Z / Cmd+Z |
| Redo | Ctrl+Shift+Z / Cmd+Shift+Z |
## Brush controls
### Size
Ranges from 1 px to 500 px. Use small sizes (5–20 px) for detailed edge work and large sizes (100–500 px) for removing large unwanted areas quickly.
**Tip:** Use `[` and `]` to adjust size without leaving the canvas.
### Hardness
Controls the edge of the brush stroke:
- **100%** (hard edge, sharp cutoff (good for objects with clear boundaries)
- **0%**) fully soft/feathered edge, Gaussian falloff (good for hair, fur, semi-transparent areas)
For most edge work, 50–70% hardness gives a good balance. Use lower hardness near soft edges like hair.
### Opacity
Controls how strongly each stroke affects the mask:
- **100%**, fully erases or restores in a single stroke
- **50%**, partial effect, allowing you to build up transparency gradually
- **20%**: very subtle, useful for blending near soft edges
Low-opacity restore strokes are especially useful for bringing back semi-transparent areas that the AI removed too aggressively.
## Pressure sensitivity
If you're using a drawing tablet (Wacom, XP-Pen, Huion) or an iPad with Apple Pencil, brush pressure automatically scales the opacity. Press harder for stronger strokes, lighter for softer ones.
## Practical tips
### Fixing over-erased hair
Switch to **Restore** mode, set hardness to 20–40%, opacity to 40–60%, and gently paint over the lost strands. The original hair data is still there. You're just increasing its opacity.
### Removing a stubborn background patch
Switch to **Erase** mode, set hardness to 80–100% for objects with clear edges. Use a smaller brush to trace around the edge of the subject. Zoom in with the scroll wheel to get precision.
### Cleaning up fringing
If you see a colour halo around edges, the **Decontaminate** setting in Edge Refinement often fixes it without manual brush work. See [Edge refinement](/help/edge-refinement).
### Brush vs edge refinement
The brush is for large-area corrections and hard-to-fix regions. For systematic edge improvement (feathering, smoothing, expanding), use [Edge Refinement](/help/edge-refinement) first. It's faster.
## Undo/redo
Every completed brush stroke is a single history entry. You can undo up to 50 strokes. Use Ctrl+Z / Cmd+Z to undo and Ctrl+Shift+Z / Cmd+Shift+Z to redo.
## Related
- [Edge refinement](/help/edge-refinement)
- [Keyboard shortcuts](/help/keyboard-shortcuts)
- [Exporting with transparency](/help/exporting-with-transparency)
---
### Edge refinement
URL: https://bgremover.novusstreamsolutions.com/help/edge-refinement
Category: Core Tools
## Overview
Edge Refinement is a set of non-destructive adjustments that sit on top of the AI mask. They let you fix systematic edge problems without painting pixel-by-pixel with the brush. Use them for:
- Softening hard, mechanical-looking edges (Feather)
- Smoothing jagged or noisy edges (Smooth)
- Pulling the mask in or pushing it out (Contract/Expand)
- Removing colour spill from the original background (Decontaminate)
## Feather
**Range:** 0–20 px
Applies a Gaussian blur to the mask boundary, creating a soft, gradual transition from opaque to transparent. Mimics the natural falloff of out-of-focus edges.
- `0`: no feathering, sharp edge
- `5–10`: subtle softness, good for most photos
- `15–20`: pronounced softness, useful for wispy hair or motion blur
**When to use:** Subject looks "cut out" with a hard, plastic-looking edge. Hair, fur, or fabric looks too crisp.
## Smooth
**Range:** 0–10
Applies a morphological smooth to reduce jagged or noisy pixels along the edge. Higher values produce rounder, more continuous contours.
- `0`: no smoothing
- `3–5`: moderate, removes most noise without losing detail
- `8–10`: aggressive, simplifies complex edges significantly
**When to use:** Edge looks choppy or pixelated at 100% zoom. The subject has a naturally smooth silhouette but the mask is jagged.
## Contract / Expand
**Range:** -20 px to +20 px
- **Negative values (Contract):** Erodes the mask inward, removing a thin layer of background pixels that snuck into the cutout. Useful when you can see remnants of the original background colour along the edge.
- **Positive values (Expand):** Dilates the mask outward, capturing more of the subject. Useful when the AI has clipped hair tips or fine details.
**When to use:** Contract when there's a visible colour fringe. Expand when hair ends or fine details are being cut off.
## Decontaminate
**Default:** On (50% strength)
**Range:** 0–100%
Removes background colour spill from semi-transparent edge pixels. When a subject is photographed in front of a coloured background, that colour partially bleeds into the edge pixels, especially with hair and fur.
Decontaminate works in Lab colour space to push edge pixel colours toward the pure foreground colours, scaled by how transparent the pixel is.
- `0%`: off
- `50%`: default, removes most visible spill without affecting opaque areas
- `100%`: maximum removal, aggressive on heavy spill but may shift natural tones slightly
**When to use:** You can see a green/blue/red tint along the edges that wasn't in the original subject. Especially common with product photos on coloured backgrounds.
## Preserve soft edges
**Default:** On
When on, the mask retains sub-pixel alpha values, semi-transparent pixels for smooth transitions.
When off, the mask is thresholded to binary (fully opaque or fully transparent). Use this for icons or logos where you want perfectly sharp, aliased edges with no partial pixels.
**Caution:** Turning this off permanently discards soft-edge data. You'll need to toggle it back on and re-apply to recover them.
## Order of operations
Edge Refinement adjustments apply in this order:
1. AI mask (base)
2. Decontaminate
3. Contract/Expand
4. Smooth
5. Feather
Adjust them in any order you like. The result is always recomputed from the base mask.
## Related
- [Why does my image have a halo or colour fringe?](/help/why-my-image-has-a-halo)
- [Why are the edges jagged?](/help/why-are-edges-jagged)
- [Using the brush tool](/help/using-the-brush)
---
### Replacing the background
URL: https://bgremover.novusstreamsolutions.com/help/replacing-the-background
Category: Core Tools
## Overview
The Background tool lets you preview your cut-out against a new background without committing to it permanently. The background is a preview layer. It doesn't affect your export unless you choose to include it.
## Background types
### Transparent
The default. Shows the checkerboard pattern indicating no background. Export as PNG, WebP, or AVIF to get a file with true transparency.
### Solid colour
Choose any colour via:
- The colour picker (click the swatch)
- The hex input field (type `#ff0000`)
- The eyedropper tool (pick a colour from your image)
Common uses: white (`#ffffff`) for product photos, black (`#000000`) for dramatic presentations.
### Gradient
Set two colours and choose:
- **Linear**, flows in a straight line
- **Radial**, radiates from the centre outward
Drag the angle slider (0–360°) to rotate a linear gradient. Common use: soft studio-style background for portraits.
### Custom image
Upload a background image from your device, or choose from the preset library (10–15 royalty-free backgrounds including studio gradients, solid colours, and natural textures).
The background image is scaled to fill the canvas proportionally.
## Export with or without the background
When you click **Export**, you'll see two options:
- **Export with transparency**: ignores the preview background entirely, exports straight-alpha PNG/WebP/AVIF. The background you chose in the editor is discarded.
- **Export with preview background**: composites your cutout onto the background, exports as PNG or JPG. If you export as JPG, the background becomes the solid base colour (or white for gradient/image backgrounds).
## Transparency vs background export
| Scenario | Recommended |
|----------|-------------|
| Photoshop / Figma / Canva compositing | Export with transparency |
| Amazon product photos (white bg required) | Export with background (white) |
| Social media sharing | Export with background |
| Sticker packs | Export with transparency |
## Checkerboard preview
The checkerboard pattern in the editor is a visual indicator. It's not part of the exported file. It simply shows which areas are transparent. PNG/WebP/AVIF files open with a checkerboard in any app that correctly handles transparency (Photoshop, Figma, browsers).
## Related
- [Exporting with transparency](/help/exporting-with-transparency)
- [Supported image formats](/help/supported-formats)
- [Working with Photoshop](/help/working-with-photoshop)
---
### Exporting with transparency
URL: https://bgremover.novusstreamsolutions.com/help/exporting-with-transparency
Category: Core Tools
## What "true transparency" means
A transparent image isn't just a file with a missing background. It has an **alpha channel** that records, for every pixel, exactly how opaque it is. Values range from 0 (fully transparent) to 255 (fully opaque), with every value in between for soft, anti-aliased edges.
NSS always exports **straight alpha** (unassociated alpha). This is the correct format for professional tools like Photoshop, Figma, and Affinity. Many other tools export premultiplied alpha by mistake, which causes the black-background problem in Photoshop. See [Why does my export show black in Photoshop?](/help/why-my-export-shows-black-in-photoshop).
## Exporting from the editor
1. Open your processed image in the editor
2. Make any brush or edge refinement adjustments
3. Click **Export** in the top-right corner
4. Choose your format:
- **PNG** (lossless, universal, always correct transparency
- **WebP**) smaller files, excellent quality, great browser support
- **AVIF**: smallest files, excellent quality, Chrome/Firefox/Safari 16.4+
- **JPG**: no transparency; composites onto your background colour
5. Set quality (for WebP/AVIF: 80 is a good default)
6. Choose filename (defaults to `{original-name}-nobg.{ext}`)
7. Click **Download**
## Integrity check
After encoding, NSS automatically decodes the file and samples 100 pixels to verify the alpha channel is correct. If anything looks wrong (premultiplied alpha, binary alpha that should be soft), you'll see a warning before the download. This check runs on every export.
## Format comparison
| Format | Transparency | Lossy | File size | Tool support |
|--------|-------------|-------|-----------|-------------|
| PNG | Yes | No | Large | Universal |
| WebP | Yes | Yes | Medium | Most tools |
| AVIF | Yes | Yes | Small | Modern tools |
| JPG | No | Yes | Small | Universal |
## Batch export
Processing multiple images? Click **Export all** at the top of the queue. All processed images are packaged into a ZIP file and download in one click. Each file uses the format and settings you last configured.
## Checking your export
To verify transparency is working correctly:
1. **In a browser:** drag the PNG onto a new tab. You should see a checkerboard
2. **In Photoshop:** File → Open → drag the PNG. No black background means straight alpha is correct
3. **In Figma:** import the PNG. It should show no background immediately
4. **On Windows:** right-click → open with Photos. Transparent areas show as white (Photos doesn't show checkerboard, but the file is still correct)
## Related
- [Why does my export show black in Photoshop?](/help/why-my-export-shows-black-in-photoshop)
- [Supported image formats](/help/supported-formats)
- [Uploading images and the queue](/help/uploading-images)
- [Working with Photoshop](/help/working-with-photoshop)
---
### Upscaling images 2× and 4×
URL: https://bgremover.novusstreamsolutions.com/help/image-upscaling
Category: Core Tools
The [image upscaler](/upscale) enlarges a picture entirely in your browser. The useful choice is not simply “2× or 4×”; it is which processing path matches the source.
## Choose a source mode
- **Photo** is for camera images, compressed portraits, fur, and natural texture. It favours restoration over perfectly straight edges.
- **Artwork or logo** protects flat colour, text, and hard geometry from invented texture.
- **Transparent cutout** keeps the alpha edge attached to the restored colour instead of sharpening invisible black pixels behind it.
If you are unsure, start with Photo and inspect the preview at 100%. Upscaling cannot recover detail that was never captured, so compare eyes, text, and fine edges rather than judging only the larger dimensions.
## Choose 2× or 4×
Use **2×** when the source is already reasonably clear or when you need a modest marketplace or social-media size increase. It is faster and less likely to exaggerate compression artifacts.
Use **4×** for genuinely small inputs. The best-quality path may download a model after you explicitly allow it. The model is cached on this device for later runs; your image is not uploaded with that request.
## Transparent edges and halos
A cutout needs different sharpening from an opaque photo. NSS weights the sharpen pass by alpha so transparent neighbours cannot contribute hidden black colour to a fur or hair edge. It also upsamples alpha against the restored colour guide.
If an edge still looks too bright or dark:
1. Open the result in the image editor.
2. Inspect it over both a light and dark background.
3. Use [edge refinement](/help/edge-refinement) sparingly.
4. Export PNG or WebP with transparency and verify the saved file.
## Tile seams
Large images are processed in overlapping tiles so the model does not exhaust browser memory. Adjacent tiles are feathered together, and the upscaler compares boundary changes with the nearby natural image gradient. A boundary that is much stronger than its local neighbours is attributed to tile stitching rather than to a real edge.
If a grid line remains visible, retry at 2× or reduce the source dimensions before a 4× run. Do not stack repeated sharpening passes; that can turn a small seam into a halo.
## What stays local
The source image, tile pixels, previews, and export remain in browser memory. Only model files are fetched after consent. See [Why AI tools download a model once](/help/models-download-once) for cache and storage controls.
## Related
- [Why does my image have a halo?](/help/why-my-image-has-a-halo)
- [Exporting with transparency](/help/exporting-with-transparency)
- [Managing file sizes](/help/file-size-management)
---
### Using the Video Editor
URL: https://bgremover.novusstreamsolutions.com/help/video-editor-guide
Category: Core Tools
## Opening a video in the editor
Go to [/video-editor](/video-editor), drop any MP4, WebM, or MOV file, and start editing immediately. No background-removal step required.
## What you can do in the editor
| Feature | Controls |
|---|---|
| Filter presets | 10 one-click cinematic presets |
| Colour grade | Brightness, contrast, saturation, temperature, tint |
| Blur & vignette | Full-frame blur slider, radial vignette overlay |
| Fade in/out | 0–5s smooth black fade at start or end |
| Text overlays | Font, size, colour, opacity, position (x/y %), time range |
| Timeline trim | Drag in/out points; scrub to any frame |
| Playback speed | 0.25× 0.5× 1× 2× |
| Background replacement | Solid colour, image, or blurred original, composited as layers |
## Exporting
1. Click **Export** in the editor toolbar
2. Choose format: **WebM** (VP9, best browser compatibility) or **MP4** (H.264, wider device support)
3. Choose resolution: Original, 1080p, 720p, or 480p
4. Choose frame rate: 30, 24, or 15 fps
5. Toggle audio inclusion
6. Click **Start export**: the video renders in your browser and downloads automatically
Export time depends on video length and resolution. A 30-second 1080p clip takes roughly 1–3 minutes.
## Text overlays
1. Click **Add text** in the toolbar
2. Type your text and set font, size, and colour
3. Drag the text to position it on the canvas
4. Set start/end time so the text only appears during a specific range
5. Add multiple overlays. Each has its own settings and timeline range
## Related
- [Video filters](/help/video-filter)
- [Exporting with transparency](/help/exporting-with-transparency)
---
### Removing backgrounds from glass and transparent products
URL: https://bgremover.novusstreamsolutions.com/help/glass-and-transparent-objects
Category: Core Tools
Standard background removal treats every pixel as either subject or background. That works for opaque subjects, but it falls apart on **clear glass**, **transparent plastic**, **acrylic displays**, and **liquid in bottles**. The model has to choose between making the glass fully opaque (which kills the see-through quality) or fully transparent (which removes the product entirely).
**Glass / plastic mode** solves this by preserving partial alpha through clear materials.
## When to use Glass mode
Turn it on for:
- **Jewellery** (clear gemstones, glass beads, faceted crystals
- **Drinkware**) wine glasses, tumblers, coffee mugs, water bottles
- **Cosmetics** (perfume bottles, clear lotion bottles, lipgloss tubes
- **Packaging**) clear blister packs, plastic clamshells, acrylic display cases
- **Eyewear** (glasses lenses, transparent frames
- **Tech accessories**) clear phone cases, screen protectors
Leave it **off** for opaque subjects (clothing, food, electronics with solid casings). The default mode produces cleaner edges in those cases.
## How to enable it
**On the homepage upload zone:** check the "Glass / plastic mode" box before uploading.
**In the editor:** open the "AI Background Removal" panel in the right sidebar and toggle the Glass mode option, then click "Best Quality" or "Clean Edges".
## What it actually does
Glass mode adds a post-processing pass after the AI model runs:
1. **Lab ΔE background detection**: samples the background colour from fully-transparent pixels at the image border.
2. **Specular preservation**: keeps bright reflections and highlights on the glass surface at full alpha so the product still looks like glass.
3. **Partial alpha smoothing**: pixels inside the glass body (where background colour shows through) get reduced alpha proportional to how close they are to the sampled background. Subject colour is preserved.
4. **Edge protection**: the rim and edges of the glass stay sharp; only the body softens.
## Tips for best results
- **Shoot against a plain background** if possible: single-colour backdrops (white, light grey, soft blue) give the cleanest results because the Lab ΔE detection is more accurate.
- **Avoid busy backgrounds** behind glass, if the background has high frequency content (text, patterns), Glass mode can't separate it from the glass body.
- **Combine with Best Quality** for the most accurate cutout: Fast mode works but Best Quality has sharper internal mask edges that Glass mode then refines.
- **Refine after**: the in-editor "Clean Edges" button now includes the same fringe decontamination, so a single click can tidy up any remaining background spill.
## Limitations
- **Coloured glass** (cobalt blue, amber): works, but tinted highlights may get partially removed if they match the background colour closely.
- **Liquid in clear bottles**: the liquid itself is preserved correctly, but the empty top of the bottle (above the liquid line) is treated as glass and gets partial alpha.
- **Frosted glass**: depending on opacity, may not need Glass mode at all. Try default first; switch to Glass mode if too much detail is lost.
---
### Removing the background from a video
URL: https://bgremover.novusstreamsolutions.com/help/video-background-removal
Category: Core Tools
The [Video Background Remover](/video-background-remover) does for clips what the main tool does for photos: the subject stays, the background goes, and everything runs on your device. Nothing about your video is uploaded. Frames are decoded, processed, and re-encoded in the browser.
## Choosing a model
The single most important choice is the model tier, because they work differently:
- **People** runs Robust Video Matting: a *recurrent* network. Each frame's result feeds into the next, so the model remembers where you were a frame ago. That memory is what makes edges hold still instead of flickering, and it is also the fastest tier (~15 MB, one-time download). Use it whenever your subject is a person: talking heads, presenters, dance clips.
- **Any subject, Fast** and **Any subject, Best** segment each frame independently (the same ORMBG and BiRefNet models as the image tool) with smoothing blended between frames. Use these for products, pets, and objects, anything that is not a person. Best gives the sharpest hair and edge detail; Fast is roughly three times quicker.
If you pick People for a coffee mug, expect poor results. The model was trained on humans. That is a model property, not a bug.
## The 60-second / 1280px limits
Every single frame runs AI inference and is then re-encoded by ffmpeg in your browser. Sixty seconds, processed at up to 1280px on the long side, is the bound that finishes reliably without exhausting browser memory. Longer footage: trim it first, the [Video Editor](/video-editor) trims without re-encoding your master, and process the section you need.
## Transparent WebM vs composited MP4
- **WebM** output is encoded as VP9 with a real alpha plane (`yuva420p`). That is genuine transparency, not a checkerboard baked into pixels. Chrome, Edge, CapCut, Premiere, DaVinci Resolve, and OBS all read it directly.
- **MP4** cannot carry alpha, so MP4 output composites your chosen background, solid colour or a blurred version of the original, into every frame. It plays everywhere.
One honest caveat: **transparent WebM support varies outside Chromium**, so some players show an opaque background. The file is not broken. Use the composited MP4 for broad playback compatibility.
Original audio is kept in both outputs.
## Putting the subject on a new scene
For a quick result, pick a solid or blurred background before processing. For full control, export the transparent WebM and open it in the [Video Editor](/video-editor): every lifestyle scene and custom background shows through wherever the clip is transparent. If you open an *unprocessed* clip in the editor and pick a scene, the editor will tell you the clip is opaque and offer to remove the background in place.
## Troubleshooting
- **Edges shimmer on an Any-subject clip**: try the Best tier, or if your subject is actually a person, switch to People.
- **Processing feels slow**: WebGPU (Chrome/Edge) is substantially faster than the WebAssembly fallback; close other heavy tabs, and remember the first run includes the one-time model download.
- **The result opens with a black background in some player**: that player does not support WebM alpha. The transparency is still in the file; verify in Chrome, Edge, or a compatible editor.
---
### Making an animated GIF transparent
URL: https://bgremover.novusstreamsolutions.com/help/gif-background-removal
Category: Core Tools
The [GIF Background Remover](/gif-background-remover) decodes your animation, removes the background from **every frame**, and re-encodes it with the original frame timing. Like everything here, it runs entirely in your browser.
## Two processing paths
- **Solid-colour backgrounds** (classic meme GIFs, screen recordings on a plain fill) are detected and keyed out instantly: no model download, near-instant results.
- **Everything else** runs the same AI models as the image background remover, Fast or Best Quality, plus the same edge-refinement chain, with smoothing blended between frames so the subject's outline does not jitter.
A **Stability** control trades a little edge softness for extra steadiness; raise it for noisy or heavily dithered source GIFs.
## Why GIF edges can never be soft
This is a file-format fact worth knowing: **GIF transparency is 1-bit**. Every pixel is either fully visible or fully invisible. The format has no in-between, so soft edges, wisps of hair, and smooth anti-aliasing physically cannot be stored in a GIF.
Tools that ignore this produce ugly white halos. We handle it honestly instead:
- The ambiguous edge band is **dithered** (a fine checker pattern that reads as a soft edge at normal viewing size), with an adjustable cutoff.
- Semi-transparent edge pixels are **pre-composited against a matte colour**: ideally the colour of wherever the sticker will sit. Auto mode picks it from your GIF's border; you can override it or turn matting off.
## When to use APNG instead
If you need genuinely soft edges, export **APNG**. It stores full 8-bit alpha (the same quality as a transparent PNG, but animated), and plays in every modern browser and most places a GIF works. A few older platforms show only its first frame, which is why GIF remains the maximum-compatibility default.
| | GIF | APNG |
| --- | --- | --- |
| Edge quality | 1-bit (dithered) | Full soft alpha |
| Compatibility | Universal | All modern browsers |
| File size | Usually smaller | Usually larger |
## Tips for better results
- **Pick the matte colour for the destination.** A sticker destined for Discord's dark theme should be matted against a dark colour; halos come from matting against the wrong side.
- **Busy backgrounds want Best Quality.** The Fast model is fine for clear subject/background separation; switch up when edges get complicated.
- **Trim your source first.** Fewer frames = faster processing and a smaller output file. The GIF is processed at its native size.
---
### Why does my export show black in Photoshop?
URL: https://bgremover.novusstreamsolutions.com/help/why-my-export-shows-black-in-photoshop
Category: Troubleshooting
## The problem
You export a PNG with a transparent background. You open it in Photoshop. Instead of seeing a checkerboard, you see a black background. The subject has a dark halo around it. Nothing you do seems to remove it.
This is one of the most common frustrations with free background removal tools, and it has a specific technical cause.
## What causes it: premultiplied alpha
Every pixel in an image has four values: Red, Green, Blue, and Alpha. There are two ways to store these:
**Straight alpha (correct):**
The R, G, B values represent the actual colour of the pixel. The A value represents how transparent it is. They're independent. A pixel that is 50% transparent still has its full, original colour in R/G/B.
**Premultiplied alpha (problematic):**
The R, G, B values have already been *multiplied* by the alpha value during encoding. A pixel that is 50% transparent has R, G, B values that are half what they should be. A pixel that is fully transparent (alpha = 0) has R = G = B = 0, regardless of what colour it actually was.
When Photoshop opens a premultiplied PNG, it reads those zeroed-out RGB values and shows them as black. The transparency data is correct, but the colour data under transparent pixels is wrong.
## Why other free tools produce premultiplied alpha
Most canvas-based export pipelines (browser Canvas, some image processing libraries) produce premultiplied alpha by default because it's the format GPUs historically preferred internally. The tools simply don't take the extra step to convert back to straight alpha before writing the file.
## How NSS fixes this
NSS never premultiplies. Throughout the entire pipeline:
- The mask is stored as a `Float32Array` of values between 0.0 and 1.0
- The original RGB values are preserved separately and never modified by the alpha
- At export time, the final pixel is written as: `R = original_R`, `G = original_G`, `B = original_B`, `A = round(mask * 255)`: never `R = original_R * (mask)`.
- Even at alpha = 0, the original RGB values are written (not zeroed)
- After encoding, the file is decoded and verified: 100 pixels are sampled, and the alpha values are confirmed to be non-binary and non-zeroed where the mask was partially transparent
If the integrity check detects any premultiplied alpha, you'll see a warning before the download.
## The test
To confirm your exported PNG has straight alpha:
1. Export a PNG from NSS
2. Open it in Photoshop (File → Open)
3. You should see a **checkerboard** behind your subject: no black, no dark fringe
If you see a checkerboard, straight alpha is working correctly.
## AVIF and WebP
The same principle applies to AVIF and WebP exports. NSS explicitly disables premultiplication when encoding AVIF (via the `@jsquash/avif` library setting). WebP via Canvas toBlob uses straight alpha natively.
## Related
- [Exporting with transparency](/help/exporting-with-transparency)
- [Why does my image have a halo or colour fringe?](/help/why-my-image-has-a-halo)
- [Working with Photoshop](/help/working-with-photoshop)
- [Glossary: premultiplied alpha](/help/glossary)
---
### Why does my image have a halo or colour fringe?
URL: https://bgremover.novusstreamsolutions.com/help/why-my-image-has-a-halo
Category: Troubleshooting
## What is colour fringing?
Colour fringing (also called colour spill or a halo) appears as a thin ring of colour around your subject that doesn't belong there. Common examples:
- A person photographed against a white wall has a faint white or grey outline
- A pet photographed on green grass has a greenish tinge around their fur
- A product against a blue background has a blue halo around its edges
## Why it happens
When you photograph a subject against a coloured background, light from the background reflects onto the edges of the subject and bleeds into those pixels, especially in soft-focus or high-contrast areas like hair. This is called **colour spill** and it happens during the original photo, before any background removal.
When the AI removes the background, it correctly identifies those edge pixels as belonging to the subject, so it keeps them. But they still carry the background colour mixed into them.
Additionally, in semi-transparent pixels (hair strands, soft edges), the AI's mask value is somewhere between 0 and 1. At lower alpha values, the edge colour becomes more noticeable because less of the true subject colour is visible.
## How to fix it: Decontaminate
The **Decontaminate** setting in Edge Refinement is designed specifically for this problem. It:
1. Identifies semi-transparent edge pixels (where mask value is between 0.05 and 0.95)
2. Samples nearby fully-opaque pixels to determine the "true" foreground colour
3. Works in Lab colour space (perceptually uniform) to shift edge pixel colours toward the true foreground colour
4. The shift is proportional to transparency. More transparent pixels get more correction
**How to use it:**
1. Open your processed image in the editor
2. Open the Edge Refinement panel
3. Toggle **Decontaminate** on (it defaults to 50% strength)
4. Increase strength if you still see fringing; decrease if colours look unnatural
## Other fixes
### Contract the mask
If the fringe is a hard ring of background colour (not semi-transparent), it may be background pixels that the AI kept. Use **Contract** in Edge Refinement with a value of 1–3 px to erode those pixels away.
### Erase brush
For stubborn patches of background colour that weren't removed by the AI, use the [brush tool](/help/using-the-brush) in Erase mode to manually remove them. Use a soft brush (low hardness) for gradual removal near edges.
### Change the preview background
Sometimes what looks like a halo against one background disappears against another. Toggle the preview background in the Background tool to check whether the edge is genuinely problematic or just a contrast effect.
## White halos specifically
A white halo is common when the original photo had a white or very light background. Because white was the background, its colour has bled into the edge pixels. Decontaminate helps, but for very strong white spill, you may also want to:
1. Use Contract (–1 to –3 px) to clip the bright edge pixels
2. Use a soft erase brush along the edges to gradually reduce opacity
## Related
- [Edge refinement](/help/edge-refinement)
- [Why are the edges jagged?](/help/why-are-edges-jagged)
- [Using the brush tool](/help/using-the-brush)
---
### Why are the edges jagged or pixelated?
URL: https://bgremover.novusstreamsolutions.com/help/why-are-edges-jagged
Category: Troubleshooting
## Why edges look jagged
Jagged edges happen when the AI mask transition is too abrupt, pixels snap between fully opaque and fully transparent instead of graduating smoothly. Several things can cause this:
1. **Low-resolution input**: the AI has less information to work with, so boundaries are less precise
2. **Hard-edged subject**: objects with very clear geometric boundaries (a box, a logo) will have naturally harder edges; the AI correctly keeps them sharp
3. **Model sensitivity**: the Fast (ORMBG) model is more likely to produce slightly harder edges on complex subjects than the Best Quality (BiRefNet) model
4. **Over-smoothed original**: heavily compressed JPEGs lose the fine detail the AI needs to make smooth decisions
## Fix 1: Feather
Feather applies a Gaussian blur to the mask edge, creating a smooth gradient from opaque to transparent. This is the fastest fix for systematic jaggedness.
1. Open the editor
2. Go to Edge Refinement
3. Set **Feather** to 2–5 px for subtle softening, 8–15 px for a pronounced effect
4. Adjust until the edge looks natural
**Caution:** Too much feathering makes subjects look out-of-focus or glowing. Start low and increase gradually.
## Fix 2: Smooth
The **Smooth** slider applies a morphological smooth to the mask contour. Unlike feathering (which blurs the edge), smoothing simplifies the shape of the boundary. It rounds sharp corners and removes jagged bumps while keeping the edge crisp.
Use Smooth before Feather. They work well together:
1. Smooth: 3–6 to clean up the jagged contour
2. Feather: 1–3 to add a slight softness
## Fix 3: Best Quality model
If you're consistently getting jagged results with the Fast model, switch to **Best Quality** (BiRefNet) before processing. This model produces significantly better edges on complex subjects, especially hair, fur, and foliage.
To switch: click the model selector above the upload zone, select Best Quality, then re-process the image.
## Fix 4: Brush tool for isolated problem spots
If only one part of the edge is jagged (a specific corner, a patch of fur), use the [brush tool](/help/using-the-brush) to manually refine it. Use low hardness (20–40%) to paint soft transitions.
## Fix 5: Process a higher-resolution image
If your original is small (under 500 px wide), the AI has limited pixels to work with. If you can get a higher-resolution version of the image, the result will be noticeably better.
## When to leave edges sharp
Some subjects *should* have sharp edges: logos, icons, printed packaging, objects with clean geometric shapes. For these:
- Turn off **Preserve soft edges** in Edge Refinement: this thresholds the mask to binary (fully on or fully off)
- Use a high Smooth value to clean up any jaggedness
- Avoid feathering
## Related
- [Edge refinement](/help/edge-refinement)
- [Using the brush tool](/help/using-the-brush)
- [General troubleshooting](/help/troubleshooting)
---
### General troubleshooting
URL: https://bgremover.novusstreamsolutions.com/help/troubleshooting
Category: Troubleshooting
## The AI is taking a very long time
**First run:** The model weights download once on first use: ~45 MB for Fast, ~99 MB for Best Quality on WebGPU, or up to ~192 MB for its CPU compatibility path. On a slow connection this can take several minutes. The progress bar shows download status.
**Subsequent runs:** If inference is slow after the first run, your device may not support WebGPU. Check the badge in the top bar. If it says WASM, inference runs on CPU, which is slower (typically 15–60 seconds vs 2–5 seconds on WebGPU). See [Browser support](/help/browser-support) for which browsers enable WebGPU.
**Large images:** Images over 2000 px wide take longer to process. This is normal.
## The page says "model failed to load"
1. Check your internet connection. The model weights download from Hugging Face CDN on first use
2. Try refreshing the page
3. Check your browser console (F12 → Console) for a specific error
4. If you're on a corporate or school network, your proxy or firewall may be blocking `huggingface.co`. Try a different network.
5. If you use a content blocker extension, temporarily disable it and try again
## My exported PNG shows a black background in Photoshop
This is the premultiplied alpha problem. See [Why does my export show black in Photoshop?](/help/why-my-export-shows-black-in-photoshop) for a full explanation.
Short answer: another tool in your workflow may have incorrectly re-saved the file. If you downloaded directly from NSS and opened it straight in Photoshop without any intermediate tools, open a bug report via [contact](/contact) with the file attached.
## The upload zone won't accept my file
- **HEIC not converting:** HEIC conversion requires a WASM module that loads on first use. Wait a moment for it to initialise and try again.
- **File type not supported:** Animated GIF and animated WebP are accepted (first frame only). Video files are not supported.
- **File too large:** There's no enforced size limit, but very large files (300+ MB RAW) may exceed available browser memory. Try downscaling first.
- **Magic byte mismatch:** If a file is renamed (e.g., a PNG renamed to `.jpg`), the tool detects the real type and processes it correctly, but may show a type warning.
## The brush tool isn't visible / editor won't open
- The editor only opens for images that have finished processing. Check the queue status. Look for a green checkmark.
- Some browser security policies block OffscreenCanvas. Try Chrome if you're on Firefox.
- If the editor is blank, try refreshing the page and re-opening the image.
## My session disappeared after a refresh
Session data is stored in IndexedDB. If it's gone after a refresh:
- Some browsers clear IndexedDB in private/incognito mode on close
- Storage quota may have been exceeded (check browser settings → site data for the site)
- Some aggressive privacy extensions clear IndexedDB automatically
To avoid losing work, export your results before closing the tab.
## The app isn't working offline
The service worker caches the app after your first visit. If offline mode isn't working:
1. Make sure you've visited the app at least once with a working internet connection
2. Open DevTools → Application → Service Workers and check the worker is registered and active
3. Try clearing the cache and reloading (this will re-download everything on next load)
See [Working offline](/help/working-offline) for more detail.
## The CPU fallback is slower than expected
When a healthy WebGPU adapter is unavailable, NSS uses single-threaded WebAssembly by design. Close other memory-heavy tabs, keep the page in the foreground, and try a smaller input. SharedArrayBuffer availability does not make this path multi-threaded.
## Something else is wrong
For bugs, unexpected behaviour, or questions not covered here:
- Check the browser console (F12 → Console) for error messages
- [Contact us](/contact) with a description of the issue, your browser version, and OS
## Related
- [Browser support](/help/browser-support)
- [System requirements](/help/system-requirements)
- [Why does my export show black in Photoshop?](/help/why-my-export-shows-black-in-photoshop)
---
### Keyboard shortcuts
URL: https://bgremover.novusstreamsolutions.com/help/keyboard-shortcuts
Category: Features
## Tools
| Shortcut | Action |
|----------|--------|
| `E` | Brush: Erase mode |
| `R` | Brush: Restore mode |
| `W` | Magic wand |
| `S` | AI subject select (click-to-isolate) |
| `F` | Edge refinement |
| `B` | Background panel |
| `P` | Cycle mask preview (Final / Red overlay / Black-white / Original) |
| `H` | Pan (hand) tool |
| `\`` | Cycle preview modes |
## Layers
| Shortcut | Action |
|----------|--------|
| `Ctrl+J` | Duplicate active layer |
| `Ctrl+Shift+]` | Bring active layer to front |
| `Ctrl+Shift+[` | Send active layer to back |
| `Delete` / `Backspace` | Delete active layer (when focus is outside an input) |
## Brush size and opacity
| Shortcut | Action |
|----------|--------|
| `[` | Decrease brush size |
| `]` | Increase brush size |
| Hold `Shift` + `[` | Decrease brush hardness |
| Hold `Shift` + `]` | Increase brush hardness |
## Canvas navigation
| Shortcut | Action |
|----------|--------|
| Scroll wheel | Zoom in / out |
| Space + drag | Pan canvas |
| `0` | Reset zoom to fit |
| `1` | Zoom to 100% |
| `+` / `=` | Zoom in |
| `-` | Zoom out |
## Edit history
| Shortcut | Action |
|----------|--------|
| Ctrl+Z / Cmd+Z | Undo |
| Ctrl+Shift+Z / Cmd+Shift+Z | Redo |
## Global
| Shortcut | Action |
|----------|--------|
| `?` | Show / hide keyboard shortcut overlay |
| Ctrl+V / Cmd+V | Paste image from clipboard (on main page) |
| Escape | Dismiss dialogs / overlays |
## Export
| Shortcut | Action |
|----------|--------|
| Ctrl+S / Cmd+S | Export current image |
| Ctrl+Shift+S / Cmd+Shift+S | Export all (batch) |
## Tips
- All shortcuts work when the canvas or editor panel has focus. If a shortcut isn't responding, click the canvas once to give it focus.
- On Mac, `Ctrl` in this table means `Cmd`. Where `Cmd` is already specified, use `Cmd`.
- Keyboard shortcuts are disabled inside text input fields (filename, hex colour fields, etc.).
## Accessibility
All editor functions are reachable by keyboard. The `Tab` key cycles through sidebar controls, and the canvas brush can be operated without a mouse using dedicated keyboard controls.
Press `?` to show the full shortcut overlay at any time in the editor.
## Related
- [Using the brush tool](/help/using-the-brush)
- [Edge refinement](/help/edge-refinement)
- [Accessibility](/help/browser-support)
---
### Working offline
URL: https://bgremover.novusstreamsolutions.com/help/working-offline
Category: Features
## What works offline
After your first visit to NSS Background Remover:
- The entire app shell (HTML, CSS, JavaScript) is cached locally by the service worker
- The AI model weights are cached after their first download
- All processing is done locally in your browser anyway: no server is involved
This means you can fully remove backgrounds without an internet connection.
## How it works
NSS registers a service worker that manages three caches:
1. **App shell cache**: the HTML, CSS, and JavaScript files that make up the app
2. **Asset cache**: icons, fonts, and other static assets
3. **Model cache**: the AI model weights (ONNX files from Hugging Face)
On each page load, the service worker checks if the cached version is fresh. If you're offline, it serves the cached version. If you're online, it may fetch updates in the background.
## First-time setup
To enable offline mode:
1. Visit the app once with an internet connection
2. Wait for the page to fully load (the service worker installs)
3. If you want offline model support: process at least one image (this triggers the model download)
4. You're now ready for offline use
## Checking offline status
To verify offline mode is working:
1. Open DevTools → Application → Service Workers
2. Check the worker is "activated and is running"
3. In the Network panel, switch to "Offline"
4. Reload the page. The app should load from cache
## What doesn't work offline
- First-time model downloads (model weights must have been cached during an online session)
- Any first-time HEIC conversion (the HEIC WASM module must have been cached)
- The help documentation (if you haven't visited those pages before)
- Any links to external sites (contact, parent company, etc.)
## Updating the app offline
When a new version of NSS is deployed, the service worker fetches the update the next time you're online. The update activates on the next page reload. You won't miss updates: they install automatically.
## Installing as an app
For the best offline experience, [install NSS as an app](/help/installing-as-app) on your desktop or home screen. Installed apps launch immediately without a browser tab and work fully offline with a single click.
## Troubleshooting offline
If the app doesn't load offline:
1. Check that the service worker is registered (DevTools → Application → Service Workers)
2. Try visiting the app once more while online and wait for the "ready to work offline" status
3. Some browser configurations or privacy extensions block service workers. Try in a clean browser profile.
## Related
- [Installing as an app](/help/installing-as-app)
- [Browser support](/help/browser-support)
- [General troubleshooting](/help/troubleshooting)
---
### Installing as an app
URL: https://bgremover.novusstreamsolutions.com/help/installing-as-app
Category: Features
## Why install as an app?
Installing NSS Background Remover as a Progressive Web App (PWA) gives you:
- A dedicated window (no browser tabs)
- Faster launch: no browser address bar or UI overhead
- Full offline access (after first model download)
- Taskbar / Dock shortcut for quick access
## Installing on Windows or Mac (Chrome, Edge)
1. Open NSS Background Remover in Chrome or Edge
2. Look for the **install icon** (a computer with a down arrow) in the browser's address bar
3. Click it and then click **Install**
4. The app appears in your Start Menu / Applications folder and on your Taskbar / Dock
Alternatively, look for the install prompt banner that appears after a few visits.
**From the Chrome menu:** Chrome → three-dot menu (⋮) → Cast, Save, and Share → Install Page as App
**From the Edge menu:** Edge → three-dot menu (···) → Apps → Install this site as an app
## Installing on Android (Chrome)
1. Open NSS Background Remover in Chrome on Android
2. Tap the three-dot menu (⋮)
3. Tap **Add to Home screen**
4. Choose a name and tap **Add**
The app appears on your home screen and in your app drawer. It opens in a standalone window.
## Installing on iPhone / iPad (Safari)
iOS doesn't support the standard install prompt, but you can still add to your home screen:
1. Open NSS Background Remover in **Safari** (must be Safari, not Chrome on iOS)
2. Tap the **Share button** (the square with an arrow pointing up)
3. Scroll down and tap **Add to Home Screen**
4. Choose a name and tap **Add**
The app appears on your home screen. On iOS 16.4+, it can receive push notifications and run service workers for offline support.
**Note:** iOS Safari has tighter memory limits than desktop browsers, so large AI models and long video jobs may need smaller inputs.
## Uninstalling
**Windows:** Start Menu → right-click the app → Uninstall
**Mac:** Applications folder → drag to Trash, or right-click → Move to Trash
**Android:** Long-press the home screen icon → Remove / Uninstall
**iOS:** Long-press the home screen icon → Remove Bookmark
Uninstalling the app doesn't affect your cached data: your model weights remain cached in the browser.
## Related
- [Working offline](/help/working-offline)
- [Browser support](/help/browser-support)
---
### Image filters
URL: https://bgremover.novusstreamsolutions.com/help/image-filter
Category: Features
## Available presets
| Preset | Effect |
|---|---|
| None | Original image: no filter |
| Cinematic | Lifted shadows, slightly desaturated highlights, warm midtones |
| Warm | Adds red/orange to midtones; golden-hour look |
| Cool | Shifts highlights toward blue; moody, cold look |
| Vivid | Boosts saturation and contrast |
| Vintage | Faded shadows, warm tint, slight vignette |
| B&W | Desaturates to luminance |
| Sepia | Warm brown monochrome |
| Faded Film | Crushed blacks (lifted shadows), slightly desaturated |
| High Contrast | S-curve: darker shadows, brighter highlights |
| Cross Process | Over-saturated cyans and greens, crushed blue shadows |
## Intensity slider
The intensity slider interpolates between the original image (0%) and the fully filtered version (100%). Use lower intensities for subtle grades, higher for dramatic effects.
## Exporting
Choose **PNG**, **WebP**, or **JPEG** format before downloading. The filter is baked into the exported file.
## Open in Editor
After applying a filter, click **Open in Editor** to continue editing (brush erase, edge refinement, background replacement), without losing the filter effect.
## Related
- [Video filters](/help/video-filter)
- [Replacing the background](/help/replacing-the-background)
- [Exporting with transparency](/help/exporting-with-transparency)
---
### Video filters
URL: https://bgremover.novusstreamsolutions.com/help/video-filter
Category: Features
## How it works
The video filter tool applies a colour preset to every frame of your video and re-encodes the result as a WebM file. Processing happens entirely in your browser. No upload required.
## Available presets
The same presets available in the image filter are available for video: Cinematic, Warm, Cool, Vivid, Vintage, B&W, Sepia, Faded Film, High Contrast, and Cross Process.
## Intensity slider
Controls how strongly the preset is applied. At 0% you get the original video; at 100% you get the full preset effect. Values around 60–80% often look more natural for video.
## Processing time
Processing time depends on video length and resolution:
| Duration | Resolution | Approx. time |
|---|---|---|
| 15 seconds | 720p | 30–60 seconds |
| 30 seconds | 1080p | 2–4 minutes |
| 60 seconds | 1080p | 4–8 minutes |
## After filtering: Open in Video Editor
When filtering is complete, click **Open in Video Editor** to continue editing. Add text overlays, trim, colour grade on top of the filter effect, or replace the background.
## Related
- [Image filters](/help/image-filter)
- [Video Editor guide](/help/video-editor-guide)
---
### Colorizing black-and-white photos
URL: https://bgremover.novusstreamsolutions.com/help/colorize-photos
Category: Features
The [Photo Colorizer](/tools/colorize) adds colour to black-and-white images two ways, and the difference matters more than with most tools.
## Realistic (AI) vs the instant styles
- **Realistic** runs DDColor, a neural network that looks at the *content* of your photo and predicts plausible colour region by region: skin tones read like skin, foliage reads green, sky reads blue. It is the mode you want for family photos and historical scans.
- **Vintage, Sepia, Saturated, and Pastel** are classical LAB-colour-space treatments. They apply instantly, need no download, and give the image a deliberate *look* rather than a prediction of reality. Think of them as toning, not restoration.
The same Realistic engine is available inside the [Image Editor](/editor). The **AI Colorize** button sits next to Grayscale, suggests itself when a black-and-white photo is detected, and is fully undoable with Ctrl+Z.
## About the 460 MB download
DDColor is a large model, so it is **consent-gated**: the first time you pick Realistic, the tool asks before fetching (~460 MB, once). Accept and it caches on your device. Later runs are instant and work offline. Decline and you keep the four instant styles with zero download. Nothing ever fetches silently.
## What colorization honestly is
A black-and-white photo does not contain its original colours. That information was never captured. **No tool on earth recovers it.** What DDColor does is predict *statistically plausible* colour from visual context. A dress the model paints blue may well have been red; there is no way for it to know.
That is why the tool shows a **before/after slider** rather than just the result: judge the output as a plausible interpretation, label it as colorized when it matters (archives, journalism, family history), and keep the original.
## Getting better results
- **Contrast first.** The model reads luminance. Faded, low-contrast scans give it little to work with, a quick levels fix in the [editor](/editor) before colorizing pays off.
- **Resolution second.** Colorize at the source resolution, then run the [AI Upscaler](/upscale) afterwards if you need a bigger file. Upscaling first just makes the colorizer slower for no quality gain.
- **Very dark scans** tend to come out muted: the model correctly refuses to invent colour where it cannot see structure.
---
### Manual image adjustments
URL: https://bgremover.novusstreamsolutions.com/help/manual-image-adjustments
Category: Features
# Manual Image Adjustments
The image editor provides four real-time tone adjustment sliders that work alongside any filter preset: **Brightness**, **Contrast**, **Saturation**, and **Colour Temperature**. Changes are non-destructive and composable. You can apply a Cinematic filter and then fine-tune brightness separately without resetting the filter.
## Where to find the sliders
Open the editor with any processed image (`/editor`). The adjustment sliders appear in the **Properties** panel on the right side. They update the canvas in real time as you drag.
## Brightness
Controls overall luminosity. The neutral value is **100** (no change).
| Value | Effect |
|-------|--------|
| 50 | Very dark: close to black |
| 80 | Underexposed, moody |
| 100 | Neutral (default) |
| 130 | Bright, airy look |
| 180 | Heavily overexposed |
**When to use:** Compensate for underexposed photos shot in low light, or knock down blown highlights. For subtle adjustments, stay in the 85–120 range.
## Contrast
Controls the difference between light and dark tones. Neutral is **100**.
| Value | Effect |
|-------|--------|
| 60 | Flat, low-contrast look |
| 100 | Neutral |
| 130 | Punchy, high-contrast |
| 160 | Heavy contrast: risk of clipping |
**When to use:** Raise contrast on flat, washed-out shots. Lower it for a soft, cinematic matte look (pair with the Matte or Faded filter).
## Saturation
Controls colour intensity. Neutral is **100**. 0 = full greyscale.
| Value | Effect |
|-------|--------|
| 0 | Black and white |
| 60 | Desaturated, film-fade look |
| 100 | Neutral |
| 150 | Vivid, punchy colour |
| 200 | Maximum saturation |
**When to use:** Lift saturation on dull product shots, or lower it when you want a more refined, editorial aesthetic. For black and white, drag to 0, or use the B&W filter for a one-click option.
## Colour Temperature
Shifts the white balance. Negative values are warm (orange-amber), positive values are cool (blue-teal). Neutral is **0**.
| Value | Effect |
|-------|--------|
| −100 | Very warm (campfire light |
| −40 | Warm, golden hour |
| 0 | Neutral daylight |
| +40 | Cool, overcast |
| +100 | Very cool) blue dusk |
**When to use:** Fix white balance on photos taken under warm indoor light (drag negative) or correct photos shot in shade (drag positive). Also useful creatively: warm portraits, cool landscapes.
## Composing adjustments with filters
Filters and adjustments are independent layers. Applying a **Warm** filter and then dragging temperature to +20 is fully supported, they compound. The render order is: original → filter → adjustments.
## Resetting adjustments
Click **Reset** below the adjustment sliders to return all four sliders to their neutral values without affecting the filter preset.
## Tips
- **Stack carefully:** Very high brightness + very high saturation can produce over-saturated, unnatural results. Adjust one dimension at a time.
- **Pair with filters:** The Warm and Cool filters shift colour balance globally; the Temperature slider gives you precise control. Use the filter for the general look, then fine-tune with the slider.
- **Contrast + Saturation together:** Boosting contrast often makes colours look more saturated. If you raise contrast, you may want to lower saturation slightly to compensate.
---
### Video upscaler
URL: https://bgremover.novusstreamsolutions.com/help/video-upscaler
Category: Features
# Video Upscaler
The video upscaler increases video resolution 2× or 4× using a single-pass ffmpeg Lanczos scaler, a high-quality algorithm that produces sharp results without the softness of bicubic interpolation. All processing runs locally in your browser.
## Accessing the tool
Navigate to [/video-upscale](/video-upscale) or click **Video Upscaler** in the header tools menu.
## Choosing a scale
**2× Upscale**: Doubles resolution in each dimension. A 960×540 video becomes 1920×1080. This is the recommended option for most clips.
**4× Upscale**: Quadruples resolution. A 480×270 video becomes 1920×1080. Ideal for old, low-resolution footage. Note: the input must be ≤ 1024px on the longest side (a 1920px input would produce 7680px output, exceeding the maximum supported output size).
## Supported formats
Upload MP4, WebM, MOV, AVI, MKV, MPEG, M4V, or OGV files. Maximum file size: 200 MB.
## Processing time
Processing time depends on clip duration, source resolution, and your device's CPU. Rough estimates:
| Clip length | 720p source | Notes |
|------------|-------------|-------|
| 10s | 30–60s | Fast GPU |
| 30s | 2–5 min | Mid-range laptop |
| 60s | 5–10 min | Near the duration limit |
The maximum clip duration is set in the site configuration (typically 120 seconds). Longer clips should be trimmed before upscaling.
## Output format
Upscaled video is exported as WebM (VP9): a widely supported, efficient format. Download from the queue card when processing is complete.
## Queue
You can add multiple clips to the queue and they will process sequentially. While a clip is processing you can continue adding more files. The current clip must finish before the next begins.
Use the **×** button on a queue card to remove a clip. Completed clips show a green Download button.
## Dimension limits
| Input resolution | 2× output | 4× output |
|-----------------|-----------|-----------|
| 480×270 | 960×540 | 1920×1080 |
| 960×540 | 1920×1080 | 3840×2160 |
| 1280×720 | 2560×1440 | 5120×2880 |
| 1920×1080 | ✓ accepted | ✗ too large (4× cap is 1024px) |
If the output would exceed the maximum supported dimensions (typically 8192px), the upscaler will display an error before starting. Downscale the source clip first or switch to 2×.
## How it works
The upscaler runs a single-pass ffmpeg Lanczos scaler implementing the **Lanczos kernel**: a high-quality reconstruction filter that preserves edge sharpness and avoids the ring artefacts of simpler methods. The clip is decoded, rescaled in one pass, and re-encoded into the output stream.
## Troubleshooting
**"Video encoding produced no data"**: This usually means the clip was too short (< 1 second) or the selected codec isn't supported by your browser. Try a different browser or a longer clip.
**"Source image could not be decoded"**: The output resolution exceeded the maximum supported dimensions. Switch to 2× scale or downscale the source first.
**Processing is very slow**: Lanczos scaling is CPU-bound. On slower machines, a 30-second 1080p clip can take several minutes. Close other heavy apps if possible.
**Output looks soft**: This is expected for highly compressed source video. The upscaler can only recover detail that exists in the source; heavily compressed clips may still look soft at 4×.
---
### Video stabilizer
URL: https://bgremover.novusstreamsolutions.com/help/video-stabilizer
Category: Features
## How it works
The video stabilizer analyzes your clip frame by frame, estimates the camera motion between consecutive frames, builds a smoothed trajectory, and re-renders the video with per-frame compensating transforms, all inside your browser.
**The four-phase pipeline:**
1. **Frame collection**: Your video plays through once while every frame is captured to an offscreen canvas.
2. **Motion estimation**: Adjacent frames are compared using a tile-based block-matching algorithm to calculate the translation offset (how much the camera moved) between each pair of frames.
3. **Trajectory smoothing**: The cumulative camera path is smoothed using a sliding-window average (3–25 frames depending on the Strength slider). Scene cuts are detected by a threshold on motion magnitude. The accumulator resets at cuts so stabilization doesn't blur across cuts.
4. **Compensated re-render**: Each frame is drawn to the output canvas with the inverse of its smoothed offset applied, eliminating shake while preserving intentional motion.
All processing happens in your browser. Your video is never uploaded to any server.
## Strength slider
| Strength | Smoothing window | Effect |
|---|---|---|
| 0 | 3 frames | Minimal, only removes the fastest micro-jitter |
| 50 | ~14 frames | Balanced, reduces handheld shake without over-smoothing |
| 80 | ~20 frames | Strong, recommended default for walking/handheld footage |
| 100 | 25 frames | Maximum, can make footage feel slightly floaty on smooth pans |
Avoid maximum strength for video with intentional, smooth camera pans. The stabilizer will over-correct them.
## Crop warning
Stabilization works by shifting frames to compensate for shake. This introduces black borders at the edges. The tool automatically applies a mild crop to fill the frame. Stronger stabilization settings produce slightly more crop.
## Output format
Stabilized video is exported as **WebM (VP9)**: the most capable lossless-compatible format available in browsers. To convert to MP4 afterwards, use the [Video Format Converter](/tools/video-format-converter).
## Supported formats and limits
| Input | Notes |
|---|---|
| MP4 (H.264 / H.265) | Best supported |
| WebM (VP8 / VP9) | Fully supported |
| MOV | Chrome and Edge only |
Practical limits: clips up to ~3 minutes at 1080p. Very long or high-resolution clips may run slowly. 720p is recommended for best performance.
## Related
- [Video editor guide](/help/video-editor-guide)
- [Video format converter](/help/video-format-converter)
- [Supported formats](/help/supported-formats)
---
### Video metadata remover
URL: https://bgremover.novusstreamsolutions.com/help/video-metadata-remover
Category: Features
## What is video metadata?
Video files store more than just picture and audio. Embedded metadata can include:
- **Creation date and time**, when the recording started
- **GPS coordinates**, where the video was recorded (common on smartphones)
- **Camera make and model**, device manufacturer and model number
- **Author and copyright tags**, names or usernames in the file header
- **Software tag**, which app encoded the original file
- **Encoding parameters**, bitrate, codec, color space details
This data is invisible to viewers but readable by anyone who inspects the file. A risk if you're sharing videos publicly or with untrusted parties.
## How the metadata remover works
The tool does **not** edit the existing file's metadata fields. Instead, it re-encodes the video through a browser canvas pipeline: the video plays to an offscreen canvas, and a new `MediaRecorder` captures the canvas output. Because the output is a freshly encoded video stream (not the original file), no metadata from the source file is carried forward.
The result is a clean WebM file that contains only:
- Video stream (VP9)
- Audio stream (if present in the original)
- Duration and dimension data required by the container
No creation date, no GPS, no camera info, no author tags.
## Privacy note
All re-encoding happens in your browser. Your video is never uploaded to a server. The original file is read locally via the browser's File API and never transmitted.
## Output format
Re-encoded output is always **WebM (VP9)**. If you need MP4, use the [Video Format Converter](/tools/video-format-converter) on the resulting file.
## Supported formats and limits
| Input | Notes |
|---|---|
| MP4 (H.264 / H.265) | Best supported |
| WebM (VP8 / VP9) | Fully supported |
| MOV | Chrome and Edge only |
Practical limits: clips up to ~5 minutes work reliably. Longer clips may take several minutes.
## What is not removed
- **Waveform / audio**, the audio track is preserved
- **Video content itself**, subtitles or watermarks burned into the picture are not removed
- **Container-level timing**: duration and frame rate are preserved (required for playback)
## Related
- [Supported formats](/help/supported-formats)
- [Browser support](/help/browser-support)
- [Video format converter](/help/video-format-converter)
---
### Video object remover
URL: https://bgremover.novusstreamsolutions.com/help/video-object-remover
Category: Features
The object remover lives in the [Video Editor](/video-editor). Open a clip on the timeline and find the Object remover panel. It removes, blurs, or pixelates a selected region on every frame it appears in, entirely on your device.
## Selecting the object
Scrub the playhead to a frame where the object is clearly visible. The preview canvas shows the frame at the playhead. Then use one of three selection tools:
- **Click object**: a click hands the frame to SlimSAM, which outlines the object's full shape. Up to five clicks refine the outline; each click re-runs the segmentation with all points.
- **Draw box**: drag a rectangle over the region. No model involved; use it for text, signs, watermarks, or anything the segmenter misjudges.
- **Plates**: one click scans the frame with a pinned Apache-2.0 RT-DETRv2 licence-plate detector (a one-time ~81 MB download, plus potentially uncached shared ONNX Runtime assets). On apply, plates are re-detected throughout the clip rather than tracked from one frame, so moving vehicles stay covered. Selecting plates switches the effect to blur by default.
## Remove, blur, or pixelate
- **Remove** fills the region using a temporal median: for each pixel, the pipeline samples nearby frames (the **Temporal window** slider, ±3–24 frames) where that pixel is *not* covered, and uses their median as the fill. A wider window is cleaner but slower.
- **Blur** applies a Gaussian blur (2–40 px): the robust choice for plates, faces, and screens.
- **Pixelate** applies mosaic blocks (4–32 px) when the censoring should read clearly.
**Edge feather** (0–20 px) softens the boundary of any treatment.
## Tracking
With **Track the object** enabled, the selected region is followed across frames by template matching. Tracking runs from the selected frame forward, follows movement but not rotation or size changes, and, if confidence stays low for several consecutive frames, freezes in place and flags the edit as *tracking froze mid-clip* instead of drifting off-target. Turn tracking off for fixed overlays such as watermarks and logos.
## The AI patch (~196 MB, consent-gated)
Removal borrows background from frames where the spot is uncovered. If the area is *never* revealed, a static watermark over a static background, there is nothing to borrow. The optional **AI patch** runs LaMa, an inpainting model, to generate a plausible fill for those areas. It is a one-time download of roughly 196 MB and the tool asks before fetching, the same consent flow described in [why AI tools download a model once](/help/models-download-once). Without it, permanently covered spots keep their original pixels.
## Applied edits, undo, and revert
Applying an edit re-processes the clip, audio is kept, and the result replaces the clip on the timeline, with `-objects` appended to the filename. Each edit is listed under **Applied edits**:
- **✕ on an edit** re-renders the clip from the pre-edit original with the remaining edits replayed exactly as first applied (tracking offsets and plate boxes are recorded, so nothing re-tracks or drifts).
- **Revert all** restores the untouched clip.
## Limits
- Removal fills need the background to be revealed in nearby frames or to hold still: moving-camera reconstruction is not attempted.
- Tracking follows movement only; rotation or scale changes cause a freeze-and-flag, not a stretch.
- Automatic detection covers licence plates only; other text and signs are a draw-a-box job.
- Processing runs at up to 1280 px on the long edge, matching the editor's other video pipelines.
## Related
- [Using the Video Editor](/help/video-editor-guide)
- [Removing the background from a video](/help/video-background-removal)
- [Video metadata remover](/help/video-metadata-remover)
- [Why AI tools download a model once](/help/models-download-once)
---
### ICO creator
URL: https://bgremover.novusstreamsolutions.com/help/ico-creator
Category: Features
## What is an ICO file?
The `.ico` format is a container used primarily by Windows for application icons, taskbar icons, file type icons, and browser favicons. Unlike a single-resolution image, an `.ico` file embeds multiple resolutions inside a single file: typically 16×16, 32×32, 48×48, and 256×256 pixels.
The operating system picks the most appropriate size automatically depending on where the icon is displayed:
- **16×16** (browser address bar favicon, small taskbar icon
- **32×32**) standard taskbar, desktop shortcut
- **48×48**, Windows Explorer file view
- **256×256**, high-DPI displays, large icon view
Browsers also read `.ico` files as favicon sources (`` tag with multiple `` children (max compatibility).
- **Stripping an unusual container** (.flv, .avi if your browser can decode it) into a modern web-friendly file.
## Quality control
The encoder runs at a fixed bitrate per resolution by default (~4 Mbps for 1080p, ~2 Mbps for 720p). A "high quality" toggle doubles the bitrate; "low quality" halves it.
For finer control, use the [Video compressor](/help/video-compressor) which exposes explicit quality presets.
## Limits
- **Browser support varies**. H.264 encoding requires Chrome / Edge with hardware encoder support, or Firefox 130+. Safari supports H.264 via VideoToolbox. WebM encoding works everywhere modern.
- **No audio support yet**: current versions of WebCodecs encode video only. The original audio track is preserved by re-muxing if possible, but for some source containers the audio is dropped. The output preview will show "no audio" if that happens.
- **Maximum file size depends on browser memory.** Modern desktops handle 4K source files fine; phones may struggle on long 4K clips.
## Privacy
All decode and encode runs in your browser. No file is uploaded.
## Related
- [Video compressor](/help/video-compressor)
- [Video resizer](/help/video-resizer)
- [Video format comparison](/help/video-format-comparison)
- [Supported formats](/help/supported-formats)
---
### Video compressor
URL: https://bgremover.novusstreamsolutions.com/help/video-compressor
Category: Features
## What it does
Re-encodes a video at a lower bitrate to shrink the file. Useful when:
- A platform has a strict upload size limit (Discord 25 MB free, Slack 1 GB, WhatsApp 16 MB).
- You're embedding a clip on a page and want it under 2 MB to keep the page fast.
- You want to email a video without the recipient needing to download a giant file.
Four quality presets:
- **High**: ~6 Mbps at 1080p. Visually near-identical to source for most content.
- **Medium**: ~3 Mbps at 1080p. Web-friendly default; good for general use.
- **Low**: ~1.5 Mbps at 1080p. Visible compression on detailed footage; fine for talking-head video.
- **Very Low**: ~600 kbps at 1080p. Significant artefacts; only when file size is the absolute priority.
Each preset scales by resolution: 720p uses about a third of the 1080p bitrate.
## Codec choice
Default output is WebM (VP9). MP4 (H.264) is available if you need maximum compatibility (some older players don't accept WebM). VP9 gets ~30 % smaller files at the same visual quality, so use it unless you specifically need MP4.
## Estimating the output size
A live estimate is shown as soon as the source is decoded: based on the source duration and selected bitrate. The actual output is usually within ±15 % of the estimate.
## When *not* to compress
- If the file is already small enough for your destination, don't recompress: every transcode is lossy.
- If you only need to *crop* or *trim*, use the [Video editor](/video-editor) instead: it can write a trimmed copy without re-encoding the kept portion.
## Multiple files
Drop multiple videos; each is compressed independently and added to the download queue. They run one at a time so a long video doesn't lock the UI.
## Privacy
All decode and encode runs in your browser. No file is uploaded to any server.
## Related
- [Video resizer](/help/video-resizer): to drop resolution as well
- [Video format converter](/help/video-format-converter): to change container
- [Video format comparison](/help/video-format-comparison)
---
### Video resizer
URL: https://bgremover.novusstreamsolutions.com/help/video-resizer
Category: Features
## What it does
Changes the pixel dimensions of a video. Frames are decoded, resized using high-quality bilinear filtering, and re-encoded into the target format.
Common preset sizes:
- **4K (3840×2160)**: for cinema-quality output. Requires a high-bitrate source to look useful.
- **1080p (1920×1080)**: standard web video.
- **720p (1280×720)**: smaller files, fine for tutorials and talking-head content.
- **480p (854×480)**: minimum viable video size; good for very low bandwidth targets.
- **Custom**: enter your own width / height.
## Aspect-ratio lock
On by default. Entering one dimension auto-computes the other so the video is not stretched. Turn the lock off only if you genuinely want anamorphic distortion.
If you need a different aspect ratio but no stretch, use the [Video canvas extender](/help/video-canvas-extender) to add letterbox / pillarbox padding instead.
## Quality vs. file size
Downsampling (e.g. 4K → 1080p) is essentially free quality-wise. There is no detail to lose because the encoder bitrate constraint dominates anyway. The resulting file is much smaller because you have fewer pixels to encode.
Upsampling (e.g. 720p → 1080p) is geometric scaling. It does not invent detail. For genuine quality improvement when upscaling, use the [Video upscaler](/help/video-upscaler), which uses Lanczos resampling tuned for video.
## Codec choice
Default output is WebM (VP9). MP4 (H.264) available if you need it.
## Privacy
All processing in your browser. No upload.
## Related
- [Video upscaler](/help/video-upscaler)
- [Video compressor](/help/video-compressor)
- [Video canvas extender](/help/video-canvas-extender)
---
### Video rotate
URL: https://bgremover.novusstreamsolutions.com/help/video-rotate
Category: Features
## What it does
Rotates an entire video by 90°, 180°, or 270°. The output is a re-encoded video where every frame is actually rotated. Not just a metadata flag that some players ignore.
Three operations:
- **Rotate 90° clockwise**: typical for a sideways phone video recorded in portrait but tagged as landscape.
- **Rotate 90° counter-clockwise**: opposite.
- **Rotate 180°**: for a fully upside-down clip.
## Why "bake the rotation" matters
Phones record video in their physical sensor orientation and add a *rotation metadata tag* to the container. Most modern players honour this tag and display correctly. But:
- Some older / embedded players ignore the tag and display the raw orientation (sideways).
- Many video editors strip or misread the tag when you import.
- Some streaming uploads only honour the tag if it matches the codec's expected stream geometry.
This tool decodes each frame, rotates the pixel array, and re-encodes. The output is unambiguously oriented. Every player will display it correctly.
## File size impact
Re-encoding always involves some quality loss (unless you crank the bitrate to match the source, which the tool does by default for 90° / 270° rotations). The output will be roughly the same size as the source.
For maximum quality on 90° / 180° / 270° rotations, the encoder bumps the bitrate ~20 % above the detected source bitrate to avoid visible recompression artefacts.
## Free-angle rotation
Not supported here. The standalone tool is intentionally limited to 90° increments for clean encoder behaviour. If you need a tilted angle for artistic effect, use the [Video editor](/video-editor) which supports rotation as part of its effects pipeline.
## Privacy
Decode and encode happen in your browser. No upload.
## Related
- [Video format converter](/help/video-format-converter)
- [Video resizer](/help/video-resizer)
- [Rotate & flip (images)](/help/rotate-flip)
---
### Video canvas extender
URL: https://bgremover.novusstreamsolutions.com/help/video-canvas-extender
Category: Features
## What it does
Adds bars on the sides or top/bottom of a video so the output matches a target aspect ratio. The actual video content is centred and never cropped, only the canvas around it changes.
Two scenarios this fixes:
- **Letterbox**: source is wider than target (e.g. 16:9 video for a 1:1 Instagram square), black bars appear top and bottom.
- **Pillarbox**: source is taller than target (e.g. 9:16 phone clip for a 16:9 YouTube upload). Black bars appear left and right.
## Preset ratios
- **1:1**: Instagram square posts.
- **9:16**: Instagram Reels, TikTok, YouTube Shorts.
- **16:9**: Standard widescreen (YouTube, websites).
- **4:3**: Classic TV / older formats; some embedded players.
- **21:9**: Cinematic ultra-wide.
- **Custom**: enter a numeric ratio (e.g. `1.85`).
## Bar colour
Default is black, which works for most platforms. You can change to:
- **White**: for slide-deck or document-style uploads.
- **Blurred source**: fills the bars with a blurred copy of the video itself. Visually richer than black bars; common on TikTok / Reels uploads of widescreen content.
- **Solid colour**: pick any hex value.
## When not to use this
If your source content is acceptable cropped (no important detail near the edges), the [Video resizer](/help/video-resizer) with the "crop to fit" option may give a cleaner result without bars.
For animated subjects where the bars feel like "wasted space", consider re-shooting in the target aspect ratio instead. Bars always look a bit awkward.
## Privacy
All processing runs in your browser.
## Related
- [Video resizer](/help/video-resizer)
- [Video rotate](/help/video-rotate)
- [Image canvas extender](/help/image-canvas-extender)
---
### Video format comparison
URL: https://bgremover.novusstreamsolutions.com/help/video-format-comparison
Category: Features
## What it does
Drop one video file and the tool re-encodes it in all three of the formats the web actually uses:
- **WebM (VP9)**: modern open codec. Best size/quality ratio.
- **WebM (VP8)**: older fallback, still widely compatible.
- **MP4 (H.264)**: universal compatibility, slightly larger files.
The result is three downloadable files plus a side-by-side comparison showing the file size of each. You can preview each result inline before downloading.
## When you'd use this
- **Picking the right format** for a self-hosted `` tag: providing multiple `` children with different formats means each visitor's browser picks the one it can play, and you want to know which to ship.
- **Verifying VP9 is actually smaller** than H.264 on your specific content. The savings vary by content type; for animation it's often huge, for grainy/noisy footage it's smaller.
- **Comparing the visual quality** of the three codecs at matched bitrate.
## How it sets a fair comparison
All three encoders are configured for the same target perceptual quality (effective bitrate around 3 Mbps at 1080p). The actual output file size is the metric the comparison surfaces.
For comparison at a *different* quality target, the slider scales all three encoders together.
## Sequential encoding caveat
Encoding three videos serially takes ~3× the encode time of one. On a 60-second 1080p source this is typically 2–3 minutes total on a modern desktop, longer on phones.
The encodes run sequentially (not in parallel) so the browser doesn't get squeezed for GPU resources, running three WebCodecs encoders in parallel on the same device fails on most hardware.
## Privacy
All encoding happens in your browser. No file is uploaded.
## Related
- [Video format converter](/help/video-format-converter)
- [Video compressor](/help/video-compressor)
- [Compare formats (image)](/help/compare-formats)
---
### Working with layers
URL: https://bgremover.novusstreamsolutions.com/help/working-with-layers
Category: Features
The editor now supports a full layer stack: drop multiple images onto the
Layers panel and each becomes its own layer you can reorder, blend, hide, and
delete independently. Works identically in the image editor (including its
real-estate / furniture mode) and the video editor.
## Opening the Layers panel
In the **image editor**: open the Properties sidebar on the right and expand
the **📚 Layers** section.
In the **video editor**: open the right sidebar and expand the **Layers**
section under the colour-grading and filters panels.
In the editor's **real-estate / furniture mode**: the Layers panel replaces
the legacy furniture list in the left sidebar.
## Adding layers
- **Drop files onto the panel**: the simplest path. Each file becomes its own
layer. Image files become image layers; in the video editor, video files
become video-source layers.
- **The + button** in the panel header opens a menu with kind-specific entries:
Image, Text, Background fill, Shape (rect / ellipse / line), Filter,
Adjustments. Picking Image or Video opens a multi-file picker.
## Per-layer controls
Every layer row shows, left to right:
- **Visibility toggle (👁)**: show/hide without removing.
- **Thumbnail**: automatic small preview per layer kind.
- **Name**: double-click to rename.
- **Blend mode** dropdown: 12 modes including Normal, Multiply, Screen,
Overlay, Soft Light, Hard Light, Darken, Lighten, Colour Burn / Dodge,
Difference, Exclusion.
- **Opacity** slider: 0–100 %.
- **Lock / Unlock (🔒)**: prevents accidental drags and edits.
- **Duplicate (⎘)**: clone the layer with all its settings.
- **Delete (✕)**: remove the layer.
## Reordering
Drag any unlocked layer row up or down. The drag handle appears on hover. The
canvas re-renders immediately with the new stacking order.
## Drag-to-position on the canvas
Image and text overlay layers can be dragged directly on the canvas: click
the layer once to select it, then drag to move. Hit-tests prefer the topmost
visible unlocked layer, so brush / wand strokes fall through when no layer is
under the pointer.
## Keyboard shortcuts (image editor)
| Shortcut | Action |
|----------|--------|
| `Ctrl + J` | Duplicate active layer |
| `Ctrl + Shift + ]` | Bring active layer to front |
| `Ctrl + Shift + [` | Send active layer to back |
| `Delete` / `Backspace` | Delete active layer (when focus isn't in an input) |
## Layer kinds reference
- **Image**: bitmap with optional baked brush mask, position (`x`, `y` as
fraction), and scale. The Brush tool can "bake" a stroke mask onto an active
image layer for non-destructive layered editing.
- **Text**: text content, position (`x`, `y` as % of canvas), font size,
colour, bold, font family.
- **Shape**: rectangle, ellipse, or line with stroke + fill colour.
- **Background fill**: full-canvas solid colour, linear gradient, or pattern
image. Use opacity to make it a tint rather than a hard overlay.
- **Cutout**: alpha mask layer; rare to add manually, used by project import.
- **3D relief**: depth-displaced mesh; not rendered in the 2D canvas (use the
3D Preview panel).
## Saving & sharing
Save the editor state as a `.nss-project` ZIP from the Project panel. The
file contains the original image, every layer's bitmap or mask, names,
blend modes, opacity, and ordering: re-opening on any device restores the
exact stack with original layer ids preserved.
## Related
- [3D preview](/help/3d-preview)
- [Manual image adjustments](/help/manual-image-adjustments)
---
### 3D preview & depth relief
URL: https://bgremover.novusstreamsolutions.com/help/3d-preview
Category: Features
The editor includes a full 3D mode powered by Three.js, preview the current
canvas as a flat plane, turn it into a depth-displaced relief mesh, dial in
lighting and material, and record an orbit to WebM. Same component is reused
in the image editor (including its real-estate / furniture mode) and the
video editor.
## Opening 3D mode
**Image editor:** Properties sidebar → **🎲 3D Preview** section → pick **Open
as flat 3D plane** or **Generate 3D relief**.
**Video editor:** click the **🎲 3D view** button at the top of the preview
canvas. The current frame is snapshotted into the 3D scene.
**Real-estate / furniture mode:** the existing "3D view" toggle in the canvas.
## Flat 3D plane
The current canvas is rendered as a textured plane standing upright in a 3D
scene with orbit controls: drag to rotate, scroll to zoom, right-drag to pan.
Adjustments available in the modal toolbar:
- **Light intensity** (0–2) and **angle** (0–360°), moves the key light
around the scene
- **Material**: **Matte** (default, high roughness), **Glossy** (low
roughness, slight metalness), **Metallic** (low roughness, high metalness)
- **Background colour**: picker for the scene clear colour
## 3D relief
Click **🗻 Generate 3D relief** to run depth estimation on the current canvas
and turn it into a depth-displaced 3D mesh. Each pixel's Z coordinate is
pushed forward by its depth value, so the subject visibly gains volume when
orbited.
The depth model is `depth-anything-small-hf`, loaded on demand. No new
download, no per-tool model. The mesh is 128×128 vertices: smooth enough for
hero shots, fast enough for phone-class devices.
## Recording an orbit
Click the **🎥 Record orbit** button in the 3D toolbar to capture a 4-second
360° camera rotation around the scene. The current camera distance + height
are preserved, so the orbit matches what you're looking at. Output downloads
as WebM.
Use cases:
- Quick product hero animations
- Architectural pre-visualisation
- Social-media-ready camera moves without leaving the browser
## Capture still frame
The **📸 Capture** button takes a single PNG of the current 3D view at the
current camera angle. Useful when you've dialled in the perfect angle and
just want one shot.
## Performance
- Three.js is dynamic-imported. Zero bytes added to the initial editor
bundle. The library only loads when you open the 3D modal.
- The depth model lazy-loads on first use, then caches in the browser via
Transformers.js. Subsequent reliefs are instant on the same browser.
- 3D rendering uses WebGL2 (not WebGPU). Hardware acceleration on every
device that can run the editor.
## Privacy
3D rendering runs entirely on your GPU. The depth model runs in a Web Worker
on your device. Nothing leaves your browser.
## Related
- [Working with layers](/help/working-with-layers)
---
### AI Face Restore
URL: https://bgremover.novusstreamsolutions.com/help/ai-face-restore
Category: Features
[AI Face Restore](/tools/face-restore) works on the part of a photo people actually look at. There are two paths through it, they produce very different results, and which one you get is a decision you make rather than one made for you.
## The two paths
- **GFPGAN v1.4** is a face restoration model. It reconstructs eyes, teeth and hair in a face that is only a few dozen pixels across. It is a 340 MB one-time download, cached afterwards, and it only runs once you have allowed it.
- **The classical pipeline** (an edge-preserving bilateral denoise, a local contrast boost (CLAHE-lite over 8×8 tiles), then an unsharp mask) needs no download and runs instantly. It evens out and sharpens what is already in the file. It invents nothing, which is sometimes exactly what you want.
The caption under the result names the path that ran and how long it took, so you never have to guess which one you are looking at.
## Nothing downloads until you allow it
Before any bytes move, the tool shows what the model costs and what your device will do with it, then asks. **Allow the download** fetches GFPGAN once and caches it; **Not now** keeps the classical pipeline. The answer is remembered on this device and you can flip it later from the same line of text. This is the same consent flow described in [why AI tools download a model once](/help/models-download-once).
Allowing the download is necessary but not sufficient. GFPGAN is only selected on a device the readiness check rates as capable of running it. WebGPU and enough reported memory. A phone or a low-memory laptop runs the classical pipeline instead, even with consent granted, rather than downloading 340 MB to disappoint you. And if the model fails to load or fails mid-run for any reason, the classical pipeline finishes the job instead of the tool dead-ending.
## How the model sees your photo
GFPGAN v1.4 is fixed at 512×512. That is the only input size the network accepts. Everything else follows from that constraint:
1. A landmark detector looks for a face and returns a bounding box, padded outwards to take in hair and chin.
2. That crop is scaled to 512×512 and run through the model.
3. The result is scaled back to the crop's original size and feather-pasted into the source photo, so the restored region blends rather than sitting in a visible rectangle.
**One face per run.** The detector is configured to find up to four faces, but the restore pass takes the first one it returns. In a group shot the other faces come back exactly as they went in. If no face is found at all, the whole image is treated as one crop and processed that way, still an improvement, just not a face-specific one.
On the CPU path, restoring a face was measured at about 6.7 seconds, on top of the 340 MB download the first time you run it.
## Strength
Four settings (Subtle, Moderate (the default), Aggressive, and Vintage repair) control how much of the restored crop is blended back over the original when it is pasted in. Subtle keeps more of the real skin texture; Aggressive commits fully to the reconstruction and can look synthetic on a close-up. Vintage repair is a strong recovery composited a little softer, for scans and prints. The setting applies to both paths.
## What "restore" honestly means
GFPGAN does not recover the original pixels. They are gone, and nothing recovers them. It generates a plausible face consistent with what survived, using a prior learned from a very large number of other faces. On a soft or small photo of someone, enough structure usually survives to constrain the result and it looks like them. On a severely degraded photo the model will still return a crisp, confident face, and that face can differ from the person in ways the output gives you no way to detect.
So it is a good tool for a print you want to hang on a wall, and the wrong tool for identification. Keep the original file.
## Limits
- One face per run, and only the first face found. Group photos need one pass per face if you crop them yourself.
- The classical path sharpens and evens; it does not rebuild detail that was never captured.
- JPEG, PNG or WebP in, up to 32 MB. PNG out.
- Everything runs in this tab. The photo is never uploaded, which for family photographs is not a small detail.
## In the image editor
The tool is also in the image editor's launcher, under **AI Tools**, as *AI Face Restore*. It is deliberately not offered in the video editor, where it would be a control that cannot do anything. A run started from the editor uses whatever download answer you have already given; if you have not answered, it takes the classical path rather than starting a download from a surface that never asked.
## Related
- [AI Deblur](/help/ai-deblur): for a photo that is soft overall rather than just in the face
- [AI Describe](/help/ai-describe): write alt text for the finished image
- [Colorizing black-and-white photos](/help/colorize-photos): restore first, colorize second
- [Why AI tools download a model once](/help/models-download-once)
- [System requirements](/help/system-requirements)
---
### AI Deblur
URL: https://bgremover.novusstreamsolutions.com/help/ai-deblur
Category: Features
[AI Deblur](/tools/deblur) sharpens camera shake and focus miss. Two things can produce the result and the difference between them matters: an unsharp mask raises contrast either side of an edge, which reads as sharper but adds nothing that was not already there, while NAFNet is a learned deconvolution trained on pairs of blurred and sharp photographs, so it reconstructs detail the blur spread out.
## The two paths
- **NAFNet** is a 92 MB one-time download, cached afterwards, and it runs behind two conditions: you have allowed the download, **and** the browser has a healthy WebGPU adapter. Both have to be true.
- **The classical direction-aware unsharp mask** needs no download, runs instantly, and is the path whenever either condition is not met.
WebGPU is a real requirement rather than a preference: on single-thread WASM, NAFNet crawls badly enough that it is not worth the wait. If the model is unavailable, fails to load, or throws mid-run, the classical path finishes the job. The tool always returns something, and the caption under the result names which path produced it.
## Nothing downloads until you allow it
The consent gate comes before any bytes move: **Allow the download** fetches NAFNet once, **Not now** keeps the classical mask. The answer is stored on this device and can be changed later from the same line of text. See [why AI tools download a model once](/help/models-download-once) for where the weights live and when a browser can evict them.
## The blur type buttons only steer the classical path
**Detect it** runs a gradient analysis and picks; **Motion blur** sharpens across the streak; **Focus miss** treats the softness as uniform in every direction. All three feed the classical pipeline only. NAFNet infers the blur itself and ignores the setting. When the classical path detects directional blur it reports the angle it found next to the result, which is a useful check on whether you picked the right type.
## Sizes the model will and will not accept
NAFNet's graph declares both spatial dimensions as dynamic, but it is not. Measured against the real weights, there is a hard per-axis minimum somewhere between 368 px (fails) and 372 px (passes), below it the encoder's spatial dimensions collapse and the run aborts inside a padding node. It is per axis, not per area: 512×256 and 256×512 both fail while 480×448 is fine.
So the tool plans a working size before it runs anything. The long edge is capped at 1024 px because deblur is heavy, the short edge is lifted to at least 384 px if the cap pushed it under, and both axes are bounded at 2048 px. The result is scaled back, so what you download always has the dimensions you uploaded. The practical consequence: a very wide panorama is processed at that short-edge floor, and fine detail in an extreme crop of it is limited by that rather than by the model.
## Which blur can actually be fixed
Blur destroys information, and no model recovers what was never recorded. What deconvolution can undo is a *predictable* spreading of light.
- **Handheld shake** is the best case. A short streak in one direction is what NAFNet was trained on.
- **Slight focus miss** is recoverable when the subject sits close to the focal plane.
- **Noise mistaken for blur** gets worse, not better. Deblur amplifies high-frequency detail, and low-light sensor noise is high-frequency detail.
- **Heavy motion, or focus missed by a wide margin**, is not recoverable here or anywhere. A tool that returns a confident result from that input is generating a plausible photo, not restoring yours.
## Limits
- NAFNet needs WebGPU. Without it you get the classical mask, whatever you answered about the download.
- The model works at up to 1024 px on the long edge, so it is a detail-recovery pass, not an upscaler.
- JPEG, PNG or WebP in, up to 32 MB. PNG out.
- Deblur sharpens; it does not denoise. On a noisy source, expect the noise to come through harder.
- Everything runs in this tab. Nothing is uploaded.
## In the image editor
The tool is also in the image editor's launcher, under **AI Tools**, as *AI Deblur*. It is not offered in the video editor. A run started from the editor uses the download answer you have already given; with no answer stored it takes the classical path rather than starting a 92 MB fetch from a surface that never asked.
## Related
- [AI Face Restore](/help/ai-face-restore): targets faces specifically, and does more for them than a whole-image deblur can
- [AI Describe](/help/ai-describe): a clearer image gets a better description
- [Why AI tools download a model once](/help/models-download-once)
- [Browser support](/help/browser-support), which browsers report a usable WebGPU adapter
---
### AI Describe (alt text)
URL: https://bgremover.novusstreamsolutions.com/help/ai-describe
Category: Features
[AI Describe](/tools/alt-text) reads an image and writes a description of it. Most images on the web have no alt text and the usual reason is not indifference, it is a hundred images and no time; a first draft in a second changes that arithmetic. The tool is listed as *AI Alt Text* on the tools pages and appears as *AI Describe* in the image editor, same thing.
## This is the one with no fallback
The other two model-backed tools keep working when you decline their download, because a classical sharpening pipeline is a genuinely useful weaker answer. There is no classical shortcut for describing a photograph in words: it requires a model that has seen photographs. So declining here leaves the tool unable to run, and it says so plainly rather than producing something worthless.
Nothing downloads until you allow it. The consent gate names the size and what happens if you decline, your answer is stored on this device, and you can change it later from the same line of text, the flow described in [why AI tools download a model once](/help/models-download-once).
One caveat on the number in that dialog. It quotes ~120 MB, which is the size of the ViT-GPT2 captioner. In practice the worker tries the richer Florence-2 model first and only falls back to ViT-GPT2 if Florence-2 will not load or run, and Florence-2 is the larger fetch. Its loader reports roughly 230 MB. Either way it is a one-time download that caches afterwards, but a first run can pull more than the dialog quotes.
## Styles
Five styles, each a different post-process over the same caption:
- **Alt text** (the default): one short sentence for a screen reader, capped at twelve words. The brevity is the point.
- **Scene**: subject, environment and lighting mood.
- **Product**: subject, material and distinctive features, for a listing.
- **Objects**: a comma-separated list, most prominent first.
- **Social caption**: one friendly sentence.
Scene and Product ask the model for a longer, more detailed caption. Alt text never does, deliberately.
There is also a quiet escalation for documents: a cheap local pixel check flags text-dense images (screenshots, scans, anything that is mostly ink on paper), and upgrades them to the detailed caption, because the brief one tends to come back as something like "a computer screen with a lot of numbers". That upgrade is skipped for alt text, where screen-reader brevity wins.
## Where it is weakest
- **Charts, diagrams and dense screenshots.** Anything whose meaning lives in its text or its axes. The model describes what it recognises, and a bar chart looks like a bar chart to it.
- **Text in the image.** Often missed or misread. Check it, and put it in the alt text yourself.
- **Anything requiring knowledge.** It does not know a name, a brand, a place, or which detail is the reason the image is on your page.
- **Other languages.** It writes English.
## Treat the output as a draft
Alt text is not a description of an image. It is a replacement for the image, in the context of the page it sits on. The same photograph of a bridge wants "the Clifton Suspension Bridge from the Somerset side" in an article about Bristol and "a suspension bridge at dusk" in a piece about lighting. A model can only produce the second.
The result appears in an editable box for exactly this reason. Before you ship it:
- **Add what only you know**: names, places, brands, and the detail that made you use this image.
- **Cut what the page already says.** Alt text that repeats the caption underneath makes a screen reader say everything twice.
- **Do not start with "image of".** Screen readers already announce that it is an image.
- **Purely decorative images take empty alt** (`alt=""`), not a description. Describing a background flourish is noise, not access.
## Limits
- No download, no tool. There is no degraded mode.
- English only, and there is no language setting.
- JPEG, PNG or WebP in, up to 32 MB. Text out, with a Copy button and the token count.
- The model is deterministic and takes no prompt, so there is no way to ask it a question about the image from this tool.
- Everything runs in this tab. Neither the image nor the generated text is sent anywhere.
## In the image editor
The tool is in the image editor's launcher, under **AI Tools**, as *AI Describe*. Its output is text, so it is reported back to you rather than applied to the canvas, and it is not offered in the video editor. Because there is no fallback, running it in the editor before answering the download question fails with a message pointing you at the tool page to answer it.
## Related
- [AI Face Restore](/help/ai-face-restore)
- [AI Deblur](/help/ai-deblur): sharpen a soft image first; a clearer image gets a better description
- [Image metadata remover](/help/metadata-remover): strip location and camera data before publishing
- [Why AI tools download a model once](/help/models-download-once)
---
### Object Remove & Replace
URL: https://bgremover.novusstreamsolutions.com/help/remove-and-replace-objects
Category: Features
[Object Remove & Replace](/tools/remove-object) separates three jobs that are often confused: selecting the pixels to change, reconstructing the area behind them, and placing a replacement asset. Nothing applies until the selection is non-empty and you press the final action.
## Build a selection
Choose **positive** guidance and draw over the object. Use **negative** strokes on nearby content that the mask should exclude, or constrain the selection with a lasso. The pinned MediaPipe MagicTouch selector uses that guidance; it never invents a centre ellipse or an empty default mask.
If the selector cannot start, the tool reports that failure and leaves the image unchanged. **Use manual brush/lasso mask** is an explicit manual alternative, not a claim that a flood fill is equivalent to interactive segmentation. Keyboard users can move the canvas crosshair with Arrow keys, press Enter to place positive or negative guidance, or enter exact horizontal and vertical percentages.
The first **Build AI mask** can fetch approximately 17.2 MB: the 6,227,884-byte MagicTouch model, about 10.6 MB of MediaPipe WASM, and the small JavaScript runtime. These pinned assets are cached for later and offline use. They are separate from the consent-gated LaMa quality model. A manual brush/lasso mask needs neither download.
## Choose the removal path
- **LaMa** is the quality path. After explicit consent, the pinned approximately 200 MB model is cached. Inference uses a padded crop around the accepted mask at a bounded 512-pixel working size, then composites through the one expanded and feathered mask you control.
- **Limited local neighbour fill** needs no model download. It works inward from the mask boundary and is suitable only for tiny marks on simple, repetitive backgrounds. It can smear lines and structure. It is not PatchMatch and is not equivalent to LaMa.
Pixels whose governed mask value is zero retain their original bytes and alpha. Large masks crossing text, faces, perspective lines, reflections, or unique structure may still produce a plausible rather than truthful reconstruction.
## Replace with a real local asset
Choose a replacement image from your device. Background removal has its own fail-closed approval: pinned BiRefNet fetches approximately 99 MB on WebGPU or up to 192 MB on the CPU compatibility path, then stays cached. Declining that request accepts only a PNG/WebP with meaningful existing transparency; a nominal one-transparent-pixel file is rejected instead of placing its opaque background. The workbench exposes position, scale, rotation, edge blend, brightness, saturation, colour temperature, and shadow controls.
Inside the Image Editor, removal and layer insertion create one composition history entry. The replacement remains an editable layer after Apply. The placement preview, editor canvas, standalone result, and editor export use the same full-resolution compositor.
## Cancellation, history, and export
Cancel invalidates the active run and enables an immediate retry. A late result from an older source or run is closed instead of being applied. If the browser cannot encode both undo snapshots, the operation fails closed: the source, layer stack, and history remain unchanged.
After Apply, compare the actual decoded before/after result at 100%. Check the removal boundary, repeated texture, line continuity, and the replacement edge and shadow before downloading.
## Related
- [Why AI tools download a model once](/help/models-download-once)
- [Working with layers](/help/working-with-layers)
- [Edge refinement](/help/edge-refinement)
- [Privacy Blur](/help/privacy-blur)
---
### Privacy Blur
URL: https://bgremover.novusstreamsolutions.com/help/privacy-blur
Category: Features
[Privacy Blur](/tools/privacy-blur) follows a detect, review, then apply workflow. Detection proposes editable boxes; it never changes pixels by itself.
## Detection and first-use assets
Select face detection, licence-plate detection, or both, then press **Detect selected categories**. Faces can fetch approximately 15 MB on first use: about 10.6 MB of MediaPipe WASM, 0.3 MB of JavaScript, and the 3.76 MB face task. Licence plates add an approximately 81 MB pinned RT-DETRv2 ONNX model and may also need uncached shared ONNX Runtime assets. The browser caches these files. Drawing manual regions requires no detector download.
A successful scan that finds nothing stays empty and reports **Nothing was detected**. It does not fall through to a skin-tone or high-contrast heuristic that invents boxes. If a detector is unavailable, a clearly labelled classical fallback may propose regions, and those proposals still require review.
## Correct every region
Drag to add or edit a box, remove a proposal, or enter exact x, y, width, and height values. Exact fields are also the keyboard-operable alternative to pointer editing. Check reflections, small background faces, angled plates, screenshots, names, badges, and any other identifying detail the automatic categories do not cover.
## Blur versus pixelation
Blur softens local pixels; pixelation replaces them with larger blocks. Neither setting guarantees anonymity at a weak strength. Inspect the actual delivery size, because a region that looks hidden in a fitted preview can reveal structure when enlarged.
Press **Apply reviewed regions** only after the complete set is correct. The image editor records the result as one strict undo operation. If the undo snapshot cannot be encoded, the tool refuses the change.
## Video privacy
The same tool is available under **AI Tools** in the Video Editor. Video regions can be tracked and corrected before rendering, and the output preserves audio. Tracking can drift after fast motion, occlusion, or a scene cut, so review the whole timeline rather than only the first frame.
## Privacy limits
Faces and plates are only part of identity. Clothing, tattoos, voices, reflections, location context, and embedded metadata can remain identifying. Use [Metadata Remover](/help/metadata-remover) where appropriate and review every exported image or frame.
## Related
- [Image metadata remover](/help/metadata-remover)
- [Video object remover](/help/video-object-remover)
- [Object Remove & Replace](/help/remove-and-replace-objects)
- [General troubleshooting](/help/troubleshooting)
---
### Smart Crop
URL: https://bgremover.novusstreamsolutions.com/help/smart-crop
Category: Features
[Smart Crop](/tools/smart-crop) offers a local framing suggestion. It is not generative AI: no pixels are created or extended. Pressing **Suggest framing** can fetch approximately 15 MB for the pinned MediaPipe face task and runtime; those files are cached and the image never uploads.
## Choose a framing mode
Use **Auto** for an assisted saliency suggestion, **freeform** for unrestricted geometry, or choose 1:1, 4:5, 9:16, 16:9, or 3:2. Portrait presets show general safe-zone guides so important content can stay clear of common social-interface overlays.
The scan combines local contrast and detail distribution with real face bounds from the pinned landmark task. The detector tries GPU and then CPU. If neither can run, the tool uses a clearly labelled contrast/rule-of-thirds fallback; it does not guess faces from skin colour. This is a useful starting point, not an understanding of narrative importance.
## Review before Apply
**Suggest framing** changes only the overlay. Drag or resize it, or enter exact x, y, width, and height values. Those numeric controls make the complete crop operation keyboard-accessible without depending on a pointer canvas.
The source stays unchanged until **Apply crop**. Cancel interrupts the cooperative scan, clears the busy state, and allows an immediate retry. If the image changes while a suggestion is running, the stale result is discarded.
## Image and mask remain aligned
When an editor item already has a background-removal mask, Apply crops and resamples the image and mask together to the same dimensions. One strict undo entry restores both. This prevents a previous full-size mask from stretching across the cropped output during export.
If the browser cannot record the before and after PNG snapshots, the tool leaves the image unchanged rather than applying a non-undoable crop.
## Verify the result
Check the reported output dimensions and each edge of the crop. Make sure low-contrast context, captions, hands, products, and environmental cues remain in frame. Safe-zone guides are general aids; always check the current destination interface before publishing.
## Related
- [Image resizer](/help/image-resizer)
- [Image canvas extender](/help/image-canvas-extender)
- [Object Remove & Replace](/help/remove-and-replace-objects)
- [Working with layers](/help/working-with-layers)
---
### Auto Subtitles
URL: https://bgremover.novusstreamsolutions.com/help/auto-subtitles
Category: Features
[Auto Subtitles](/tools/auto-subtitles) transcribes the latest edited clip in the Video Editor. It uses the pinned q8 Whisper-base revision, not a remote speech API.
## First-use model consent
The measured first-use network total is approximately 82 MB, including the pinned weights and supporting files. Nothing downloads until you approve that exact revision. The browser caches the model; changing revision creates a separate consent key rather than silently reusing approval for different weights.
## Review the caption track
Transcription creates one typed caption timeline track. Edit cue text and start/end times, split or merge cues, delete mistakes, and apply shared style and position settings. The tool does not create hundreds of unrelated overlay objects.
Export captions as SRT, VTT, or plain text. Applying the track keeps it editable. Optional burn-in renders a new clip at source resolution and frame rate, then muxes the source audio back into the result. Its absolute browser limits are 60 seconds for opaque output and 30 seconds while preserving WebM transparency; the device-aware memory preflight can ask for a shorter or lower-resolution clip sooner without changing the source.
## Cancellation and empty audio
Cancel terminates the current worker generation so a late response cannot update the timeline. A retry starts with a fresh owner. Clips with no decodable audio or no detected speech remain unchanged and report the condition instead of committing an empty destructive result.
A transcription run is limited to 15 minutes. Before cloning decoded channels into mono PCM or transferring them to the worker, a device-aware memory preflight can ask for a shorter clip or lower-rate mono audio. Refusal is non-destructive.
## Accuracy limits
Whisper can mishear names, technical language, overlapping speakers, accents, and noisy recordings. Choose the source language before transcription. The pinned browser wrapper supports multilingual transcription when a language is selected, but it does not currently implement reliable automatic language identification; the interface therefore never guesses or silently labels the result as detected. Check every cue against the actual audio before publishing.
## Related
- [Auto Highlights](/help/auto-highlights)
- [Using the Video Editor](/help/video-editor-guide)
- [Why AI tools download a model once](/help/models-download-once)
---
### Auto Highlights
URL: https://bgremover.novusstreamsolutions.com/help/auto-highlights
Category: Features
[Auto Highlights](/tools/auto-highlights) proposes a 15, 30, or 60-second cut from the latest edited clip. The v3 local engine combines scene boundaries, measured motion, visual prominence, and real audio-energy voice activity; it does not download a highlight model.
## Choose a focus
- **Motion** favours visible movement.
- **Visual prominence** favours luma structure and centre contrast without claiming that it found a person, product, or narratively important subject.
- **Speech** uses decoded audio energy and voice-activity evidence.
- **Mixed** balances all available signals.
Speech remains available only when the workflow has real decoded audio/VAD evidence. Silent clips still support the visual modes.
## Review every range
Analysis produces chronological scene cards and proposed start/end ranges. Adjust boundaries, remove weak moments, or exclude a range before Apply. The proposal never exports blindly. When the source is long enough, the accepted total targets the chosen duration within five seconds and avoids micro-clips.
## Apply and undo
Encoding uses the latest visible editor media, applies the same ranges to picture and audio, and commits one timeline history operation only after encoding succeeds. Cancellation, a source change, or an editor fingerprint change discards stale output. Transparent video is handled explicitly rather than being silently flattened.
## Editorial limits
Local signals do not know which moment matters to the story. Quiet but important statements, setup, reactions, and context can score below energetic but unimportant footage. Review the complete proposal and the final audio continuity.
## Related
- [Auto Subtitles](/help/auto-subtitles)
- [Using the Video Editor](/help/video-editor-guide)
- [Video stabilizer](/help/video-stabilizer)
---
### Browser support
URL: https://bgremover.novusstreamsolutions.com/help/browser-support
Category: Compatibility
## Browser compatibility table
| Browser | Support level | Inference backend | Notes |
|---------|--------------|-------------------|-------|
| Chrome 94+ | Full | WebGPU | Best performance |
| Edge 94+ | Full | WebGPU | Same engine as Chrome |
| Opera 80+ | Full | WebGPU | Same engine as Chrome |
| Firefox 90+ | Good | WebGPU or WASM | Backend depends on the browser and adapter detected |
| Safari 16.4+ | Good | WASM (varies) | WebGPU available in Safari 18+; service workers work |
| iOS Safari 16+ | Supported | WASM | Slower; install from Safari only |
| iOS Safari < 16 | Limited |: | Service workers not available; app warns on load |
## What WebGPU provides
WebGPU allows the AI model to run on your device's GPU instead of the CPU. This makes inference significantly faster:
| Backend | Typical inference time |
|---------|----------------------|
| WebGPU (discrete GPU) | 1–3 seconds |
| WebGPU (integrated GPU) | 3–6 seconds |
| Single-threaded WASM | 20–60 seconds |
The quality of the output is the same regardless of backend, only the speed changes.
## Why the WASM fallback is single-threaded
NSS pins ONNX Runtime Web to one CPU thread. During regression testing, the multi-threaded heap caused out-of-memory failures on large segmentation models. Cross-origin isolation is still applied to the two full editors as a privacy boundary, but SharedArrayBuffer availability does not change the inference backend today.
## Checking your backend
The inference backend badge appears near the top of the upload zone:
- **WebGPU**, running on your GPU
- **WASM (single)**, CPU, single-threaded
## Firefox notes
The site checks for a healthy hardware WebGPU adapter instead of assuming support from the browser name. When no suitable adapter is available, Firefox uses the same single-threaded WASM fallback as other browsers; output quality is unchanged, but processing takes longer.
## Safari notes
Safari 16.4+ supports service workers and most PWA features needed for offline operation. Safari 18+ adds WebGPU support. If you're on macOS Sonoma or later with Safari 18, you should see the WebGPU badge.
## Recommended setup for best performance
1. Use **Chrome** or **Edge** on desktop
2. Make sure your GPU drivers are up to date
3. Don't run NSS in a private/incognito window (model caching is restricted)
## Related
- [System requirements](/help/system-requirements)
- [Working offline](/help/working-offline)
- [General troubleshooting](/help/troubleshooting)
---
### System requirements
URL: https://bgremover.novusstreamsolutions.com/help/system-requirements
Category: Compatibility
## Minimum requirements
| Requirement | Minimum |
|-------------|---------|
| Browser | Chrome 94, Edge 94, Firefox 90, Safari 16.4 |
| RAM | 4 GB (8 GB recommended for large images) |
| Storage | 500 MB free (for model cache) |
| Internet | Required on first use for model download |
| GPU | Not required (WASM fallback available) |
## Recommended for best performance
| Requirement | Recommended |
|-------------|-------------|
| Browser | Chrome 94+ or Edge 94+ |
| RAM | 16 GB |
| GPU | Any modern GPU with WebGPU support (2019+) |
| Internet | Required on first use only |
## GPU / WebGPU support
WebGPU is supported by most modern dedicated and integrated GPUs from 2019 onwards. If your GPU is too old to support WebGPU, the tool falls back to WASM automatically. The output quality is the same, but inference takes longer.
GPUs with known WebGPU support in Chrome/Edge:
- NVIDIA GTX 1000 series and newer
- AMD RX 5000 series and newer
- Intel Arc and Intel Iris Xe (11th gen+)
- Apple M1 and newer (Mac)
- Most Android GPUs from 2020+
## Memory usage
| Scenario | Approximate RAM |
|----------|----------------|
| App + ORMBG Fast model | ~250 MB |
| App + BiRefNet Lite 512 Best Quality model | ~350–650 MB |
| Processing one 4K image | +100–300 MB |
| Queue of 10 processed images | +200–500 MB (varies) |
If your device runs low on memory, close other tabs and applications before processing large images or long queues.
## Storage
The AI model weights are cached in your browser:
| Model | Download size | Cached size |
|-------|--------------|-------------|
| Fast (ORMBG) | ~45 MB | ~45 MB |
| Best Quality (BiRefNet Lite 512, WebGPU fp16) | ~99 MB | ~99 MB |
| Best Quality CPU compatibility (WASM fp32) | ~192 MB | ~192 MB |
Model files are stored in the browser's Cache API storage. Open **Downloads** from the navigation menu to remove one model or clear all downloaded tools.
## Mobile devices
| Platform | Support |
|----------|---------|
| iPhone (iOS 16+, Safari) | Supported: slower inference |
| iPhone (iOS < 16) | Limited (no service worker, basic processing |
| Android (Chrome) | Full support |
| iPad (Safari) | Supported) varies by model |
On mobile devices, processing is slower (typically 30–120 seconds per image) due to memory and thermal constraints. For batch work, a desktop is recommended.
## Related
- [Browser support](/help/browser-support)
- [General troubleshooting](/help/troubleshooting)
---
### Working with Photoshop
URL: https://bgremover.novusstreamsolutions.com/help/working-with-photoshop
Category: Workflows & Integrations
## The quick answer
Export from NSS as **PNG**. Open it in Photoshop with **File → Open** (not Place). You should see a checkerboard pattern behind your subject. That means the transparency is working correctly.
## Why NSS exports work in Photoshop
Photoshop expects **straight alpha** (also called unassociated alpha). NSS always exports straight alpha. The RGB values of each pixel are the actual, un-multiplied colour values, and the Alpha channel records opacity separately.
Many other background removal tools export premultiplied alpha by mistake, which causes the famous "black background in Photoshop" problem. NSS verifies straight alpha on every export before delivering the download. See [Why does my export show black in Photoshop?](/help/why-my-export-shows-black-in-photoshop) for the technical explanation.
## Step-by-step import
1. Export your image from NSS as **PNG** (recommended) or **WebP**
2. In Photoshop: **File → Open** → select the file
3. The image opens as a single layer with the checkerboard indicating transparency
4. Optional: double-click the layer to unlock it (converts "Background" to a regular layer)
5. You can now composite it over other layers, adjust it, etc.
## Using as a Smart Object
For non-destructive workflows:
1. Open your main Photoshop document
2. **File → Place Embedded** → select your NSS PNG
3. The cutout becomes a Smart Object layer you can transform, mask, and apply Smart Filters to
## Checking the alpha channel
To verify the alpha channel is correct:
1. Open the file
2. Go to **Window → Channels**
3. Click the **Alpha 1** channel
4. You should see the mask: white = opaque, black = transparent, grey = partially transparent
5. Grey areas (soft edges) confirm straight alpha with smooth transitions
If the Alpha channel is binary (only black and white with no grey), the export may be treating soft edges as hard. Make sure "Preserve soft edges" is on in NSS Edge Refinement before exporting.
## Colour profiles
If your image was photographed in Display P3 or AdobeRGB, NSS detects the ICC profile and preserves it. When you open the file in Photoshop:
- If Photoshop's colour settings match the embedded profile, colours will be accurate
- If there's a mismatch, Photoshop will ask whether to convert or keep the embedded profile: choose **Use Embedded** to maintain the original colours
See [Colour accuracy and ICC profiles](/help/color-accuracy) for more detail.
## AVIF in Photoshop
AVIF support in Photoshop varies by version. Photoshop 25.x and newer support AVIF via the Camera Raw plugin. If your version doesn't support AVIF, export as PNG instead.
## Common workflows
**E-commerce product photo:**
1. Export white-background JPG: NSS → Replace Background (white) → Export with background → JPG
2. Or: export transparent PNG → open in Photoshop → flatten onto a new white Background layer
**Magazine compositing:**
1. Export PNG from NSS
2. Open in Photoshop → place over your background image layer
3. Use Layer Masks to blend if needed
**Sticker / icon design:**
1. Export PNG from NSS
2. In Photoshop, go to Layer → Layer Style → Stroke if you want an outline
## Related
- [Why does my export show black in Photoshop?](/help/why-my-export-shows-black-in-photoshop)
- [Colour accuracy and ICC profiles](/help/color-accuracy)
- [Exporting with transparency](/help/exporting-with-transparency)
---
### Working with Figma
URL: https://bgremover.novusstreamsolutions.com/help/working-with-figma
Category: Workflows & Integrations
## Importing your cutout
1. Export your image from NSS as **PNG** or **WebP** (both work well in Figma)
2. In Figma: drag the file onto your canvas, or use **File → Place image**
3. The transparent areas are immediately visible against the canvas background
Figma handles straight-alpha transparency natively. NSS exports are fully compatible.
## Choosing PNG vs WebP
Both formats support transparency. For most Figma workflows, **PNG** is the safest choice:
- Universal compatibility, always works
- Lossless, no quality degradation
**WebP** is a good option if you're working in Figma and then exporting optimised assets for web. WebP is smaller and your design handoff stays at web-native quality.
## Best practices in Figma
### Keep the layer unlocked
Figma imports images as image fills inside a frame. To work with the transparency properly:
1. Click the frame containing your image
2. In the Fill panel on the right, confirm the fill type is "Image"
3. The transparency works through Figma's compositing automatically
### Using as a component
For product photos or brand assets you'll reuse:
1. Import the cutout
2. Wrap it in a Component (Ctrl+Alt+K / Cmd+Option+K)
3. Instances maintain the transparent background
### Overlaying on backgrounds
Simply place your cutout layer over a background layer. The transparency composites correctly. No "multiply" blend mode tricks needed. Straight alpha works directly in Normal blend mode.
## Exporting from Figma with the cutout
If you're using Figma as a compositing step and need to re-export:
1. Select your composition frame
2. In the Export panel, choose PNG (preserves transparency from your NSS cutout)
3. Choose 2x or 3x for retina/high-DPI output
## Figma Dev Mode
When handing off to developers, the exported PNG from Figma will include your cutout's transparency if you're using a PNG fill. Make sure the developer exports as PNG, not JPG (which flattens transparency to white).
## Related
- [Exporting with transparency](/help/exporting-with-transparency)
- [Supported image formats](/help/supported-formats)
- [Working with Canva](/help/working-with-canva)
---
### Working with Canva
URL: https://bgremover.novusstreamsolutions.com/help/working-with-canva
Category: Workflows & Integrations
## Importing into Canva
1. Export your image from NSS as **PNG** (most compatible with Canva)
2. In Canva, open your design
3. Click **Uploads** in the left sidebar
4. Click **Upload files** and select your PNG
5. Drag the uploaded image onto your canvas
The transparent areas should show the canvas background through. No extra steps required.
## Canva and PNG transparency
Canva supports PNG transparency natively. When you place a transparent PNG from NSS on a Canva canvas:
- The background of your Canva design shows through the transparent areas
- You can place the cutout over any background, gradient, or photo in Canva
- The transparency is preserved if you download your design as PNG
## Download from Canva with transparency preserved
If you're using your cutout in Canva and need to keep transparency in the final download:
1. **File → Download**
2. Choose **PNG** as the file type
3. Check **Transparent background** (if your Canva design has a transparent background)
4. Click Download
Note: if your Canva design has a coloured background, the transparency is composited onto that colour at export.
## Canva Pro vs free
Canva's built-in background remover requires a Pro subscription and processes images on Canva's servers. NSS is free and processes everything locally in your browser.
If you use Canva Pro's background remover, you may encounter premultiplied alpha issues in some workflows. NSS exports don't have this problem, but once you've placed the image in Canva and Canva re-exports it, the alpha behaviour depends on Canva's own export pipeline (generally fine for PNG).
## Common Canva use cases
**Social media graphic:**
1. Create a new design at the platform's dimensions (e.g., 1080×1080 for Instagram)
2. Add a gradient or photo background from Canva's library
3. Upload your NSS cutout and place it over the background
**Presentation slide:**
1. Use your NSS cutout to place a product or person on a clean slide background
2. Add text and design elements around it
**Canva template with your product:**
1. Find a product mockup template in Canva
2. Replace the placeholder product image with your transparent cutout
3. The product sits naturally in the scene
## Known Canva limitation
Canva does not currently support AVIF uploads. Stick to PNG or WebP when uploading to Canva.
## Related
- [Exporting with transparency](/help/exporting-with-transparency)
- [Working with Figma](/help/working-with-figma)
- [Supported image formats](/help/supported-formats)
---
### Managing file sizes
URL: https://bgremover.novusstreamsolutions.com/help/file-size-management
Category: Advanced
## Format comparison
For a typical 1000×800 px product cutout:
| Format | Typical size | Notes |
|--------|-------------|-------|
| PNG | 200–800 KB | Lossless; size depends heavily on image complexity |
| WebP (q80) | 40–150 KB | Good quality, significant size reduction |
| AVIF (q70) | 20–80 KB | Excellent quality, smallest size |
| JPG (q85) | 30–120 KB | No transparency, for when you include a background |
Note: these are rough estimates. Highly detailed images (hair, complex textures) will be larger; simple shapes (logos, icons) will be smaller.
## When to use each format
### PNG: use for
- Source files for design work
- Photoshop, Affinity, print workflows
- When absolute quality matters and file size doesn't
- Logos and icons (lossless preserves crisp edges)
- When you're unsure what the recipient's software supports
### WebP: use for
- Web publishing (product pages, blog images)
- Social media that supports WebP (most modern platforms)
- When you need transparency AND smaller file sizes
- Figma export for web handoff
### AVIF (use for
- Modern web publishing where you control the pipeline
- When every KB matters (mobile pages, slow connections)
- Chrome/Firefox/Edge users (wide support as of 2024)
### JPG) use for
- Amazon product photos (requires white background anyway)
- Email attachments
- Platforms that don't support PNG/WebP
- Sharing to non-technical recipients
## Quality settings
For WebP and AVIF, the quality slider (1–100) controls the compression level:
| Quality | Use case |
|---------|---------|
| 90–100 | Near-lossless, large files (use for source assets |
| 75–85 | Recommended sweet spot for web use |
| 60–74 | Noticeably smaller, minor quality reduction |
| Below 60 | Significant quality loss) not recommended for cutouts |
For cutouts with soft, transparent edges, compression artefacts show up more obviously near semi-transparent pixels. Keep quality above 75 for best edge results.
## PNG compression
PNG is always lossless, but you can reduce file size by changing the canvas area:
- Crop tightly to your subject before processing if you don't need extra canvas space
- PNG file size is proportional to the number of fully transparent pixels: a tightly cropped cutout is smaller than one with a large transparent border
## Tips for batch exports
When exporting a batch as ZIP, all images use the same format and quality setting. To minimise ZIP size:
- Use WebP at quality 80 for most web product photos
- Use PNG only for deliverables that must be lossless
- Large images are the main driver of ZIP size: consider resizing before uploading if you don't need 4K exports
## Related
- [Supported image formats](/help/supported-formats)
- [Exporting with transparency](/help/exporting-with-transparency)
- [Uploading images and the queue](/help/uploading-images)
---
### Colour accuracy and ICC profiles
URL: https://bgremover.novusstreamsolutions.com/help/color-accuracy
Category: Advanced
## What is an ICC profile?
An ICC (International Colour Consortium) profile is metadata embedded in an image file that describes the colour space it was captured in. The most common profile is sRGB, which covers the colours most monitors can display. Professional cameras, iPhones, and many modern monitors also support wider colour spaces like Display P3 (which covers ~25% more colours than sRGB).
Without reading the ICC profile, a wide-gamut image can look washed out or over-saturated when displayed or edited in an app that doesn't know the colour space.
## How NSS handles colour profiles
1. **Detection:** NSS reads the ICC profile from the raw file bytes before decoding
2. **Preservation:** The profile is stored and attached to the exported file
3. **Warning:** If a non-sRGB profile is detected, a notice is shown in the editor
4. **Correct decoding:** Images are decoded with `colorSpaceConversion: 'none'` to prevent the browser from silently converting colours
The AI inference runs on the raw pixel data, and the ICC profile is reattached at export. Your colours are not modified.
## Wide-gamut images (Display P3, AdobeRGB)
If you're photographing with an iPhone in its default mode, your photos are likely Display P3. NSS:
1. Detects the P3 profile
2. Shows a notice: "Wide-gamut image detected (Display P3)"
3. Processes the image without converting colours
4. Exports with the original P3 profile preserved
When you open this file in Photoshop or Figma (both P3-aware), the colours will look correct. If you open it in a browser or tool that doesn't support P3, it may look slightly different.
## Converting to sRGB
NSS does not convert colour spaces automatically. That's a deliberate choice. Colour space conversion involves trade-offs (gamut clipping, rendering intent) that you should control.
If you need an sRGB export for maximum compatibility:
1. Export the PNG from NSS with the original profile
2. Open in Photoshop
3. Edit → Convert to Profile → sRGB IEC61966-2.1
4. Save/export from Photoshop
Or, if you're shooting on iPhone: in Camera settings, you can capture in sRGB instead of P3 by disabling HDR and Photo formats → Most Compatible.
## Colour spill and decontamination
Colour accuracy issues at edges are usually caused by colour spill (background colour bleeding into subject edges) rather than ICC profile issues. If you see colour shifts near edges, use [Decontaminate in Edge Refinement](/help/edge-refinement), it operates in Lab colour space and corrects spill without affecting the overall colour profile.
## Related
- [Edge refinement](/help/edge-refinement)
- [Why does my image have a halo?](/help/why-my-image-has-a-halo)
- [Working with Photoshop](/help/working-with-photoshop)
---
### Glossary
URL: https://bgremover.novusstreamsolutions.com/help/glossary
Category: Advanced
## Alpha channel
The fourth channel in an RGBA image (alongside Red, Green, Blue) that stores transparency information. Values range from 0 (fully transparent) to 255 (fully opaque), with every value in between for partial transparency. The alpha channel is what makes a PNG "see-through."
## Straight alpha
Also called *unassociated alpha* or *non-premultiplied alpha*. In straight alpha, the RGB values of a pixel represent its true colour, independent of how transparent it is. A pixel that is 50% transparent still has its full original colour in RGB. This is the correct format for compositing in professional tools like Photoshop. NSS always exports straight alpha.
## Premultiplied alpha
Also called *associated alpha*. In premultiplied alpha, the RGB values have been multiplied by the alpha value before storage. A pixel that is 50% transparent has RGB values that are half their true colour values. A fully transparent pixel has RGB = 0, 0, 0. When a Photoshop user opens a premultiplied PNG, these zero-RGB transparent pixels appear black. This is the cause of the "black background" problem common with other background removal tools.
## Mask
A grayscale representation of the selection, which pixels belong to the subject and which belong to the background. In NSS, the mask is stored as a `Float32Array` of values from 0.0 (background) to 1.0 (subject). It's kept separate from the image data until the final export.
## Float32Array
A JavaScript typed array where each element is a 32-bit floating-point number. NSS stores the mask in Float32Array throughout the pipeline to avoid the rounding errors that would occur if converted to 8-bit integer (0–255) values prematurely. Only at the final export step are mask values quantised to integers.
## WebGPU
A modern web API that allows JavaScript to run code on the device's graphics processing unit (GPU). NSS uses WebGPU to accelerate AI inference, making it 5–20x faster than running on the CPU. Available in Chrome, Edge, and Opera 94+.
## WebAssembly (WASM)
A binary format that allows code written in languages like C/C++/Rust to run in the browser at near-native speed. NSS falls back to WASM for AI inference when WebGPU isn't available. WASM is supported in all modern browsers.
## SharedArrayBuffer
A JavaScript feature that enables shared memory between the main thread and web workers, making multi-threaded WASM possible. NSS does not currently use it for ONNX Runtime or ffmpeg; both media runtimes are deliberately single-threaded.
## Decontamination
The process of removing background colour that has bled into subject edge pixels, called "colour spill." NSS's decontamination algorithm works in Lab colour space to identify and correct spill without affecting opaque subject areas.
## Feathering
Softening the edge of a mask by applying a Gaussian blur to the boundary. Creates a smooth, gradual transition from opaque to transparent instead of a hard cutoff.
## ICC profile
International Colour Consortium profile: metadata embedded in image files that describes the colour space the image was captured in. Common profiles include sRGB (standard), Display P3 (wide gamut, used by iPhones), and AdobeRGB (professional photography). NSS reads and preserves ICC profiles so colours remain accurate.
## Inference
The process of running an input image through the AI model to produce an output, in this case, a mask separating the subject from the background. Each inference run produces one mask for one image.
## ONNX
Open Neural Network Exchange. An open format for AI models. NSS uses ONNX-format ORMBG and BiRefNet models, which can be loaded and run by Transformers.js in the browser.
## ORMBG
The primary "Fast" AI model used by NSS for background removal. Released under Apache-2.0 and distributed by onnx-community. ~45 MB quantized download. Good for general photos, products, people, and fast inference.
## BiRefNet
The "Best Quality" AI model used by NSS. Its browser-ready 512px export preserves finer detail on hair, fur, and complex edges. It downloads ~99 MB for WebGPU or up to ~192 MB for the CPU compatibility path. Released under the MIT licence.
## Lab colour space
A colour model where L represents lightness, and a and b represent colour channels. Lab is designed to be perceptually uniform: equal numerical differences correspond to equal perceived colour differences. NSS's decontamination algorithm uses Lab because it makes "shift this colour toward another" operations behave predictably.
## Service worker
A JavaScript file that runs in the background of your browser, separate from the page. NSS uses a service worker to cache the app shell and AI model files, enabling offline use.
## Progressive Web App (PWA)
A web application that can be installed on your device and used like a native app: with its own window, icon, and offline capability. NSS supports PWA installation on desktop (Chrome, Edge) and mobile (Chrome for Android, Safari for iOS).
## Related
- [Why does my export show black in Photoshop?](/help/why-my-export-shows-black-in-photoshop)
- [Colour accuracy and ICC profiles](/help/color-accuracy)
- [Browser support](/help/browser-support)
## Blog posts
### How to Remove and Replace Objects in Photos Without Uploading Them
URL: https://bgremover.novusstreamsolutions.com/blog/remove-and-replace-objects-in-photos-without-uploading
Published: 2026-08-20 | Category: Tutorials | Author: Novus Stream Solutions Editorial Team
Removing an object and replacing an object are two different jobs that are too often hidden behind the same magic-looking button.
Removal needs a trustworthy answer to two questions: *which pixels belong to the object*, and *what should occupy the hole after those pixels are gone?* Replacement adds a third: *how should a real new subject sit in that scene?* If any one of those answers is guessed silently, the polished preview can conceal a weak edit.
The [Object Remove & Replace tool](/tools/remove-object) keeps those decisions visible. You select and refine the mask, choose the fill path, inspect the result, then optionally import a separate local asset as a transformable layer. The source photo and replacement asset remain in your browser.
## Selection comes before inpainting
The old failure mode was simple: draw a rough shape in the middle of the image, call an inpainting model, and hope the intended object happened to be inside it. Sometimes the output looked like paint smeared across the subject because that was effectively what the mask asked the model to do.
The rebuilt workflow uses Google MediaPipe’s stateful [Interactive Image Segmenter](https://developers.google.com/edge/mediapipe/solutions/vision/interactive_segmenter/web_js). A positive stroke says “include this”; a negative stroke says “exclude this.” The segmenter returns a confidence mask matching the image, and each additional stroke refines the same selection rather than starting over.
That first result is still a draft. The tool also provides:
- a lasso for objects with a clear silhouette;
- a brush for adding missed areas;
- an erase brush for removing spill from the background;
- mask expansion to reach beneath the object edge; and
- feathering to make the final composite meet the original pixels gradually.
No mask means no run. An empty selection never becomes a default ellipse, and a mask with the wrong dimensions is rejected rather than stretched over the photograph.
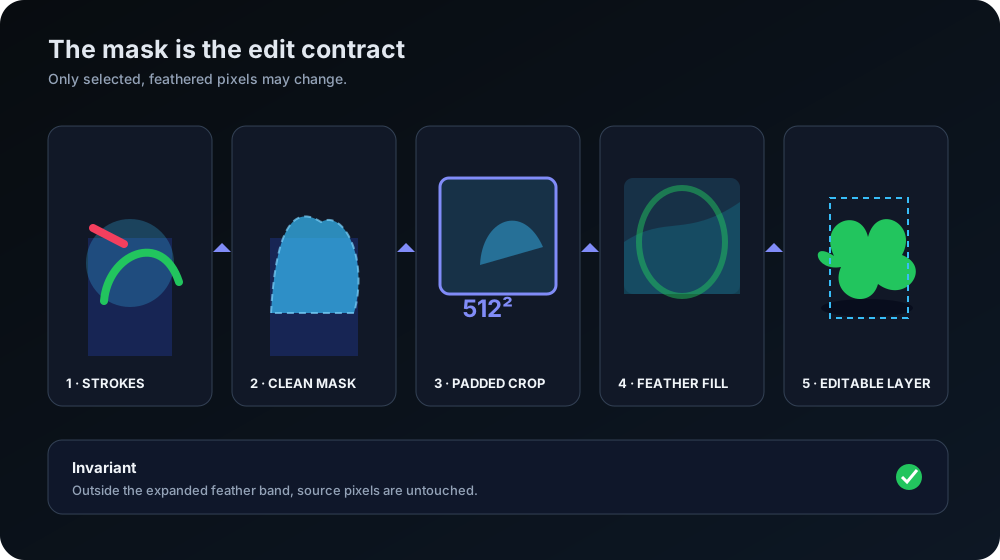
## Why the hole is processed as a crop
The consent-gated removal path uses LaMa, an inpainting network whose browser ONNX port has a fixed 512 × 512 input. The naive implementation resizes the entire photograph to that square, processes it, and stretches the answer back. A landscape photo becomes temporarily distorted, fine detail outside the object is needlessly resampled, and the output can change pixels nowhere near the selection.
This workflow takes a tighter route:
1. Find the mask bounds.
2. Expand them enough to show the surrounding texture the fill must continue.
3. Pad that region to a square without distorting its contents.
4. Resize only that crop to 512 × 512 for inference.
5. Return the result to the original crop size.
6. Composite only through the expanded, feathered mask.
Pixels outside that feather band remain byte-for-byte source pixels. A very large selection may be refused or flagged because a small fixed model asked to invent most of a full-resolution photograph is not a robust edit.
The one-time LaMa download is requested only after explicit consent and then cached locally. The model is based on the fixed-input [Carve LaMa ONNX port](https://huggingface.co/Carve/LaMa-ONNX/blob/main/README.md). If you decline or the model cannot run, the tool offers a clearly named boundary-inward neighbour fill. That no-download fallback is limited to tiny marks surrounded by simple, repetitive colour or texture; it can smear structure, is not PatchMatch, and is not represented as equivalent AI reconstruction.
## Removal is plausible reconstruction, not recovery
An inpainting result is invented from context. Over sky, plaster, foliage or soft depth of field, that invention can be nearly invisible. Across text, faces, repeated architecture or the edge of another object, it can be confidently wrong.
The useful test is not “does the hole look smooth?” It is:
- Do repeated lines continue with the right spacing?
- Did the fill duplicate a nearby object?
- Does grain and noise match at 100%?
- Is there a soft halo around the mask?
- Did anything outside the selection change?
If the hidden content matters as evidence, do not remove it. Crop, blur, or preserve the original instead.
## Replacement means importing a real asset
Typing “put a red vase here” would require a large generative model and would still make the edit depend on a prompt interpretation. The free browser workflow deliberately does not pretend a palette-based patch is prompt generation.
Instead, replacement is a dependable layer operation:
1. Remove the original object and approve the fill.
2. Import a photograph or graphic of the replacement from your device.
3. Remove that asset’s background locally when it needs a cutout.
4. Place it as a separate editor layer.
5. Adjust position, scale and rotation.
6. Tune edge softness, colour balance, lighting and shadow until it belongs in the scene.
Because the replacement stays a layer, you can move it after seeing the composition, lower its opacity to align perspective, and undo it without running removal again. The source asset is not flattened until export.
## Matching the scene is the real work
A technically clean cutout can still look pasted in. Work through the mismatch in this order:
**Perspective and scale.** Compare the replacement to objects sitting on the same plane, not to the whole frame. Converging lines and horizon height usually expose the wrong scale first.
**Contact shadow.** A small, soft shadow under the object tells the eye where it touches the surface. Its direction must agree with other shadows in the photograph.
**Colour temperature.** A cool studio product dropped into a warm room needs colour adjustment before more edge work.
**Edge character.** A sharp product cutout in a motion-soft phone photo looks synthetic. Match the source sharpness and grain instead of maximising crispness.
**Occlusion.** If part of the new asset should sit behind a foreground object, use layer order and a mask. Shrinking the whole asset until it avoids the overlap breaks the composition.
## One apply, one undo point
Experimentation is only safe when the editor records clear boundaries. Applying the removal or the replacement creates one history operation after the result succeeds. Cancelling, switching tools, replacing the file or navigating away invalidates the in-flight run so a late model response cannot overwrite newer work.
Before export, use undo and redo once. That is a practical integrity test: the original state should return exactly, the approved state should return exactly, and the exported pixels should match the visible composite rather than an earlier preview buffer.
## A reliable sequence
1. Open the best available source in [Object Remove & Replace](/tools/remove-object) or launch it from the [Image Editor](/editor).
2. Mark the object with a positive stroke, then use negative strokes and the brush to clean the mask.
3. Expand the mask enough to cover the object edge; add feather only after the silhouette is correct.
4. Approve LaMa if you want the model path, or choose the labelled neighbour fill only for a tiny, simple repair.
5. Inspect the full-resolution result outside and inside the feather band.
6. If replacing, import a real local asset and treat it as a layer.
7. Match perspective, shadow, colour and edge character.
8. Apply once, verify undo/redo, and export the visible result.
The expensive-looking part is the fill. In practice, the mask and the scene match determine whether the edit holds up. Keeping both visible is what turns object removal from a one-click gamble into a controlled editing workflow.
---
### From Long Video to Captioned Highlights: A Browser-Local Workflow
URL: https://bgremover.novusstreamsolutions.com/blog/turn-long-videos-into-captioned-highlights-in-browser
Published: 2026-08-20 | Category: Tutorials | Author: Novus Stream Solutions Editorial Team
A useful highlight is not simply the loudest thirty seconds of a recording, and a useful caption track is not an unedited transcript broken wherever a model happened to pause.
The browser-local workflow separates those decisions. [Auto Highlights](/tools/auto-highlights) proposes chronological ranges from the latest edited clip; you review and adjust them before any encode. [Auto Subtitles](/tools/auto-subtitles) decodes that same current clip, transcribes its audio locally, and gives you timed cues to correct before exporting SRT, WebVTT, text, or an optional burned-in video.
Nothing is uploaded. That privacy boundary is useful for interviews, customer footage and unpublished work, but it also makes device limits visible: model downloads, memory and encoding time belong to your browser rather than a remote render farm.
## Start with the latest edited clip
Trim dead material and make structural edits first in the [Video Editor](/video-editor). Both tools operate on the current output blob, not the original upload hidden behind it. That sounds obvious; it prevents a subtle class of failures where captions refer to speech you already cut or highlights silently restore an earlier version.
The editor passes the workflow:
- the latest video blob;
- decoded mono audio and its sample rate;
- whether an audio stream exists;
- source duration and dimensions; and
- whether the video carries transparency that an output codec must preserve or explicitly composite.
Changing the file or tool invalidates an in-flight result. A late worker message from the old clip is discarded instead of becoming a caption track on the new one.
## Highlights are a proposal, not an automatic cut
Choose a target of 15, 30 or 60 seconds and one scoring mode:
| Mode | Signals it favours | Best starting point |
| --- | --- | --- |
| Motion | frame-to-frame visual change | sport, demonstrations, action |
| Visual prominence | luma structure and centre contrast | visually structured tutorials and product clips |
| Speech | detected voice activity and speaking density | interviews, lectures, presentations |
| Mixed | a balanced combination of all available signals | unfamiliar or varied footage |
Speech mode is only meaningful when speech is actually scored. The workflow runs local voice-activity analysis over decoded audio; it does not relabel volume as “speech.” Silent clips remain valid for Motion and Visual prominence, while a missing audio stream disables speech-dependent scoring rather than throwing an encode error.
Scene boundaries and scores become cards in chronological order. Each card shows a thumbnail, the proposed numeric range, and why it ranked. You can include or remove it and edit its start and end times, then verify the rendered result in the output player before publishing.
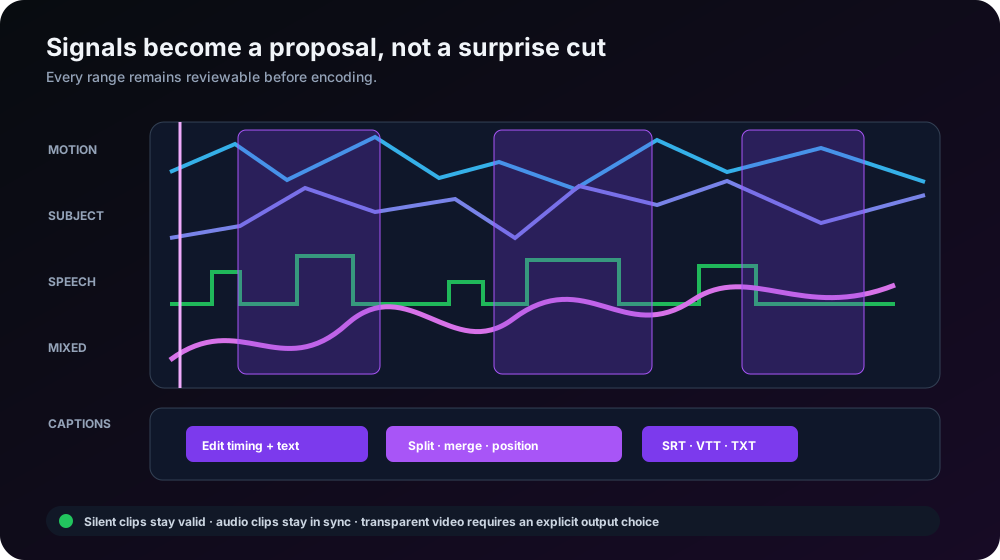
## How to judge a proposed cut
The highest numerical score is not always the moment a viewer needs. Check four things:
**The action has a beginning and an end.** A product reveal that starts after the hand enters frame feels clipped even if the motion peak sits in the middle.
**Speech is not cut mid-sentence.** Move boundaries to nearby pauses. A five-second duration tolerance is more valuable than hitting exactly 30.000 seconds with a broken thought.
**Tiny fragments are removed.** Several half-second peaks create a frantic montage and increase the risk of audio discontinuity. The planner rejects micro-clips and prefers ranges long enough to understand.
**Chronology still makes sense.** Highlights are ranked by interest but presented and encoded in source order. Reordering an explanation after its result may score well and communicate badly.
When enough suitable material exists, the accepted duration stays within five seconds of the target. A ten-second source cannot honestly produce a sixty-second highlight, and the interface reports that limitation instead of duplicating footage.
## Transcription has a separate consent boundary
Auto Subtitles uses a pinned, quantized Whisper browser model. OpenAI describes Whisper as a general-purpose system for multilingual recognition, translation and language identification in its [official project documentation](https://github.com/openai/whisper/blob/main/README.md). This browser workflow deliberately asks you to choose the spoken language: the pinned JavaScript wrapper can transcribe multiple languages but does not currently expose reliable automatic language identification. The task is transcription, preserving what was spoken rather than silently translating it.
The first run names the exact model revision and measured files before asking permission. Declining makes no request. A cached model can run offline; a cold offline browser explains that the required files are unavailable. WebGPU can accelerate browser inference through Transformers.js, but support varies, so the readiness state distinguishes accelerated and slower supported paths rather than promising the same timing everywhere. See the official [Transformers.js WebGPU guide](https://huggingface.co/docs/transformers.js/en/guides/webgpu).
Cancel really means stop. The transcription worker is terminated and recreated so inference does not continue invisibly after the UI says it ended.
## A transcript becomes captions through editing
Speech recognition returns text with time information. The editor stores that as one typed caption track, not hundreds of disconnected text overlays. Each cue has:
- an identifier;
- editable text;
- a start and end time;
- position and alignment;
- style values; and
- track-level defaults that “apply to all” can update intentionally.
From there you can split a long cue at its midpoint, enter exact start and end times, merge an awkward fragment with its neighbour, or delete false speech without regenerating the transcript.
Review names, numbers, product terms and punctuation first. Then check cue length. A grammatically complete sentence can still be too wide for a vertical video, while breaking every phrase into two words makes reading exhausting.
## SRT, WebVTT, text or burned-in video
External caption files remain editable and accessible to a video player. SRT is the common interchange option. WebVTT is the web-native timed-text format; its cues are ordered by start time and each end must come after its start, as defined by the [W3C WebVTT specification](https://www.w3.org/TR/webvtt1/). Plain text is useful for review and copy, but it has no timing.
Burn-in draws the approved cues into the video frames. It works on platforms that ignore caption tracks, but the words cannot be switched off, translated or restyled later. Keep the external caption file even when you export a burned version.
Caption styling should solve readability rather than imitate a poster:
- use high contrast and a restrained background or shadow;
- keep cues inside the platform safe area;
- test the smallest destination size;
- avoid covering faces, demonstrations and existing lower thirds; and
- apply global changes through the track, then override only genuine exceptions.
## Audio and transparency are part of the result contract
Highlight encoding preserves the source audio and checks sync across every concatenated range. A silent source takes a video-only encoding path instead of failing because an audio stream was assumed.
Transparent WebM needs an explicit choice. Preserve alpha in a compatible WebM output or choose the background that should be composited. Flattening transparent pixels to black without asking is not a successful highlight.
Encoding happens locally through ffmpeg.wasm, a browser WebAssembly port of FFmpeg described in its [official overview](https://ffmpegwasm.netlify.app/docs/overview/). Local encoding avoids upload latency and server copies, but it is slower than native desktop FFmpeg and consumes browser memory. Shorten and review ranges before the final encode rather than rendering every experiment.
## A workflow that survives review
1. Open the source in the [Video Editor](/video-editor), trim obvious dead time, and save the current edited state.
2. Run Auto Highlights with a 15, 30 or 60 second target and the scoring mode that matches the footage.
3. Review every scene card, remove weak ranges, and move boundaries to complete actions and pauses.
4. Encode once; confirm duration, picture order, audio continuity and transparency handling.
5. Run Auto Subtitles on that latest highlight clip.
6. Approve the pinned model only if you want the local transcription path.
7. Confirm the selected source language, correct the words, then split, merge and time cues while watching the clip.
8. Export SRT and WebVTT for reuse. Burn captions only when the destination requires visible text in the pixels.
9. Use one undo operation to return to the pre-highlight timeline and verify the accepted state can be restored exactly.
Automation is most useful when it turns an unstructured hour into a reviewable proposal. The human decision stays where it belongs: which moments tell the story, and which words a viewer should actually read.
---
### Why Sharpening a Cutout Draws a Halo Around Fur
URL: https://bgremover.novusstreamsolutions.com/blog/why-sharpening-a-cutout-draws-a-halo-around-fur
Published: 2026-08-08 | Category: Technical Deep Dives | Author: Novus Stream Solutions Editorial Team
Take a cutout of a long-haired cat, run it through an upscaler in photo mode, and look at the fur. There is a good chance you will find a bright rim tracing the silhouette. Brightest exactly where the hair is wispiest, fading out a couple of pixels in. It looks like the AI hallucinated a glow.
It did not. The super-resolution model never saw the transparency, and the halo is not in its output. It is added afterwards, by a sharpening pass, and the reason is a single assumption that holds for every ordinary photograph and fails for every cutout.
## Unsharp masking, and the assumption underneath it
The standard way to sharpen an image is the unsharp mask, which is less exotic than the name suggests. Blur a copy of the image. Subtract the blurred version from the original. What remains is the fine detail: the parts that changed most under the blur. Add a multiple of that difference back onto the original and the detail is exaggerated:
```
result = original + amount × (original − blurred)
```
Where the image is flat, `original − blurred` is zero and nothing happens. Where there is an edge, the blurred copy has smeared it, the difference is large, and the edge gets steeper. This is the whole algorithm, and it works well.
It also quietly assumes that every pixel inside the blur window is part of the picture. For a photograph, that is true by definition. There is no such thing as a pixel that is not part of a photograph.
## A cutout is full of pixels that are not part of the picture
An image with transparency carries colour and an alpha channel, and the colour that sits underneath a fully transparent pixel is not meaningful. Nothing is showing there. The trouble is that it is not absent either. It is some specific number, and once the image has been through a canvas, that number is black.
Canvases store colour premultiplied by alpha. The image data you read back out is unpremultiplied again, so the subject keeps its colour right up to the edge, but the round trip is lossy in a way that depends on alpha: dividing by a small alpha to undo the multiply amplifies the rounding, so the damage grows as a pixel gets more transparent. At alpha 0 there is nothing left to divide back out and the recovery is total loss. The colour comes back as black, whatever the subject was.
So a cutout arriving at the sharpener looks like this: solid subject, a band of partial-alpha fur, then a cliff to black.
## The cliff is what makes the rim
Put the blur window on a pixel just inside the silhouette. With a five-tap kernel, that window reaches two pixels out. Far enough to include some of the black. The blur averages it in and reads far darker than the pixel really is.
Now run the arithmetic. `original − blurred` is a large positive number, not because there was any detail there, but because the blur was contaminated. The pixel gets pushed brighter. Do that along the whole silhouette and you get a rim of brightening, and on the partial-alpha pixels that make up fur and hair, that rim is the reported halo.
Two details of the symptom fall straight out of the mechanism. The halo is *local*, because with a five-tap kernel only pixels within two of the transparent region can see the black at all, which is why it reads as a glow around the fur rather than a general brightening of the animal. And it is worst on fur specifically, because wispy edges have the most partial-alpha pixels sitting next to the cliff.
## Why it reached the final image
Two things made it stick.
The sharpening ran *after* the joint-bilateral upsample that produces the final alpha, so the silhouette was already frozen by the time the damage was applied. Nothing downstream had any opportunity to notice or undo it.
And photo mode does not sharpen once. Every AI pass ends with an unsharp, the 4× cascade adds one more between its two passes, and the default finishing chain adds a last one on the final pixels. Each pass reads the output of the one before it. An error that reappears every pass does not stay a faint rim.
The pass itself was also duplicated (one copy in the Real-ESRGAN wrapper, another in the upscale worker), so there were two places to fix and two places for a fix to be missed. Both now call one shared implementation.
## What alpha-weighted sharpening does instead
Two changes, and the whole fix is in them.
**The blur is weighted by alpha.** Each neighbour contributes to the blur in proportion to how opaque it is, and the total is divided by the sum of those weights rather than the sum of the kernel taps. A fully transparent neighbour contributes exactly nothing and adds nothing to the divisor. The black behind the cutout cannot cross the silhouette, because it is never in the average in the first place. There is no contamination, so there is nothing to overshoot against.
**The sharpening amount is scaled by the pixel's own alpha.** A pixel that is thirty percent opaque is mostly background, and cranking its contrast manufactures detail that was never in the source. Scaling the amount by alpha means the correction fades out exactly as the pixel does.
Two smaller decisions matter more than they look. The blur is separable, a horizontal pass then a vertical one, and the alpha-weighted colour sums and the weights are both carried through *both* passes and normalised only at the very end. Normalising after the horizontal pass would turn the intermediate back into a plain colour image and re-admit precisely the bleed the function exists to prevent. And where a window contains no opaque pixel anywhere, the divisor is approximately zero; rather than divide by it, the pixel is left exactly as it arrived. Alpha itself is never modified, and fully transparent pixels come back byte for byte unchanged.
## The property that made it safe to ship
Nearly every upscale is an ordinary opaque photograph, and a fix for cutouts that perturbed those would be a bad trade.
It does not perturb them, and not by being careful: by arithmetic. On a fully opaque image every alpha weight is 1, so the weighted sum is the plain sum, the normalisation divides by the same total the plain version divides by, and the amount is scaled by 1. Every term collapses. The alpha-weighted unsharp *is* the plain unsharp on opaque input, exactly.
That is pinned by a regression test rather than asserted in a comment: the new implementation is compared byte for byte against a preserved copy of the old alpha-blind code, across three kernels and four sharpening amounts, and required to match exactly. A companion test requires both of them to actually change the image, so the comparison cannot pass by doing nothing.
## What the numbers are, and what they were measured on
This is the part worth stating precisely, because it is easy to overclaim.
The measurements come from a **synthetic fixture**, not from photographs: a 24×24 image with a flat opaque subject, a linear partial-alpha band standing in for fur, and then transparency, with the premultiply-and-back round trip reproduced exactly so the black cliff is real rather than assumed. The subject is deliberately flat, which is what makes the measurement meaningful. A flat field contains no detail to sharpen, so *any* brightening of a visible pixel is manufactured contrast, and the halo can be read off directly as the largest such brightening.
On that fixture:
- The alpha-blind version overshoots by more than 10 levels at the silhouette.
- The alpha-weighted version stays at 1 level or below, which is the quantisation noise floor of the round trip itself.
- The reduction is **over 90%**, pinned as an assertion that the new peak is less than a tenth of the old one.
- Stacked four passes deep, the alpha-blind overshoot keeps growing pass over pass, while the alpha-weighted version stays at the noise floor no matter how many run.
What those numbers support is that the mechanism is understood and the fix removes it. They are not a measurement on real photographs, and they should not be read as one. A synthetic silhouette reproduces the cause cleanly, which is what a regression lock needs; it does not tell you how the fur on your particular cat looks at 4×.
## What this does not fix
Worth being explicit, because "halo" gets used loosely for several different edge artefacts.
Two tile-seam problems on the Swin2SR path are untouched by this work: tiles butted together with no feathering between them, and a joint-bilateral window that gets truncated at every core-tile edge. Those produce edge damage too, they are a genuinely separate mechanism, and attributing them properly needs a real fixture that reproduces them. They remain open.
If your cutout upscales have carried a bright fringe along hair or fur, the [upscaler](/upscale) is worth another run. And if what you are seeing is a coloured fringe rather than a bright one, that is a different mechanism with its own fix. [Edge decontamination](/blog/why-cutouts-get-a-colored-fringe-edge-decontamination) covers it.
---
### Restoring an Old Family Photo, End to End: Face First, Then Colour
URL: https://bgremover.novusstreamsolutions.com/blog/restore-then-colourise-an-old-family-photo
Published: 2026-08-08 | Category: Tutorials | Author: Novus Stream Solutions Editorial Team
You have a scan of a print. Someone's grandmother at about twenty, black and white, and her face is roughly sixty pixels across because the photographer stood too far back. The paper has gone warm and the whole thing is soft.
Two tools now exist that between them handle most of this, and the order they go in is not arbitrary. This is the whole workflow, including the part that decides whether you should use the output at all.
Everything below runs on your device. Nothing is uploaded, which for photographs of living relatives is not a small detail.
## Before anything: keep the original scan
Restoration is not a substitute for the file it came from. Every step below produces a new image and none of them improve on the scan as a *record*. They produce something more pleasant to look at, which is a different thing. Keep the raw scan, name it clearly, and treat the restored version as a derivative.
If you have not scanned the prints yet, the capture is the biggest single lever on the result and no editing recovers a bad one. That is its own job, covered in [bringing old, faded family photos back to life](/blog/restoring-old-faded-scanned-family-photos-in-browser).
## Step 1: neutralise the paper
If the scan is sepia-toned or the paper has yellowed, deal with that before anything else touches it.
The reason is specific: a colouriser reads sepia toning as *image content* rather than as a property of the paper. It sees a warm cast and treats it as information about the scene, and the colours it then predicts are built on top of a mistake. Converting to neutral grayscale first removes the false signal.
The [grayscale converter](/tools/grayscale) does a true luminance-based conversion, which is what you want here. Not a desaturation that leaves tonal weirdness behind. If your scan is already neutral black and white, skip this.
## Step 2: restore the face
Open [face restore](/tools/face-restore) and drop the image in.
What happens mechanically: the model is fixed at 512×512 and works on one aligned face, so the tool runs a landmark detector, takes the **first** face it returns, crops it with padding for hair and chin, restores that crop, and feather-pastes it back into the original image.
That is one face per run, and it is the thing to know before you point this at a family group. Everyone else in the frame comes back exactly as they went in, and the run costs the same whether the photo has one face in it or five. The [face restore help page](/help/ai-face-restore) records about 6.7 seconds on the CPU path. To restore a whole group, crop each person out of the scan and run them one at a time. If no face is detected at all, the whole image is processed as a single crop instead; the result is still an improvement, just not a face-specific one.
The model is GFPGAN v1.4 and it is a 340 MB one-time download, cached afterwards, and only fetched if you allow it. The readiness panel tells you what your device will actually do with it before anything is fetched.
You can decline. If you do, a classical bilateral + CLAHE + unsharp pipeline runs instantly instead. It evens out and sharpens what is already there and it invents nothing, which, as the next section explains, is sometimes exactly what you want.
## Step 3: understand what "restore" just did
This is the part to read before you use the output anywhere that matters, and it is more important than any of the mechanics above.
**GFPGAN does not recover the original pixels. They are gone.** It generates a plausible face consistent with what remains, using a prior learned from a very large number of other faces. That is a fundamentally different operation from sharpening or denoising, which only rearrange information already present.
On a soft or small photo the result usually looks like the person, because enough structure survived to constrain what the model could produce. On a severely degraded photo it will still produce a crisp, confident face, and that face may differ from the real person in ways you cannot detect by looking at the output. There is nothing in a restored image that flags which parts were reconstructed.
So the honest boundary is:
- **Right for a print you want to hang on a wall.** The face reads as the person, the detail is plausible, and the purpose is to look at it.
- **Wrong for identification.** It is not evidence, and it should never be used to decide who someone is.
If the second case is anywhere near your purpose, decline the model download and use the classical pipeline. It will give you less, and everything it gives you was really in the photograph.
## Step 4: colour, after the restore and not before
Now open [colorize](/tools/colorize).
The order matters, and there is a concrete reason for it. DDColor predicts only the colour channels and preserves the original luminance exactly. The luminance (the detail, the grain, the tonal range) passes through untouched. So whatever detail you recovered in step 2 is what the colour gets laid over. Colourise first and you would be predicting colour for a face you were about to replace, then throwing that work away.
That same property is why a colourised scan still prints like the black-and-white original: the grain and tonal range are the source's own, not the model's.
Realistic mode runs DDColor, a roughly 460 MB one-time download, gated behind the same consent prompt as face restore. If you would rather not, the instant palette styles (vintage, sepia, saturated and pastel), apply with no download at all. They are a look rather than a prediction, and for some photographs that is the more honest choice.
Use the built-in before/after slider on the result. Comparing against the original is how you catch the failures in the next section.
## Step 5: check the colours you can actually know
Colourisation produces confident, attractive output that can be simply wrong, and nothing in the image signals which parts to doubt. The photograph never recorded colour; the model predicts what is statistically likely.
What it is reliably good at: skin, hair, foliage and sky. These are consistent across the enormous number of photographs the model learned from, so an outdoor portrait usually comes back convincing.
What it cannot know: clothing, paint, vehicles, flags and signage could have been anything. Clothing in particular is a coin flip. If a specific colour matters (a uniform, a regiment, a livery), check a written source and correct it by hand rather than trusting the prediction.
And if the image is going anywhere public, memorial or archival, label it as a colourised interpretation. Whoever sees it next has no way to tell.
## Step 6: size it, only if you need to
If the print is destined for a frame and the scan is too small, [upscale](/upscale) it: last, after the corrections, not before. If the photograph is soft overall rather than just in the face, [deblur](/tools/deblur) addresses that specifically.
Neither is a required step. A well-scanned print at a sensible resolution often needs neither.
## The short version
1. Keep the raw scan. Everything else is a derivative.
2. Convert a sepia or yellowed scan to neutral grayscale first.
3. Restore the face (one per run, so crop a group shot per person), and decide whether a generated face is appropriate for your purpose before you accept it.
4. Colourise after restoring, never before; the luminance you recovered is what carries through.
5. Correct the colours that are knowable, and label the result as an interpretation.
6. Upscale last, and only if the print needs the size.
None of it touches the internet.
---
### Which Blurs Can Be Recovered, and Which Are Simply Gone
URL: https://bgremover.novusstreamsolutions.com/blog/which-blurs-can-be-recovered-and-which-are-gone
Published: 2026-08-08 | Category: Technical Deep Dives | Author: Novus Stream Solutions Editorial Team
There is a particular kind of photograph that makes people go looking for a deblur tool. One frame, of something that will not happen again, and it is soft. A child mid-laugh, a stage, a bird leaving a branch. You cannot reshoot it, so the only question is whether software can put back what the camera did not record.
The honest answer is that it depends entirely on *which* blur you have, and the difference is not cosmetic. Some blurs are a reversible operation with information still recoverable inside them. Others threw the information away. The two look identical when you are squinting at a thumbnail, which is why "can this be fixed" gets such unsatisfying answers.
## Blur is an average, which is why it is sometimes reversible
Every kind of blur is the same operation underneath: each pixel in the result is a weighted average of a neighbourhood of the pixels that should have been there.
Camera shake is the most literal case. During a 1/15s exposure the sensor keeps integrating while the camera drifts along some short path, so each photosite accumulates light from a smear of scene points along that path rather than one. A focus miss does the same thing with a different shape. Each point of light in the scene lands on the sensor as a small disc instead of a point, so every pixel is an average over that disc.
The reason this matters is that averaging is not *deletion*. A blurred edge still carries evidence about where the sharp edge was and how strong it was. In principle, if you knew the exact shape of the average, you could solve backwards for the original.
In practice you cannot solve it exactly, for two reasons that never go away. The averaging is many-to-one, more than one sharp scene produces the same blurred image, and the sensor added noise on top, which the inversion amplifies violently. This is what people mean when they call deconvolution *ill-posed*: there is not one answer, there is a family of them, and picking among them requires knowing something about what photographs generally look like.
That knowledge is what a learned deblur model is. It has seen a very large number of blurred-and-sharp photograph pairs, and what it contributes is not arithmetic but a preference. Of all the sharp images that could have produced this blur, which one looks like a photograph.
## The two things that can run when you press the button
[AI Deblur](/tools/deblur) has two paths and it is worth knowing which one you got, because they are not the same kind of operation at all.
**NAFNet** is the learned deconvolution described above. It is a 92 MB one-time download, cached afterwards, and it runs only when two conditions are both true: you have allowed the download, and the browser exposes a healthy WebGPU adapter. WebGPU is a genuine requirement here rather than a preference. On the single-threaded WASM path the model is slow enough that waiting for it is not a reasonable thing to ask of anyone.
**The direction-aware unsharp mask** is the other path, and it is what runs instantly with no download whenever either condition fails. It is worth being precise about what it does, because "sharpen" and "deblur" get used interchangeably and they are not the same claim. It blurs a copy of the image with a radius-5 Gaussian, subtracts that from the original to isolate the fine detail, multiplies that difference by a little under five, and adds it back. Then, if it detected a dominant direction in the image gradients, it runs a second sharpening pass perpendicular to that direction, on the theory that a motion streak needs its contrast rebuilt across the streak rather than along it.
The high-pass term is clamped to plus or minus 64 levels before it is added back. That clamp is the difference between a photo that reads as recovered and one that reads as crunchy: without it, a few very strong edges take the full multiplier and ring into bright and dark fringes, and the eye reads the ringing before it reads the sharpening.
None of that invents detail. It raises local contrast either side of edges that were already there, which the eye interprets as sharpness. On mild shake that is genuinely useful and it is instant. It is simply a different thing from reconstruction, and the caption under your result names which one produced it.
## The resolution trade the model path makes
This is the part that surprises people, and it changes which path you should want.
Deblur is expensive, so before NAFNet runs, the tool plans a working size. The long edge is capped at 1024 px. The short edge is lifted to at least 384 px if that cap pushed it under. Both axes are bounded at 2048 px. The model runs at that planned size, and the result is then resampled back to the dimensions you uploaded.
So the file you download always has the pixel dimensions of the file you gave it, and the model's actual contribution is bounded by that working size. On a 1200 px web image, nothing meaningful is lost. On a 24-megapixel photograph, the reconstruction happened on roughly a 1024 px view of your image and was then enlarged between five and a half and six times, linearly, to meet the original frame. A 6000×4000 frame is 5.9x the 1024 px long edge, a 5657×4243 one is 5.5x.
The classical path has no such cap. It runs at the image's native resolution.
That inverts the advice you would expect. The model is the better answer when the blur is real and the image is not enormous, which is most web images, most crops, most phone photos you are about to post. On a very large file where you need full-resolution micro-detail, the instant no-download path can genuinely serve you better, because whatever it does it does at every pixel you actually have.
There is a related constraint at the small end. The model's graph declares both spatial dimensions as dynamic, and it is not: measured against the real weights, there is a hard per-axis floor somewhere between 368 px, which fails, and 372 px, which passes. It is per axis rather than per area: 512×256 and 256×512 both abort while 480×448 is fine. That is why the planner lifts the short edge to 384 rather than letting a wide panorama land under the floor and throw. The consequence for you is that a very wide crop is processed at that floor on its short axis, so fine detail in it is limited by the planner rather than by the model.
## Which blurs are recoverable
**Handheld shake is the best case.** A short, roughly straight streak from a hand that moved during the exposure is exactly the failure a motion-deblur model is trained on. This is where the difference between the two paths is most visible.
**A slight focus miss is often recoverable**, when the subject sits close enough to the focal plane that the disc each point spread into is still small. The further out of focus, the larger the disc, the more scene points got averaged into each pixel, and the less there is to work backwards from.
**Subject motion is much harder than camera motion,** and for a structural reason. Camera shake applies one smear to the whole frame. A moving subject in a still frame applies a smear to the subject and nothing to the background: different regions, different kernels. The classical path in particular estimates a *single* dominant gradient direction for the entire image, so on a photo where only the subject moved it will happily sharpen the stationary background across an axis that has nothing to do with it.
**Noise is not blur, and deblurring makes it worse.** Sensor noise from a dark scene is high-frequency detail, and everything above amplifies high-frequency detail. A noisy handheld night shot has both problems and the tool only addresses one of them, so the noise comes through harder. If your image is noisy first and soft second, deal with your expectations about the noise before you press anything.
**Heavy blur is gone.** If the streak is long, or the focus missed by a wide margin, the averaging destroyed the information and no prior recovers it. What a model can still do from that input is produce a sharp, confident, plausible image, which is a generated photograph rather than a restored one. That is a real distinction and it matters for the same reasons it matters in [face restoration](/blog/restore-then-colourise-an-old-family-photo): nothing in the output flags which parts were invented.
## What to do instead
If the reason you care about the photo is a face, [face restore](/tools/face-restore) targets exactly that, with a prior specific to faces rather than to photographs in general. It does considerably more for a soft face than a whole-image deblur, and it comes with its own honest boundary about what a generated face is and is not appropriate for.
If the image is not blurred so much as *small* (a thumbnail, a screenshot, a saved-from-messaging copy), then softness is a resolution problem wearing a blur costume, and the fix is a different one. [Choosing the right source mode](/blog/why-your-upscaled-photo-still-looks-soft-source-modes) on the [upscaler](/upscale) covers that case properly.
If you are going to do both, do the deblur first and on the smaller file. A blur that survives into an upscale becomes a larger blur, and the model that upscales it will faithfully reconstruct the smear. A small image is also comfortably inside the working-size cap, so the resolution trade above costs you nothing.
And if the answer is that the photograph is not recoverable, that is a real answer. It is worth more than a confident sharp rendering of a moment that no longer matches what happened.
## The short version
1. Blur is an average, so some of it is reversible, but never exactly, and never without a prior.
2. Two paths exist: NAFNet reconstructs, the unsharp mask raises contrast. The result names which one ran.
3. NAFNet needs both an allowed download and WebGPU. Without either, you get the classical path.
4. The model works at up to 1024 px on the long edge and the result is scaled back, so on very large files the classical full-resolution path can be the better trade.
5. Camera shake and a slight focus miss are the recoverable cases. Subject motion, noise, and heavy blur are not.
6. Deblur before upscaling, not after.
The mechanics, the consent gate and the exact size constraints are documented in [the AI Deblur help article](/help/ai-deblur). All of it runs in your browser tab. The model comes to your image rather than the other way round.
---
### Writing Alt Text That Actually Helps, and Where an AI Caption Fits
URL: https://bgremover.novusstreamsolutions.com/blog/writing-alt-text-that-actually-helps
Published: 2026-08-08 | Category: Tutorials | Author: Novus Stream Solutions Editorial Team
Almost nobody leaves alt text off an image out of indifference. They leave it off because there are ninety more images in the folder, the deadline is today, and writing ninety short descriptions is a genuinely tedious job that nothing about the CMS makes faster.
A model that hands you a first draft in a second changes that arithmetic. It does not, however, change the part that requires you, and being clear about which part is which is the difference between alt text that helps somebody and alt text that adds noise to a page that already had too much.
## Alt text is a replacement, not a description
This is the single idea that makes everything else follow, and it is the one most guides skip.
Alt text is not a caption of the image. It is what stands in for the image when the image is not available. Because a screen reader is reading the page aloud, because the file failed to load, because the connection is slow, because someone is using a text-only view. The question it answers is not "what is in this picture" but "what would this reader miss if the picture were simply not here".
Which means the right alt text depends on the page, not only on the photograph. The same shot of a bridge wants *the Clifton Suspension Bridge seen from the Somerset side* in an article about Bristol, and *a suspension bridge at dusk* in a piece about lighting. Nothing about the pixels distinguishes those two. Only the sentence next to them does.
A model can produce the second one. It cannot produce the first, and it never will, because the information is not in the image.
## The decision that comes before the writing
Before you describe anything, work out which of four jobs the image is doing on the page. This takes about two seconds per image once you have the habit, and it decides everything after.
**Decorative.** A background flourish, a divider, a stock photo of hands on a keyboard that carries no information. These take an *empty* alt attribute, `alt=""`, not a missing one and not a description. An empty alt tells the screen reader to skip it, which is exactly right. A missing alt makes some screen readers read out the filename instead, and describing a decorative flourish is noise, not access.
**Informative.** The image carries content: a product, a person, a place, a state of something. This is the case that wants real alt text, and the case where a model draft is worth having.
**Functional.** The image *is* a control: a logo that links home, a magnifying glass that submits a search, a thumbnail that opens a gallery. Describe the destination or the action, never the picture. The alt text for a search icon is `Search`, not `magnifying glass`.
**Complex.** Charts, diagrams, maps, infographics. The meaning lives in relationships that no single sentence carries. These want a short alt that says what kind of thing it is and where the detail lives, plus the actual content in the page: a table, a paragraph, a caption. "Bar chart of quarterly revenue, described below" is honest. A three-hundred-word alt attribute is not, because a screen reader user cannot pause, re-read or skim inside it.
Only the second of these four is a job a caption model can help with. Getting the classification right is worth more than getting any individual sentence right.
## Where the model actually fits
[The alt text tool](/tools/alt-text) runs a captioning model on your device and writes a first-draft description of whatever you drop into it. Nothing is uploaded, which is the practical reason you can point it at client work, unreleased product shots, or screenshots of an internal dashboard without a conversation about data handling first.
A few things are worth knowing before you rely on it.
**It needs a model, and there is no way around that.** Every other AI tool here keeps working when you decline its download, because a classical fallback is a genuinely useful weaker answer. There is no classical shortcut for describing a photograph in words, that requires a model that has seen photographs. So declining the download leaves this tool unable to run, and it says so plainly rather than producing something worthless.
**The download can be larger than the dialog says.** The consent gate quotes about 120 MB, which is the size of the smaller ViT-GPT2 captioner. In practice the worker tries the richer Florence-2 model first and only falls back to ViT-GPT2 if Florence-2 will not load or run, and Florence-2 is the bigger fetch, with its loader reporting roughly 230 MB. Either way it is a one-time download that caches afterwards, but a first run on a metered connection can cost more than the number in the dialog.
**The default style is deliberately terse.** Five styles are offered (alt text, scene, product, objects, social caption), and alt text is the default, capped at twelve words. That cap is not a limitation to work around; brevity is the feature. A screen reader user navigating a page of images is served by one short sentence naming the subject, not by a paragraph.
For everything else, the longer styles exist because product copy and social captions are real jobs with different needs. Just do not paste a *product* description into an alt attribute.
**It is one image at a time, and it hands you text.** There is no batch mode and no folder import; you drop an image, you get a description in an editable box with a Copy button. It does not write the attribute into your HTML and it does not embed anything into the file. The text goes where you put it.
## The edit pass
Treat every result as a draft, and run it through four questions. This is the part that takes thirty seconds and is the entire reason the output arrives in an editable box rather than a read-only one.
**Add what only you know.** Names, places, brands, model numbers, and, most importantly, *which detail is the reason this image is on the page*. A model describes what it recognises. It has no idea that the point of the photo is the scuff on the heel.
**Cut what the page already says.** If the sentence above the image already names the subject, alt text that names it again makes a screen reader say everything twice. Alt text is not an SEO field to stuff; it is a thing a person hears.
**Delete any "image of".** Screen readers already announce that an image is an image. Opening with "image of" or "photo of" spends the listener's first three words on nothing. Captioning models produce that framing often, and the tool does not strip it for you on this path, so read the first three words of every draft.
**Cut the adjectives that are opinions.** "Beautiful", "stunning", "gorgeous" describe your reaction, not the image, and they are unverifiable to someone who cannot see it. They also tend to survive a caption model, because they are extremely common in the text those models learned from.
A useful length rule of thumb is to stay under about 125 characters. It is a convention rather than a specification, no accessibility standard names a number, but it is a good proxy for "one sentence a listener can hold in their head", and if you are past it you are usually describing rather than replacing.
## Where the model is weakest
Be sceptical in these four cases specifically, because they are where a confident-sounding caption is most likely to be wrong.
- **Charts, diagrams and dense screenshots.** Anything whose meaning lives in its text, its axes, or the relationships between its parts. A bar chart looks like a bar chart to a caption model. These are the "complex" images above and they were never going to be a one-sentence job.
- **Text inside the image.** Frequently missed or misread. If words in the picture matter, type them yourself.
- **Anything requiring knowledge.** It does not know a name, a brand, a place, or a date. It describes categories: *a dog*, not *Rufus*; *a suspension bridge*, not *the Clifton*.
- **Other languages.** It writes English, and there is no language setting.
There is one quiet helpful behaviour worth knowing about: a cheap local pixel check flags text-dense images (screenshots, scans, anything that is mostly ink on paper), and quietly asks the model for a longer, more detailed caption, because the brief one on a screenshot tends to come back as something like "a computer screen with a lot of numbers". That upgrade is deliberately skipped for the alt text style, where the short sentence is the point.
## A workable routine for a folder of ninety
1. **Sort by job first.** Walk the list once and mark each image decorative, informative, functional or complex. Most folders are more decorative than people expect, and every decorative image is now zero work, `alt=""` and move on.
2. **Draft the informative ones.** Run each through the tool on the alt text style. Copy, paste, keep moving; do not edit yet.
3. **Edit in one pass, with the page open.** This is where context arrives. Add the names, cut the duplication with the surrounding text, delete the framing and the opinions.
4. **Write the functional ones by hand.** They are short, and they are about destinations rather than pictures, so a caption model has nothing to offer.
5. **Handle the complex ones properly.** Short alt, real content in the page.
The model saves you step two, which is the boring one. Steps one, three, four and five are the ones that decide whether the page is usable, and they are yours.
## One more reason to run it locally
Alt text work usually happens on the same images you are about to publish, which makes it a natural moment to check what else is riding along in those files. Camera GPS coordinates, device details and timestamps all survive into a JPEG you upload, and [stripping EXIF metadata before sharing](/blog/strip-exif-metadata-photos-privacy) takes about as long as writing one description.
That both jobs happen in the same tab, on your device, is not a marketing line. It is the reason you can run them over work you are not allowed to upload. The [reference article](/help/ai-describe) has the full mechanics; the [accessibility statement](/accessibility) covers this site's own posture.
Ninety images and no time is a real constraint. A draft in a second is a real fix for it. Just do not mistake the draft for the job.
---
### Removing Unwanted Objects from Video in Your Browser: Click, Track, Erase
URL: https://bgremover.novusstreamsolutions.com/blog/remove-unwanted-objects-from-video-in-browser
Published: 2026-07-31 | Category: Tutorials | Author: Novus Stream Solutions Editorial Team
Most clips are nearly right. The take is good, the light is good, and there is a parked car with a readable number plate in the corner, a passer-by over your shoulder, or a brand logo you would rather not advertise. Until recently the honest options were to crop, to reshoot, or to learn a desktop compositing suite.
The object remover in the [NSS Video Editor](/video-editor) gives you a fourth option: select the thing once, and it is removed, blurred, or pixelated on every frame it appears in, with the clip never leaving your browser. It is the most ambitious AI tool we ship, which is exactly why this post spends as much time on what it cannot do as on what it can.
## Three ways to select what should go
Open a clip in the editor, find the Object remover panel, and scrub the playhead to a frame where the offending object is clearly visible. Then pick one of three selection methods:
- **Click the object.** A single click hands the frame to SlimSAM, a compact segmentation model running in a background worker, which returns the object's full outline: not a rectangle around it, the actual shape. If the first outline misses a part, keep clicking: up to five points refine the mask, and each click re-runs the segmentation with the full set.
- **Draw a box.** For text, signs, watermarks, or anything where you know better than a segmenter, drag a rectangle. No model involved, no surprises. The box is the mask.
- **Find licence plates.** One click runs a pinned Apache-2.0 RT-DETRv2 plate detector (a one-time download of roughly 81 MB, plus potentially uncached shared ONNX Runtime assets) over the frame and proposes plate boxes for review. On apply, plates are re-detected as the clip processes rather than tracked from a single frame, so a car driving through the shot stays covered. When you select plates, the tool switches the effect to blur by default: censoring, not erasing, is almost always what a plate needs.
The click tool is the one that feels new. The old version of this feature asked you to guess an object's extent with corner handles; SlimSAM replaced that guesswork with an outline that actually hugs the object, which matters because everything downstream (the fill, the tracking, the feathered edge) is only as good as the mask.
## Remove, blur, or pixelate
Three treatments, and choosing well saves you re-processing:
| Treatment | What it does | When to reach for it |
| --- | --- | --- |
| Remove | Fills the region with reconstructed background | Distractions you want gone: objects, logos, litter |
| Blur | Gaussian blur (2–40 px) over the region | Plates, faces, screens. Proof something was hidden |
| Pixelate | Mosaic blocks (4–32 px) over the region | The same, when you want the censoring to read clearly |
An **edge feather** slider (0–20 px) softens the boundary of any treatment so the edit does not sit in the frame with a hard cut-out edge.
The distinction worth internalising: blur and pixelate are honest about hiding something, and they are robust. They work no matter what is behind the object. Removal is reconstruction, and reconstruction has preconditions. That is the next section.
## How removal actually fills the hole
The remover does not hallucinate the background by default. It borrows it, from time.
For every pixel inside the mask, the pipeline looks at a window of nearby frames (the **temporal window** slider, ±3 to ±24 frames) and collects that pixel's value from each frame where the mask does *not* cover it. The median of those clean samples becomes the fill. If a cyclist rides through your shot, the pavement behind them is visible a few frames earlier and a few frames later: the median stitches those revealed pixels into a stable, natural fill with real grain, real colour, real light.
The phrase *clean samples* is doing important work. An earlier version of this tool skipped that check and computed the median from every frame in the window, so for a static watermark, it averaged the watermark with itself and proudly produced a no-op. The rebuilt pipeline only samples frames where that pixel is actually uncovered, and when there are none, it says so and hands the problem to the AI patch rather than pretending. This is the same [fail-loudly principle](/blog/fail-loudly-not-silent-fallback) we apply everywhere else.
A practical consequence: a wider window gives cleaner fills for slow-moving objects, at the cost of processing time. The default of ±12 frames covers about half a second each way at 24 fps, which handles most walking-pace occlusions.
## When the camera never sees behind
Some regions are never revealed: a watermark that sits over the same corner for the whole clip, a sticker on a static shot. Temporal borrowing has nothing to borrow.
For those cases there is an optional **AI patch**: LaMa, an inpainting model that generates a plausible fill for the permanently covered area. It is a large model, roughly 196 MB, so it is consent-gated: the first time you enable it, the tool asks before downloading, and the model is cached on your device afterwards, the same way [all our models download once and stay ready](/blog/why-ai-models-download-once-keep-ready-offline). Decline, and permanently covered spots simply keep their original pixels: nothing fetches silently, and nothing pretends to have worked.
Be honest with yourself about what inpainting is: a plausible invention, not a recovery. Over a flat wall or soft bokeh it is excellent. Over text, faces, or intricate patterns it will produce something texture-shaped rather than the truth. For anything that matters forensically, blur it instead.
## Tracking that freezes instead of drifting
Objects move, so a mask selected on one frame has to follow its object. The tracker uses normalised cross-correlation: the region you selected becomes a small grayscale template, and each subsequent frame is searched for the best match near the last known position.
Two deliberate design choices are worth knowing about:
- **The template never updates.** Trackers that refresh their template from each new frame accumulate tiny errors until they slide off the object entirely. Drift is how a blur ends up censoring a patch of empty road. A fixed template means confidence genuinely falls when the object changes, instead of the tracker confidently following its own mistake.
- **It freezes rather than wanders.** After five consecutive low-confidence frames, the mask freezes in place and the edit is flagged in the edits list. You will see *tracking froze mid-clip* rather than discovering a wandering blur in the export.
Tracking runs from the selected frame forward, because the mask only matches the object there. And for things that do not move (watermarks, channel bugs, fixed overlays) turn tracking off entirely; a static mask is more reliable than a tracker asked to follow something stationary.
## Edits that stay on the timeline
Applying an edit re-processes the clip, audio kept, and the result replaces the clip on the editor timeline, so everything downstream ([grading, text, layers, export](/blog/from-background-removal-to-finished-video-editor-workflow)) operates on the cleaned footage.
Each edit is also recorded: the mask, the per-frame tracking offsets, the detected plate boxes. Delete one edit from the list and the remaining ones replay deterministically from the pre-edit original using their recorded data, no re-tracking, no drift between what you approved and what you get. Revert all restores the untouched clip. It behaves like [non-destructive editing](/blog/non-destructive-editing-undo-explained) even though each apply is a real render.
## The limits, stated plainly
The panel prints its own limits, and we will repeat them here rather than let you discover them mid-project:
- **Removal needs the background to be revealed in nearby frames, or to hold still.** If the camera orbits an object, reconstructing the parallax behind it is a research problem we do not attempt.
- **Tracking follows movement, not rotation or scale.** A car turning towards the camera changes shape; the tracker freezes and flags rather than stretching a stale mask over it.
- **Automatic detection covers licence plates only.** Street signs, name badges, and screens are a draw-a-box job.
- **Processing runs at up to 1280 px on the long edge**: the same memory-safety ceiling as the [video background engine](/blog/how-our-new-video-background-engine-works), and the price of doing this in a browser tab instead of on a server farm.
Everything runs on your device. For footage of your home, your family, or your customers, that is not a slogan. The clip is never uploaded, which pairs naturally with stripping the file's [hidden metadata before you share it](/blog/strip-video-metadata-before-sharing-privacy).
## A workflow that holds up
1. Open the clip in the [Video Editor](/video-editor) and trim first. The remover only processes the range you keep.
2. Scrub to a frame where the object is clear, then click it (refine with extra clicks), draw a box, or run plate detection.
3. Pick the least ambitious treatment that does the job. Blur beats removal for anything you are censoring.
4. Leave tracking on for moving objects; turn it off for fixed overlays.
5. Apply, watch the processed range end to end, and check the edit stayed attached.
6. Delete any edit that draws more attention than the distraction did, and try a wider temporal window or a feathered edge.
7. Export from the editor, or run the result through the [video metadata remover](/tools/video-metadata-remover) if it is leaving your hands.
The full control reference lives in the [object remover help article](/help/video-object-remover). Bring a clip with something in it you wish were not. That is the entire test.
---
### What Your Videos Know About You: Stripping Hidden Metadata Before Sharing
URL: https://bgremover.novusstreamsolutions.com/blog/strip-video-metadata-before-sharing-privacy
Published: 2026-07-31 | Category: Tutorials | Author: Novus Stream Solutions Editorial Team
By now, many people know to [strip the EXIF data from photos](/blog/strip-exif-metadata-photos-privacy) before posting them: the GPS coordinates, the device model, the timestamp. Fewer people realise their videos carry the same payload, and often more of it. A clip recorded on a phone and sent as-is can reveal where you live, what you filmed it with, and exactly when you pressed record.
The file plays identically either way, which is the problem: there is no visible difference between a clean video and one that announces your home address to anyone who checks. This post covers what a video file actually embeds, how to strip it in your browser without uploading the footage anywhere, and, because stripping has real boundaries, what it cannot remove.
## What a video file records besides the video
Container formats like MP4 and MOV reserve dedicated space for metadata, and recording apps fill it enthusiastically:
| Field | Typical content | Why it matters |
| --- | --- | --- |
| GPS location | Latitude/longitude, often to a few metres | Filmed at home? The file contains your address |
| Creation time | Date and time recording started, to the second | Places you somewhere at a specific moment |
| Device make and model | Phone or camera identification | Fingerprints your hardware across uploads |
| Software / encoder | The app and encoder version that wrote the file | Narrows down your device and habits |
| Author, title, comments | Names or usernames some apps write | Can identify you directly |
Phones are the worst offenders. A smartphone video typically stores its location as an ISO 6709 coordinate string in the container's metadata atoms, alongside the device model and the exact recording time. None of it is visible during playback; all of it travels with the file through copying, renaming, and most direct-transfer methods. Anyone with a metadata inspector (or, for some fields, a file-properties panel) can read it.
Two cases deserve particular caution: marketplace listing videos (recorded where the item is, which is usually where you are) and dashcam or doorbell footage shared publicly, which pairs a location with a routine. If you have ever checked [what is inside an AI-generated image](/blog/whats-inside-an-ai-generated-image-metadata), the lesson is the same. Files carry stories about their origins.
## Where the data lives, and why stripping is even possible
The useful mental model: a video file is a container holding compressed video and audio streams plus a labelled shelf of metadata. The metadata is *not* woven into the pixels. It sits in its own structures (`udta` atoms and key/value stores in MP4 and MOV, tag elements in WebM) separate from the streams themselves.
That separation is what makes clean removal possible. You do not need to touch the picture to remove the labels; you need to rewrite the container around unchanged streams and simply decline to copy the shelf across.
## How the remover strips everything without touching quality
The [video metadata remover](/tools/video-metadata-remover) does exactly that rewrite, on your device, using an ffmpeg engine compiled to WebAssembly and running in a background worker. Drop in an MP4, WebM, or MOV, and it performs a **stream copy**: the compressed video and audio are copied bit-for-bit into a fresh container created with its metadata map explicitly emptied.
The properties that follow from that design, stated precisely:
- **Quality is identical.** Nothing is decoded or re-compressed. The output holds the same encoded pixels and samples as the input.
- **Audio is preserved.** The audio stream is copied alongside the video.
- **The container stays the same.** An MP4 comes back as an MP4, ending in `-clean.mp4`: no forced conversion to another format.
- **It is fast.** Copying streams is bounded by your device's speed, not by re-encoding time.
- **Nothing is uploaded.** The engine is a one-time download of about 32 MB, cached for next time; your footage never leaves the browser. That is the [same one-time-use principle](/blog/one-time-use-by-design) the rest of NSS is built on.
We should be honest about our own history here: the first version of this tool worked by replaying the video onto a canvas and re-recording it. That did strip metadata, but it silently dropped the audio track and re-compressed every frame. The current stream-copy pipeline replaced it precisely because a privacy tool should not quietly cost you quality, and [we would rather a tool fail loudly than degrade silently](/blog/fail-loudly-not-silent-fallback).
## What stripping does not remove
A metadata strip cleans the container. It does not, and cannot, clean the content, and a privacy tool that implies otherwise is lying to you.
| Still present after stripping | Why |
| --- | --- |
| Anything visible in the frame | Faces, number plates, street signs, and on-screen timestamps are pixels, not metadata |
| Duration, resolution, frame rate | Structural values the container needs for playback |
| Encoder notes inside the video bitstream | Some encoders write a settings string into the compressed stream itself, which a stream copy preserves |
The first row is the one that matters most in practice. If the concern is a readable licence plate or a bystander's face, that is a job for the [object remover in the video editor](/blog/remove-unwanted-objects-from-video-in-browser), which can blur or pixelate a region across every frame. Use it before stripping, then strip the edited file.
The last row is a genuinely obscure edge: container metadata is what inspectors, platforms, and casual snoops read, and it is fully removed. But a determined analyst can find encoder fingerprints inside the compressed stream itself. If your threat model includes that, a full re-encode through the [video format converter](/tools/video-format-converter) replaces the bitstream entirely, at the cost of a generation of quality.
## When to strip
The habit costs a few seconds, so the honest answer is: before any video leaves your control.
- Before posting to social platforms: some strip metadata on upload, some do not, and the file you hand over contains the data either way
- Before marketplace listings filmed at home
- Before sharing dashcam, doorbell, or security footage
- Before sending clips to buyers, clients, or anyone you do not know
- Before publishing footage where the recording time or place is itself sensitive
## One habit, both media
Videos and photos leak the same way, so it is worth pairing the tools. The [image metadata remover](/tools/metadata-remover) goes further than its video sibling. It inspects the file first and reports exactly what it carries, including AI-provenance data like C2PA manifests, then lets you strip all of it or a selection. The reasoning behind keeping all of this on-device is laid out in [privacy-first image editing](/blog/privacy-first-image-editing).
The video workflow, end to end:
1. If the frame itself shows something sensitive, [blur or remove it](/blog/remove-unwanted-objects-from-video-in-browser) in the editor first.
2. Drop the clip into the [video metadata remover](/tools/video-metadata-remover). First run fetches the engine once.
3. Download the `-clean` file and check the size: near-identical to the source, because nothing was re-encoded.
4. If the file is too large for its destination, compress the *clean* copy with the [video compressor](/tools/video-compressor). The output of a fresh encode carries no old metadata either.
5. Share the clean copy; keep the original private.
The clip looks the same, plays the same, and weighs the same. The only thing missing is the part that was about you rather than about the video.
---
### From Cutout to Marketplace White: Finishing a Background Removal for Listings
URL: https://bgremover.novusstreamsolutions.com/blog/from-cutout-to-marketplace-white-background
Published: 2026-07-28 | Category: Tutorials | Author: Novus Stream Solutions Editorial Team
A clean cutout is not always what a marketplace wants. Amazon, many Shopify themes, and a long list of retail portals still ask for an **opaque white** (or near-white) field behind the product. A transparent PNG is perfect for design tools and comps, and the wrong deliverable if the listing form rejects alpha or composites your item onto a grey page.
This walkthrough covers the finish line after [background removal](/background-remover): verify the mask, place a solid back with [Add Background](/tools/add-background), and export something a catalogue can accept. Processing stays in your browser; nothing is uploaded for the AI step.
## What marketplaces actually ask for
Requirements vary by channel, but the pattern is familiar:
- **Main image:** product on a pure white or very light field, fully opaque, subject filling most of the frame.
- **Secondary images:** often allow lifestyle scenes; those are a different job.
- **File type:** JPEG is common for the main slot. JPEG has **no alpha**, so a transparent PNG saved “as JPEG” will get a baked background, usually black or white depending on the encoder. Decide the background *before* you flatten.
If you only need a transparent asset for Canva, Figma, or print-on-demand, stop after the cutout. This article is for the case where the storefront wants white (or a brand colour) baked in.
## Remove the background first: match the mode to the subject
Open the [background remover](/background-remover), drop in the photo, and pick a mode that fits the edges:
- **Fast** for clear products on plain sweeps.
- **Best Quality** for hair, fur, soft packaging, or busy backdrops.
- **Glass** when see-through regions must stay see-through.
We cover the decision tree in detail in [Fast, Best Quality, or Glass?](/blog/fast-vs-best-quality-choosing-the-right-model). For a listing batch, start Fast, escalate only the failures, then move on to the finish below.
Export a **true transparent PNG** (or WebP with alpha) from the remover. That file is your working master. Do not jump straight to JPEG yet.
## Verify the alpha before you composite
A checkerboard preview is useful, but it is not a certificate. Spend thirty seconds on a quick checklist:
1. **Subject completeness**: no missing handles, straps, or corners.
2. **Background leftovers**: no grey wedges or table lines still attached.
3. **Edge quality**: no thick coloured fringe from the old studio wall.
4. **Soft detail**: hair and fur should look intentional, not chewed.
If the fringe is the main problem, fix the mask or refine edges before compositing. Putting a white field behind a bad fringe just makes the halo more obvious. For why spill happens and what cleanup does, see [coloured fringe and edge decontamination](/blog/why-cutouts-get-a-colored-fringe-edge-decontamination). For how NSS checks exports before download, see [how we verify transparent exports](/blog/how-nss-verifies-transparent-exports-before-download).
## Place white (or brand colour) with Add Background
Open [Add Background](/tools/add-background) and load the transparent cutout.
- Choose a **solid** fill: pure white (`#FFFFFF`) for classic marketplace mains.
- Or pick a **brand colour** when the channel allows it and your style guide requires it.
- Keep gradients and patterns for lifestyle assets, not for “white background” compliance slots.
The tool composites the subject onto the fill in the browser and lets you download a flat, opaque image. That is the file you resize and upload to the listing.
| Goal | Background choice | Typical export |
| --- | --- | --- |
| Amazon-style main image | Solid white | JPEG after composite |
| Brand-consistent PDP | Solid brand hex | JPEG or PNG (opaque) |
| Design / POD / overlay | Leave transparent | PNG / WebP with alpha |
| Soft-edge preview only | Checkerboard in the editor | Do not upload checkerboard |
## Size and export checklist
After the background is baked in:
- **Crop and pad** so the product sits comfortably in frame: many portals want the subject occupying most of the image without touching the edges awkwardly.
- **Match the portal’s pixel rules** (longest side, file size caps). Use [Image Resizer](/tools/image-resizer) or [Image Compressor](/tools/image-compressor) when you need dimensions or kilobytes under control.
- **Flatten to JPEG** only after the white (or brand) field is permanent. Saving a transparent PNG as JPEG earlier is a common way to get a black box behind the product.
- **Keep the transparent master** in a separate folder. Listing requirements change; re-compositing from a good cutout is faster than re-running removal.
For large catalogues, remove in a batch, export ZIP cutouts, then composite the ones that need white. The batch path is covered in [batch cutouts and ZIP export](/blog/batch-cutouts-and-zip-export-for-store-catalogs).
## Mistakes that show up after upload
| Mistake | What you see on the storefront | Fix |
| --- | --- | --- |
| JPEG’d a transparent PNG too early | Black or weird fill behind the product | Composite white first, then JPEG |
| Uploaded checkerboard “preview” | Grey squares in the listing | Never export the editor’s preview pattern as the listing file |
| Coloured fringe on white | Pink/blue halo around the silhouette | Clean edges / decontaminate, then re-composite |
| Soft hair on mandatory hard white | Fuzzy grey smear | Best Quality + softer refine, or accept a slightly harder edge for compliance |
| Wrong canvas size | Rejected upload or tiny product | Resize to the portal’s published specs |
## Privacy stays the same through the finish
Removal, verification, and add-background all run locally. The marketplace only receives the final file you choose to upload. There is no account required in NSS for this pipeline, and the session is one-time-use: download what you need before you close the tab.
## Try the pipeline
1. Cut out the subject in the [background remover](/background-remover).
2. Confirm the transparent master looks clean.
3. Place solid white (or brand colour) in [Add Background](/tools/add-background).
4. Resize/compress if the portal demands it, then upload the opaque file.
Transparent when you need flexibility. Opaque white when the listing form insists. The cutout is the hard part: finishing it for the storefront is a short, deliberate last step.
---
### Clean Animated Product GIFs: Background Removal Without Soft-Edge Surprises
URL: https://bgremover.novusstreamsolutions.com/blog/clean-animated-product-gifs-background-removal
Published: 2026-07-28 | Category: Tutorials | Author: Novus Stream Solutions Editorial Team
Animated product GIFs do a job still photos cannot: they show turn, flex, pour, or pack without forcing a shopper to open a video player. The catch is the background. A studio sweep or desktop clutter that looks fine in a full-bleed clip becomes noise the moment the loop sits on a white PDP, a dark theme, or a paid ad canvas.
This guide is for **product and logo loops** (Shopify embeds, site heroes, email-safe animations, ad creative) using the [GIF background remover](/gif-background-remover). If you are building chat stickers and emotes, the dedicated [animated GIF sticker walkthrough](/blog/animated-gif-stickers-with-clean-transparency) goes deeper on tiny sizes and messaging quirks. The engine is the same; the brief is different.
Everything runs in your browser. Frames are not uploaded to finish the cut.
## When an animated GIF is the right asset
Use a short transparent (or keyed) GIF when:
- The motion is simple and loops cleanly (a few seconds, not a film).
- The destination expects GIF (email clients, older CMS blocks, many ad units).
- File size and compatibility matter more than cinematic soft edges.
Prefer a still transparent PNG, a short WebM/MP4, or APNG when:
- Soft hair, glow, or motion blur *is* the product story.
- The platform accepts modern formats with full alpha.
- You need audio or longer narrative: that is video territory, not GIF.
## Colour-key first, AI second
Drop the GIF into the [GIF background remover](/gif-background-remover). The tool chooses a path based on the source:
- **Colour-key fast path**: if the loop already sits on a flat, solid field (green screen, pure white, single studio paper), keying that colour is exact and fast. No model guesswork. Ideal for many product turntables shot on a controlled backdrop.
- **Per-frame AI path**: for photographic or busy backgrounds, each frame uses the same **Fast** / **Best Quality** ladder as still removal. Best Quality costs more time per frame; spend it when edges define the brand (packaging foil, fine logo strokes, soft fabric).
| Source background | Start with | Why |
| --- | --- | --- |
| Flat green / white / single colour | Colour-key | Exact; preserves hard logo edges |
| Softbox studio with gradients | AI (often Best Quality) | Keying will leave bands |
| Lifestyle desk / shelf clutter | AI | No single key colour |
| Already almost clean | Colour-key, then spot-check | Avoid paying AI cost for nothing |
For still-image mode choice philosophy, [Fast vs Best Quality](/blog/fast-vs-best-quality-choosing-the-right-model) still applies frame by frame.
## Temporal smoothing keeps the loop calm
Independent per-frame masks can shimmer: an edge that jumps one pixel between frames reads as flicker when the GIF repeats. The GIF remover applies **temporal smoothing** across frames so the silhouette stays stable through the loop. For a product spin on a storefront, that stability matters as much as a single “hero” frame looking perfect.
If the source animation itself has a bad loop seam (last frame does not match the first), fix or trim the source before removal. Transparency makes loop seams more obvious, not less.
## The GIF format’s hard limit (stated once, clearly)
GIF stores **1-bit alpha**: each pixel is fully opaque or fully transparent. There is no 40% opacity. Soft hair, motion blur, and glows cannot be stored as true soft edges in a GIF, no matter which AI you use.
For hard-edged products and logos, that is fine. For soft subjects, you get jagged or chewed fringes unless you mitigate:
- **Bayer dithering** on the edge band: scatters on/off pixels so the eye reads a softer boundary at a distance. Good for unknown destinations.
- **Matte colour**: pre-composites soft edges against a known destination colour (e.g. your PDP white). Looks clean on that colour; wrong on others.
- **Export APNG**: full 8-bit alpha when the platform supports it. Same frame processing; better container for softness.
| Subject | Practical export |
| --- | --- |
| Hard logo / rigid product | GIF, plain 1-bit cutout |
| Soft fabric, slight blur, unknown page colour | GIF + dithering |
| Soft edges on a known white PDP | GIF + white matte, or APNG |
| Soft edges are mandatory | APNG (or video), not GIF |
## Product-loop workflow
1. **Prep the source**: short loop, consistent framing, trim dead frames. Prefer a controlled backdrop if you can reshoot; colour-key will thank you.
2. **Remove**: colour-key when possible; otherwise Best Quality for brand-critical edges.
3. **Preview on the real destination colour**: not only the editor checkerboard. A fringe invisible on grey may scream on white.
4. **Pick format**: GIF for maximum compatibility; APNG when soft alpha matters and the CMS allows it; PNG-ZIP if you need frame files for another pipeline.
5. **Watch file size**: more frames and dithered edges grow the palette. Short loops with restrained colour count stay under email and ad caps.
## Mistakes that show up on the live site
| Mistake | Symptom | Fix |
| --- | --- | --- |
| Forced GIF on wispy soft edges | Sparkly / bitten silhouette | Dither, matte, or switch to APNG |
| Matted for white, placed on dark theme | White halo | Rematte or use dither / APNG |
| No temporal smoothing awareness | Edge flicker every loop | Prefer the tool’s smoothed path; simplify motion |
| Huge frame count | Slow load, rejected upload | Trim frames; reduce canvas |
| Using the sticker guide’s tiny-size advice only | Product looks crude on PDP | Design for PDP scale; stickers are a different brief |
## Privacy and one-time-use
Frames are processed locally. Large optional models may download once with consent, then cache like other NSS AI features. Close the tab when you are done; download exports you need first. There is no cloud render queue for the cut.
## Try it on a real product loop
Open the [GIF background remover](/gif-background-remover), drop in a short product or logo animation, and try colour-key if the backdrop is flat. If edges are soft and the destination supports it, compare GIF dithering against APNG before you commit the asset to the storefront.
For chat-sized stickers and emoji packs, continue with the [sticker transparency guide](/blog/animated-gif-stickers-with-clean-transparency). For single product stills that need marketplace white after cutout, use the [marketplace white finish](/blog/from-cutout-to-marketplace-white-background) pipeline on stills instead of forcing a GIF.
---
### From Background Removal to Finished Video: A Complete Browser Editor Workflow
URL: https://bgremover.novusstreamsolutions.com/blog/from-background-removal-to-finished-video-editor-workflow
Published: 2026-07-27 | Category: Tutorials | Author: Novus Stream Solutions Editorial Team
A background remover can produce a transparent clip. A finished video needs more decisions: where the clip begins and ends, what sits behind the subject, which information appears on screen, and which export will play where the audience watches it.
The [NSS Video Editor](/video-editor) does not require background removal first. Start with an ordinary MP4, WebM, or MOV and introduce transparency only when the idea needs it. Trim, background treatment, layers, text, grading, cleanup, and export all happen on your device.
Use the controls in production order: structure first, visuals second, encoding last. You will not polish frames you later cut, and expensive processing stays focused on visible footage.
## Define the delivery before you edit the clip
Start by naming the job. A talking-head lesson, a product loop, a marketplace demo, and a social advertisement may use the same source video, but they do not need the same canvas or finish.
| Destination | Prioritise | A useful starting point |
| --- | --- | --- |
| Website or product page | Clean composition and broad playback support | Short MP4 with a solid or branded scene |
| Social feed | Immediate subject, readable text, compact duration | Tight trim, bold text, 1080p or 720p |
| Presentation or training | Legibility and calm pacing | Original framing, restrained grade, timed labels |
| Reusable design asset | A clean separated subject | Transparent WebM from the removal workflow |
Decide whether you need the original background, a replacement scene, or a transparent asset, and whether the editor is making the final delivery or a reusable element. Do not flatten a subject onto a decorative scene if the next designer needs to place it elsewhere.
For a transparent deliverable, read [exporting with transparency](/help/exporting-with-transparency) before choosing the format. For a finished composite, plan around MP4 or WebM playback.
## Import and trim before running the expensive steps
Drop the source into the [Video Editor](/video-editor). The editor accepts MP4, WebM, and MOV and opens ordinary opaque video directly; background removal is optional. Scrub through the full clip once before touching an effect. Find the first frame that communicates something and the last frame that still earns its place.
Drag the timeline in and out points around the useful range. Playback at 0.25× helps when checking a gesture, edge, or title cue; 2× helps find pauses. A shorter timeline tightens the story and gives later frame-by-frame operations less footage to process.
Make orientation and canvas decisions now. Utilities for rotate, resize, canvas extension, compression, conversion, and metadata removal stay inside the editor. Correct a sideways clip or wrong frame before placing text because a later canvas change invalidates positions.
Keep the untouched source separate from exports. Let a file such as `demo-source.mov` remain the source and the final download take the `-edited` name.
## Decide whether the background should remain, disappear, or change
For colour grading, trimming, and text, leave the clip opaque. For a new scene behind a person, the foreground must first contain transparency. Choosing a solid colour, image, blurred original, or lifestyle scene does not place that content *over* an opaque clip; it composites it behind the clip and shows it through transparent pixels.
If you choose a background while the clip is opaque, the editor offers **Remove background (People model)**. A roughly 15 MB one-time model download produces a transparent WebM. Because the recurrent model carries information between frames, its outline is designed to stay more consistent than unrelated still-image masks. See [how the video background engine works](/blog/how-our-new-video-background-engine-works).
Use removal deliberately. A presenter against a simple wall is a strong candidate; overlapping people, fast rotation, motion blur, and transparent props are harder. Preview a demanding section before committing to a replacement background.
Transparent WebM previews best in Chrome and Edge; support varies in other players. For broad playback compatibility, composite the finished background and export an ordinary MP4.
## Build the scene from the back forward
Once the subject is separated, choose the background that serves the message rather than merely proving the old one is gone.
- **Solid colour** is dependable for explainers, profile clips, product listings, and brand systems. Check contrast with clothing, hair, and text.
- **Uploaded image** lets you use a campaign photograph, office, set, or custom graphic. Match its horizon and light direction to the source.
- **Blurred original** preserves the source colours and context while reducing distraction. It is often the most believable choice for a quick privacy-safe or shallow-depth look.
- **Lifestyle scene** creates a ready-made environment in the browser. Treat it as art direction: choose a scene whose perspective and scale agree with the subject.
Then open **Layers**. The pinned Source video row controls the base clip's visibility and opacity. Image, video, and text layers can sit above it; overlays can be reordered, hidden, locked, duplicated, blended, or given their own opacity. Build from large elements to small ones: background, subject, supporting media, then text.
A logo below an opaque video is invisible; a full-frame image above the presenter covers the presenter. When something disappears, inspect visibility, opacity, and stack order before re-importing it.
## Establish one look with presets, then refine it
The Filter Presets section gives you one-click starting looks and an Intensity control. A preset changes the same core values exposed below it, so it is not a mysterious permanent filter: choose a direction, reduce or increase its strength, then fine-tune the result.
Use **Brightness** for exposure, **Contrast** for separation, and **Saturation** for colour intensity. **Temperature** moves the frame warmer or cooler; **Tint** corrects a green or magenta cast. Watch skin, white objects, and brand colours because they reveal an overdone grade quickly.
Full-frame **Blur** softens the complete composite; a blurred background only sits behind a transparent subject. **Vignette** darkens the outer frame. **Fade in** and **Fade out** can each cover up to five seconds, although a short clip may need only half a second.
Judge the grade at normal playback size. A dramatic preset can look attractive on one paused frame while making the whole clip tiring. The goal is continuity: the subject should remain recognisable from the first visible frame to the last.
## Add text when the timing and composition are stable
Text overlays have their own content, font, size, colour, opacity, x/y position, and start and end times. That makes them suitable for a name strap, short instruction, feature callout, price, or closing action. Multiple overlays can occupy different ranges instead of forcing every message onto the screen at once.
Keep titles short enough to read on a phone and away from edges where platform controls or cropping may intrude. Place type against predictable contrast; if the background changes dramatically, split the message or change the scene.
Add text after trimming because its time range is tied to the edited sequence. Play through every entrance and exit instead of checking only the middle. A label that arrives one second late feels like an editing error even when its typography is perfect.
## Remove only the distractions that matter
The Object remover is useful for a logo, plate, or small unwanted item that would otherwise spoil a clean frame. You can click an object for SlimSAM selection, draw a box, or use the licence-plate detector, then remove, blur, or pixelate the selected area across the whole clip or the trimmed range.
This is targeted cleanup, not unrestricted reconstruction. Tracking follows movement, but not arbitrary rotation or scale; when confidence is lost, it freezes and flags the edit. Removal works best when nearby frames reveal the background or it stays still. An optional LaMa patch helps with areas that never become visible, but requires a separate, consent-gated download of roughly 196 MB.
Use the least ambitious treatment that works. Blurring a moving plate is often more robust than inventing the road behind it. Review the full range and revert a repair that attracts more attention than the distraction.
## Perform a full-playback quality check
Before export, stop making changes and watch the trimmed clip from beginning to end at normal speed. Check the story first, then make a second pass for technical details:
1. Does the first frame begin cleanly, without a stray setup moment?
2. Does a replacement background show through every intended transparent area?
3. Do hair, hands, and moving edges remain stable in the busiest section?
4. Are overlay layers visible in the right order and only for the right duration?
5. Is text readable on the smallest likely display?
6. Do the grade, vignette, and fades help rather than announce themselves?
7. Does every object-removal edit stay attached to its target?
Scrub the exact in and out points too. Playback can hide one bad frame, while still inspection can exaggerate defects nobody sees in motion. You need both views.
## Export for the audience, then verify the actual file
The export panel offers MP4 or WebM, Original, 1080p, 720p, or 480p resolution, and 30, 24, or 15 frames per second. Start with the source frame rate and a resolution no larger than the useful source. Upsizing a soft 720p recording to 1080p creates more pixels, not more captured detail.
Choose MP4 for a finished composite when broad support is the priority, and WebM when it fits the destination. An MP4 request can fall back to WebM when H.264 recording is unavailable; the downloaded extension identifies what was produced.
Rendering happens locally, so longer, higher-resolution, higher-frame-rate jobs take more time and memory. Keep the tab open, then play the download and confirm duration, frame size, text timing, background, and destination compatibility.
That final replay closes the loop: define the delivery, trim the source, introduce transparency only when needed, build the scene, create one look, add timed information, clean distractions, and verify the export. The result is a finished video, built privately in the browser.
---
### Why AI Models Download Once, and How to Keep Them Ready Offline
URL: https://bgremover.novusstreamsolutions.com/blog/why-ai-models-download-once-keep-ready-offline
Published: 2026-07-27 | Category: Product & Mission | Author: Novus Stream Solutions Editorial Team
When an online AI tool says it is private because processing happens on your device, one practical question follows: where does the intelligence come from? The answer is a model download.
The app code accepts a file, draws controls, prepares pixels, and saves an export. A model is the learned set of numerical weights that recognises a subject, estimates colour, selects an object, or reconstructs pixels. A cloud service keeps those weights on its servers and sends your media to them. NSS sends the weights to your browser so your media can stay with you.
Instead of uploading every image or video, you download a model once, cache it, and reuse it. The [Downloads & storage](/help/models-download-once) manager shows what is present, how much space it occupies, whether storage is durable, and what you can safely remove.
## The model comes to the data
In a cloud workflow, your image crosses the network, the provider runs inference, and the result crosses back. In an on-device workflow, the model weights cross the network on first use and inference runs in the browser. The original photo or clip does not need to be uploaded for the AI operation.
A neural network may contain millions of learned parameters, so its model can be much larger than a normal page asset. Once cached, a second job loads those weights from browser storage. A tool can then work without a live connection when its model and the application shell are both present.
This is also why “nothing uploaded” does not mean “nothing downloaded.” Privacy describes the direction your media travels, not an absence of network activity. On first use, your browser still needs internet access to fetch any model it does not have. For a closer comparison of the two architectures, see [Browser AI vs. Cloud API](/blog/browser-ai-vs-cloud-api-privacy).
## Different features need different weights
NSS does not bundle every AI model into the initial page. That would force every visitor to download tools they may never use. Instead, each feature acquires its own model when needed.
| Feature | Approximate first-run model download | Why it is separate |
| --- | ---: | --- |
| Background Remover, Fast | 45 MB | Responsive general foreground separation |
| Background Remover, Best Quality | 99–192 MB | Higher-detail path selected for the device |
| Video Background Remover: People | 15 MB | Recurrent matting across video frames |
| Image Upscaler | 65 MB per model path | Adds detail through a dedicated super-resolution network |
| Object remover click selection | 40 MB | Segments the object indicated by your clicks |
| Licence plate detector (RT-DETRv2) | 81 MB | Proposes plates for reviewed blur or removal |
| Photo Colorizer, Realistic | 460 MB | Predicts plausible colour for monochrome photographs |
| Object remover AI patch | 196 MB | Fills regions that surrounding frames cannot reveal |
These are working estimates. Device capability also matters: Best Quality can use a smaller WebGPU path or a larger compatibility path through WASM.
Many utilities need no AI model at all. Resize, rotate, format conversion, compression, metadata removal, and classical filter operations can run from application code already loaded in the page. Choosing the simplest sufficient tool saves both time and storage.
## Large downloads ask before they begin
NSS uses consent gates for large optional weights. Anything above roughly 50 MB should not quietly consume a metered connection. The dialog identifies the model, gives an approximate size, explains the benefit, and states the fallback when one exists.
Declining is a real choice, not a broken state. The Realistic colourizer can fall back to instant classical colour styles. Object removal can use a simpler fill when the LaMa patch is declined. Other tools may offer a smaller or more compatible path. Your answer is remembered so the same tool does not repeatedly interrupt the workflow.
Permission controls *whether* a download starts. It does not send the selected photo anywhere. The model request and the local media-processing path remain separate.
## Read the Downloads & storage summary
Open **Downloads & storage** from the header or navigation menu. The first summary card reports model files that belong to NSS: total bytes, number of grouped models, and number of underlying files. A model can include more than one file because weights, configuration, and tokenizer or runtime assets may be cached together.
The second card shows the browser's estimate of usage and quota. It covers the site's browser storage, not only grouped models, so the figures need not match. Some browsers expose no estimate; the manager says so.
Below the summary, every detected model is grouped by tool with its source, measured size, and file count. The inventory recognises the app's managed ONNX, Transformers.js, and versioned service-worker caches, so older downloads remain manageable after an update.
Use **Refresh** after a tool finishes downloading if its entry has not appeared yet. If the browser does not expose Cache Storage at all, the manager shows an unsupported state; offline model management cannot be assumed in that environment.
## Pre-download background removal before you need it
Normal loading is demand driven: open [Background Remover](/background-remover), choose a mode, and acquire the required model. The manager also offers **Pre-download** for the Fast and Best Quality background-removal weights. The current offline bundle is approximately 336 MB because it includes Fast plus both device paths for Best Quality.
Pre-downloading helps before a flight, shoot, client visit, class, or unreliable connection. It warms the same Cache Storage used by the tools, so removal can start offline after the app is cached.
Use a stable, unmetered connection. Wait for success, refresh the inventory, and confirm the entries are present. Then run one image online to confirm the browser can load and execute the selected model path.
Pre-download currently targets background removal, not every AI feature in the product. To prepare another tool for offline use, open and run that tool once while online so its own model and supporting assets can be cached.
## Best-effort and durable storage are not the same
Browser storage begins as **best-effort**. The data is local, but the browser may evict it when the device is short on space or according to its own storage policy. That is the common explanation when a model used last month unexpectedly downloads again.
**Make durable** calls the browser's persistent-storage API. If granted, NSS marks the status durable. That makes automatic eviction less likely; it is not a backup and does not survive clearing site data, a private session, or removal of the browser profile.
The browser, not NSS, decides whether to grant persistence and how much quota the site receives. Policies differ, so the manager reports the result rather than promising that one click controls every device.
For frequent offline use, combine three steps: [install NSS as an app](/help/installing-as-app), pre-download the models you rely on, and request durable storage. The installed app makes launch convenient; the cache provides the assets; persistence reduces the risk of automatic eviction. Each solves a different part of offline readiness.
## Delete one model or reclaim everything safely
Cached weights are replaceable. Choose **Delete** beside one model to reclaim only its measured files, or **Delete all** to remove every model cache NSS owns. Both actions ask for confirmation. The manager reports the approximate bytes freed and refreshes its inventory after deletion.
Deleting model files does not delete your projects, edits, settings, source media, or exported images. It only removes the local weights used by AI tools. The next time you select that feature, the model downloads again and the tool returns to normal.
Per-model deletion suits a shared or space-constrained device: keep the 45 MB Fast model and remove a 460 MB colourizer after a restoration project. Use “Delete all” when you need the maximum space back.
Clearing site data in browser settings also removes model caches, but it is a broader operation and may remove other local site state. Use the manager when you want the precise, understandable option.
## Use a short offline-readiness checklist
Before relying on NSS without a connection:
1. Visit the app online and allow the service worker to cache the application shell.
2. Open Downloads & storage and review the browser's available quota.
3. Press **Pre-download** for Fast and Best Quality background removal if those are your planned tools.
4. Run any other required AI feature once while online.
5. Request durable storage and confirm the reported state.
6. Test the real workflow with the network switched off before leaving the reliable connection.
7. Keep enough device space available for working files and exported results, not only model weights.
The first-time model download, an uncached HEIC conversion module, unvisited help content, and external links still require a connection. Offline support is prepared capability, not a claim that the browser can manufacture assets it has never received. The full boundary is documented in [Working offline](/help/working-offline).
If a model downloads again, open the manager and follow the evidence. Site data may have been cleared, the browser may have reclaimed space, or you may be using another profile. A model revision or different device path can also require a new file; WebGPU and WASM do not always use the same Best Quality asset.
The system remains reversible and visible. Models can be acquired, inspected, prepared for offline work, made more resistant to eviction, and deleted without sacrificing your media. The initial download is not a privacy loophole; it moves the computation to your side of the connection.
That is the product choice behind on-device AI. NSS spends local bandwidth and disk once so your images and videos do not have to make a round trip for every edit. You can see the cost, decide when to accept it, and take the space back when the job is done.
---
### Fixing an Imperfect AI Cutout: Brush, Magic Wand, and Edge Refine
URL: https://bgremover.novusstreamsolutions.com/blog/fix-imperfect-ai-cutout-brush-wand-edge-refine
Published: 2026-07-26 | Category: Tutorials | Author: Novus Stream Solutions Editorial Team
The first preview after background removal can feel like a verdict. Either the subject looks perfect, or you spot a missing finger, a pale rim, a patch of old wall between two chair legs, and assume the answer is to run the AI again. Usually it is not.
The model has already done the expensive part: it has separated most of the subject from most of the background. What remains is a **mask-editing problem**. A mask is simply a greyscale map attached to the original image. White keeps a pixel, black removes it, and grey keeps it partly transparent. Repair the map and the original detail is still there underneath; you are not painting fake pixels over the photo.
NSS gives you three different repair tools because the defects are different. The Brush handles local, irregular mistakes. Magic Wand handles larger regions whose colours are similar. Edge Refine changes the character of the whole boundary. The quickest workflow is knowing which problem belongs to which tool.
## Diagnose the defect before touching a control
Open the processed result in the [image editor](/editor), zoom to 100 per cent, and inspect it on both a light and a dark background. A checkerboard shows that transparency exists, but it can hide a white halo; a white canvas can hide pale leftover background. Switching the preview background makes the boundary tell the truth.
Most imperfect cutouts fall into four groups:
| What you see | What actually happened | Start with |
| --- | --- | --- |
| A piece of the subject is missing | The mask marked foreground as background | Restore Brush |
| Old background remains inside or around the subject | The mask marked background as foreground | Erase Brush or Magic Wand |
| The shape is right but the outline looks crunchy or stepped | The boundary changes too abruptly | Edge Refine |
| A coloured or pale rim follows the subject | Background colour contaminated the soft edge | Decontaminate, then a small Contract if needed |
Do not treat all four with one aggressive slider. Heavy feathering will not bring back a missing finger. A hard erase stroke will not make hair blend naturally. Diagnose first, then make the smallest correction that fits.
## Restore what the AI removed
Choose **Restore** in the Brush tool, or press **R**. A restore stroke raises the mask where you paint, revealing the original pixels that were always under it. This is the right tool for clipped ears, fingers, handles, straps, jewellery, thin chair legs, or a bite taken out of a product edge.
Start with a brush slightly smaller than the feature. Use the bracket keys (`[` and `]`) to resize without leaving the canvas. Keep **Hardness** high for a geometric object and lower it for hair, fabric, or motion blur. If you are uncertain about the exact boundary, reduce **Opacity** and build the restoration over two or three strokes. A low-opacity stroke makes a partial-alpha repair instead of snapping every touched pixel to fully opaque.
Work from the solid interior toward the edge. Restoring from the transparent side inward makes it easy to overshoot and bring back a strip of the old background. Starting inside the known subject gives your hand a safe anchor. If you go too far, switch to Erase with **E** and trim it back; the two modes are meant to be used together.
One useful rule: preserve recognisable structure before chasing softness. A complete glasses arm with a slightly firm edge reads better than a beautifully feathered arm with a missing section. Rebuild the shape first. Edge Refine can settle the transition later.
## Erase the leftovers without shaving the subject
Choose **Erase** or press **E** when the mask has kept something that should be transparent. Common examples are a wedge of wall under an arm, floor visible between furniture legs, a loose island beside the subject, or a shadow the model mistook for part of a shoe.
For a small isolated patch, use a firm brush and remove it directly. For a narrow space, shrink the brush and trace the middle of the unwanted region before working toward the subject. That order gives you room to correct. A huge brush seems faster, but it puts the real edge under the cursor where you cannot see it.
Soft Erase is useful for wispy spill, not for definite holes. If the old background is clearly visible, remove it completely. Leaving a low-opacity fog often creates a dirtier composite than either keeping or deleting the pixel. Save partial opacity for genuine mixed pixels: hair, fur, motion blur, translucent fabric, and antialiased edges.
## Use Magic Wand for colour-shaped mistakes
The Brush follows your hand. **Magic Wand** follows colour. Click a leftover region and the editor selects pixels similar to the colour you clicked, then erases or restores them according to the selected mode.
The **Tolerance** control decides how similar is similar. Start low. Raise it until the unwanted region is selected, then stop before it crosses into the subject. A high tolerance on a beige product against a beige wall can remove both because the colour evidence cannot distinguish them. In that case the Brush is slower but safer.
Keep **Contiguous** on when you want only the connected region under the cursor: the patch of wall between an arm and a torso, for example. Turn it off when the same unwanted colour appears in many separate places and you genuinely want all of them. Hold **Shift** to add another region without losing the first selection.
Magic Wand also has a Restore mode. It is useful when the model punched several holes through a flat-colour logo or product label. Click inside the missing colour, keep tolerance conservative, and restore the connected region. It is less suitable for photographs with textured detail, where similar colours may belong to unrelated objects.
## Refine the boundary after the shape is correct
Brush and Wand repair *where* the boundary runs. **Edge Refine** adjusts *how* that boundary behaves. Use it after the large mask mistakes are fixed, because every edge setting operates across the result.
The two presets are sensible starting points. **Soft edges** keeps partial alpha for hair, fur, feathers, and fabric. **Hard edges** tightens products, logos, icons, and geometric subjects. From there, use the individual controls sparingly:
- **Feather** spreads the transition over more pixels. One or two pixels can settle a hard photographic edge. Large values create a visible blur and should be reserved for genuinely soft material.
- **Smooth** reduces small bumps and stair steps. It helps a noisy mask, but too much rounds corners and erases deliberate detail.
- **Contract** pulls the boundary inward; **Expand** pushes it outward. A one-pixel contract can remove a stubborn rim. Large contractions make the subject look shaved, especially around hair and fabric.
- **Preserve soft edges** keeps the grey values that make strands and motion blur composite naturally. Turn it off for a deliberately hard-edged icon, not as a universal cleanup switch.
- **Decontaminate edges** reduces colour spill inherited from the old background. Adjust its strength before you start cutting the outline inward. A coloured fringe is often an RGB problem, not a shape problem.
If you want the mechanics behind that last control, [why cutouts get a coloured fringe](/blog/why-cutouts-get-a-colored-fringe-edge-decontamination) explains why semi-transparent pixels can carry the old background colour even when their alpha is correct.
## Use a large-to-small repair order
A reliable sequence is faster than random clicking:
1. Run the photo through the [background remover](/background-remover) and choose the mode that fits the subject.
2. At 100 per cent zoom, Restore any missing structural pieces.
3. Remove large retained background regions with Magic Wand where colour separation is clear.
4. Use Erase and Restore for the remaining local corrections.
5. Switch between light and dark preview backgrounds and inspect the full outline.
6. Apply a Soft or Hard Edge preset, then tune Feather, Smooth, Contract, and Decontaminate in small amounts.
7. Zoom out. A technically perfect edge at 800 per cent can look too sharp at the size people will actually see.
8. Export a transparent PNG and verify it with [Check Transparency](/tools/check-transparency) if the destination is strict.
This order matters. If you feather first and then make hard brush corrections, the new strokes can look pasted onto the softened boundary. Shape first, edge character second, export last.
## Know when the source has run out of information
Manual refinement is powerful because it lets you tell the mask what the subject is. It cannot recover detail the camera never recorded. A strand blurred into a same-coloured wall has no recoverable boundary. A heavily compressed thumbnail may have replaced a fine outline with square JPEG blocks. A blown highlight can erase the distinction between a white product and a white backdrop.
Try [Best Quality or Glass mode](/blog/fast-vs-best-quality-choosing-the-right-model) when the subject deserves a different first pass. Restore an important feature when you can still see it in the original. But if you are drawing an entire edge from imagination, stop and ask whether a better source or a quick reshoot would be faster and more honest.
The goal is not to spend twenty minutes proving you can rescue every upload. It is to turn a strong automatic result into a clean finished asset with a few deliberate corrections. Let the model cover the broad image, let the editor handle the exceptions, and keep your attention for the places where a human eye is still better than a probability map.
Start with [NSS Background Remover](/background-remover), open the result in the editor, and treat the first cutout as exactly what it is: an editable first draft that never left your device.
---
### The AI Mask Is Only the First Draft: Inside Our Cleanup Pipeline
URL: https://bgremover.novusstreamsolutions.com/blog/ai-mask-first-draft-background-removal-cleanup-pipeline
Published: 2026-07-26 | Category: Technical Deep Dives | Author: Novus Stream Solutions Editorial Team
It is tempting to describe background removal as one operation: an AI model looks at a photograph and returns a transparent subject. That is the convenient version. The real version has a middle.
The model returns a **mask**: one floating-point value per pixel, somewhere between background and foreground. It is a prediction made at the model's working resolution, not a finished export. The prediction can be soft around a studio backdrop, uncertain in the gap between two chair legs, too firm around hair, or simply broken because a browser inference backend failed. Turning that answer directly into a PNG would make the quality of every cutout depend on the raw quirks of one network.
NSS treats the model output as a first draft. A bounded cleanup pipeline checks that the answer is usable, repairs topology without shaving off thin structures, returns it to the source dimensions, and then uses evidence from the original pixels to decide what to tighten and what to preserve. Here is that middle, in order.
## Stage 1: reject a broken answer
Before polishing anything, the worker checks whether the returned mask is structurally usable. An all-zero array, non-finite values, an impossible shape, or another obviously corrupt result is not a difficult photograph; it is a failed inference run.
That distinction matters. If a broken result were accepted, the page could show an empty canvas and call the job complete. Instead, the current worker stops and the host follows a short, deterministic plan. A transient download interruption can retry the chosen model once in a clean worker. A graph, session, or memory failure moves to one compatibility fallback. Each worker is terminated before the next starts so a failed runtime does not leave a second copy of the model and image in memory.
The fallback is bounded rather than an endless loop. It also reports when the requested model could not run. That is the same philosophy described in [why our AI tools fail loudly](/blog/fail-loudly-not-silent-fallback): a slower or different result can be useful, but pretending it came from the selected path is not.
## Stage 2: recover openings connected to the border
A raw mask often leaves a faint amount of foreground probability in obvious holes: the space between a person's arm and torso, between chair legs, inside a mug handle, or around a cable. A conventional cleanup trick is to erode the whole mask until those uncertain pixels disappear. It works on the hole, but it also attacks the thin foreground structure surrounding it.
Our first topology pass takes a different route. It starts from pixels along the image border that already lean toward background, then follows connected background inward. Confident background can cross colour changes. Uncertain pixels are followed only when the local colour transition stays smooth, which helps the flood move through a real backdrop without stepping across a visible subject boundary.
Every reached pixel becomes background. Opaque chair legs, fingers, stems, straps, and wires are never globally replaced by their transparent neighbours. The pass removes the connected haze while leaving confident foreground alone.
This is a small distinction with a large visual effect. People notice a mysteriously missing chair leg long before they notice the mathematics that protected it.
## Stage 3: close speckle, not real holes
After the border-connected cleanup, a one-pixel morphological close removes tiny pinholes and isolated speckle. The radius is deliberately small. Older, wider close operations could fill the legitimate opening between legs and then require aggressive erosion to reopen it, damaging the surrounding shape twice.
Glass and clear-plastic mode skips this close. An opening inside a transparent bottle may be meaningful, not noise, and [transparent materials need their own interpretation](/blog/removing-backgrounds-from-glass-and-transparent-products). A generic "fill the holes" rule cannot tell a dust speck from the view through a glass interior.
The pipeline therefore branches early enough to preserve the evidence that the glass-specific pass will need later.
## Stage 4: return the mask to the original image
Neural networks usually reason at a fixed working size. Your source photo does not. A 3000-pixel product photo may be reduced for inference, while the final export still needs to match the source dimensions.
NSS upsamples the cleaned model mask to the original image width and height before the fine-edge passes. That scaling is not allowed to be the final word. A plain enlarged probability map can blur a one-pixel transition into several uncertain pixels, so the resize includes edge sharpening and is followed by a guided filter that consults the full-resolution source colours.
The guided filter asks a local question: does the colour evidence at this position support foreground or background? It pushes uncertain alpha toward a clearer answer while respecting boundaries visible in the actual photograph. Fast mode receives a somewhat stronger pull because its raw edges are typically softer; Best Quality starts from a more detailed mask and needs less correction.
This is how an inference mask and a full-resolution export can be different sizes without the outline simply becoming a scaled blur.
## Stage 5: keep fine detail soft where it should be soft
Not every uncertain pixel is a mistake. Hair, fur, feathers, fine fabric, foliage, and motion blur genuinely occupy only part of a pixel. Force those pixels to zero or one and the edge becomes clipped or crunchy.
The hair-preservation pass looks at high-frequency detail in the source image around the mask transition. Where the image contains strand-like or textured evidence, it resists snapping the alpha to a hard threshold and keeps a softer value. Where there is no fine structure, the normal guided cleanup can be firmer.
This is not strand generation. It does not invent hair the camera failed to record. It preserves mixed pixels the source and model already found. The distinction between a binary segment and a soft matte is covered in more depth in [segmentation versus matting](/blog/segmentation-vs-matting-why-good-masks-still-look-cut-out).
## Stage 6: remove light-backdrop spill selectively
Uniform white, grey, cream, and pale studio backdrops are common because they make products easy to shoot. They also leave a faint light rim when the model assigns a low but non-zero alpha to pixels that closely match the background.
The background-kill pass samples patches around the corners and edge midpoints. It activates only when those samples describe a light, reasonably uniform backdrop. Low-alpha pixels close to that sampled colour are reduced or removed; a textured, dark, or non-uniform scene bypasses the pass.
There is a second guided pass afterward, then a narrow fringe trim when the mask contains enough ambiguous pixels and the border looks near-white. Crucially, the trim touches only semi-transparent values. Pixels already judged confidently foreground are protected, so a thin wire does not disappear merely because transparent pixels sit beside it.
This replaced the blunt global-erosion approach that could make a clean object look shaved. A hard boundary is not automatically a good boundary; it is only good when it follows the subject.
## Stage 7: separate shape cleanup from colour cleanup
The next smart-edge pass samples background colour from transparent areas and compares it with pixels in the transition band. Pixels that resemble the old background are pushed outward; pixels that carry distinct subject colour are preserved.
Then fringe decontamination handles the stubborn halo that can remain on hard-edged products and logos. It considers both colour similarity and neighbourhood: a background-coloured pixel mostly surrounded by transparency is a stronger removal candidate than the same colour embedded inside the subject. This is why edge cleanup can reduce a white rim without erasing every white pixel in a white object.
Shape and colour are related but not identical. Alpha says how much of a pixel is present. RGB says what colour that pixel carries. The companion article on [edge decontamination](/blog/why-cutouts-get-a-colored-fringe-edge-decontamination) explains why a correct-looking mask can still composite with the wrong colour at its border.
## Stage 8: take a separate path for transparent materials
Glass mode avoids the ordinary fringe pass, estimates see-through interiors, and then polishes the partial-alpha edge band. Pixels that resemble the sampled background can become translucent instead of disappearing completely. Bright, low-saturation highlights can remain more visible so bottle glints and clear rims survive.
This branch is intentionally opt-in. Run it on an opaque subject and it can interpret background-coloured areas inside the object as transparency. Run the opaque cleanup on glass and it can turn a clear bottle into a solid silhouette. The same input pixels require different assumptions, which is why [Fast, Best Quality, and Glass are separate choices](/blog/fast-vs-best-quality-choosing-the-right-model).
## What still belongs to the human
At the end, the worker records useful mask signals such as overall coverage, ambiguous-edge fraction, and how much foreground touches the border. The result is now at the original dimensions and has passed through the correct cleanup branch. It is still an estimate.
A model cannot know that a beige strap against a beige wall matters more than the wall. It cannot recover a finger hidden by motion blur or decide that a soft shadow should stay because it grounds a product. Those are semantic and creative choices. That is why the result can be opened in the editor and repaired with the workflow in [Brush, Magic Wand, and Edge Refine](/blog/fix-imperfect-ai-cutout-brush-wand-edge-refine).
The important point is that the editor starts from more than a raw neural-network tensor. By the time you see the preview, the app has validated the run, protected the topology, restored the source dimensions, consulted the original colours, preserved fine detail, and chosen the opaque or glass path. All of it happens in the same browser worker pipeline as the model itself; the image is never sent to a cleanup server.
Try the [background remover](/background-remover) with a photo containing real openings or thin structures, then inspect the result at full size. The clean space between those details is not an accident. It is the part after the AI.
---
### How NSS Verifies a Transparent Export Before You Download It
URL: https://bgremover.novusstreamsolutions.com/blog/how-nss-verifies-transparent-exports-before-download
Published: 2026-07-26 | Category: Technical Deep Dives | Author: Novus Stream Solutions Editorial Team
A transparent checkerboard is a useful preview, but it is not proof. A page can draw a checker pattern behind an image whose file has no alpha channel at all. An encoder can return a blob with the wrong header. A soft mask can become binary during a round trip. RGB values can be damaged under partly transparent pixels and reveal a dark halo only after the cutout is placed on a new colour.
That is why NSS does not treat "the browser gave us a file" as the end of export. The app builds the transparent pixels deliberately, encodes them in the requested format, checks the file signature, decodes the result again, and compares real edge pixels with the mask that went in. PNG also has a separate fallback encoder if that round-trip check fails.
The verification takes place on your device before the download. It is less visible than the Remove button, but it is part of what makes the downloaded asset usable outside our own preview.
## Transparency is four channels, not a visual effect
Every output pixel starts as RGBA: red, green, blue, and alpha. Alpha is opacity. A value of zero is transparent, 255 is opaque, and values between them are essential for antialiasing, hair, fur, motion blur, glass edges, and any other soft transition.
The export compositor combines the original source pixels with the edited mask. For a transparent background, the final alpha is the mask value capped by the source pixel's own alpha. If the uploaded image was already partly transparent, background removal cannot make that pixel more opaque than the source. The colour channels remain separate from opacity.
That separation is **straight alpha**. The RGB does not get multiplied by alpha and baked toward black before storage. The compositor also avoids turning every fully transparent RGB value into zero merely because the pixel cannot currently be seen. Preserving colour information across the boundary makes later compositing more predictable.
If you want the underlying distinction, [straight alpha versus premultiplied alpha](/blog/the-difference-between-straight-and-premultiplied-alpha) explains the equations and the halos they can create. The export pipeline is where that theory becomes a file.
## Edge colour is cleaned before encoding
An alpha value can be correct while its RGB still carries the old background. Imagine a hair-edge pixel that is half brown hair and half blue wall. The mask may correctly keep it at 50 per cent opacity, but the blue mixed into its RGB will show as a cool rim on a white or orange replacement background.
When edge decontamination is enabled, NSS works on a copy of the source colours and reduces that spill before compositing. For a transparent result it also performs a narrow post-composite halo sweep: an almost-transparent, near-white pixel at the outer fringe is overwhelmingly likely to be leftover studio background, so it can be cleared without flattening the whole edge.
Neither pass turns the mask into a hard silhouette. The goal is to clean contaminated transition pixels while preserving partial alpha where the subject genuinely mixes with the background. That is why [Edge Refine](/blog/fix-imperfect-ai-cutout-brush-wand-edge-refine) offers separate controls for boundary position, softness, and decontamination strength.
## The output format changes the promise
The export panel supports PNG, WebP, AVIF, and JPG, but those formats do not make identical promises.
| Format | Transparency | Quality control | Best fit |
| --- | --- | --- | --- |
| PNG | Full alpha, lossless | Not needed | Editing handoff, logos, print assets, safest general cutout |
| WebP | Full alpha, compact | Yes | Websites and applications that support WebP |
| AVIF | Alpha with very strong compression | Yes | Small modern web assets where compatibility has been checked |
| JPG | No alpha channel | Yes | A finished image flattened onto white, solid colour, gradient, or another background |
JPG is not a broken transparent export. It is a format that cannot store transparency. If JPG is selected, the compositor supplies a background; white is the safe fallback when none was chosen. PNG, WebP, and AVIF go through the alpha-integrity path.
The broader trade-offs are covered in [PNG versus WebP versus AVIF](/blog/png-vs-webp-vs-avif-which-format-for-transparency). For an asset that will be edited again, PNG remains the least surprising default. For a finished web placement, WebP or AVIF can be much smaller.
## Check 1: does the file identify as the format requested?
An extension and MIME type are labels. The bytes inside the file are the evidence. Immediately after encoding, NSS reads the opening bytes and checks the format signature: the PNG signature for PNG, the RIFF/WEBP markers for WebP, the file-type box for AVIF, or the JPEG start marker for JPG.
If the header does not match the chosen format, the export is aborted instead of downloading a corrupt blob with a convincing filename. This is a small check, but it catches a class of failures that otherwise surface later as "file cannot be opened" in another application.
The filename is added only after the encoded payload has proven what it is.
## Check 2: can the browser decode the alpha it just encoded?
A valid PNG signature proves that the file is a PNG. It does not prove that its soft edge survived. The next check decodes the new blob into an image again, draws it on an alpha-enabled canvas, and inspects the pixel data.
The verifier finds positions where the original mask was neither near zero nor near one: the ambiguous edge band that should contain partial transparency. It samples up to 100 of those pixels across the mask and compares the decoded alpha with the expected alpha.
Three failure signals matter:
1. **Binarisation.** A pixel expected to be partly transparent comes back as fully transparent or fully opaque.
2. **Large alpha drift.** The decoded value is too far from the mask value that was encoded.
3. **Destroyed edge colour.** A visible pixel comes back with all-black RGB, a sign that colour information may have been lost or mishandled.
Hard-edged graphics may have no soft pixels to sample. That is valid; an icon with only zero and 255 alpha is not defective merely because it has no feathering. The check adapts to the actual mask rather than demanding partial transparency everywhere.
## Check 3: PNG gets an independent fallback
Browser image encoders are fast and normally reliable, but export should not bet the only copy of your result on "normally". If the PNG round trip fails its alpha-integrity check, NSS re-encodes the same ImageData with a pure-JavaScript PNG fallback.
The fallback is independent of the path that produced the failed blob. It is slower, which is why it is not the first choice, but it gives the export a second route that does not repeat the same browser or driver behaviour. The replacement file is then used for the download.
WebP and AVIF still receive the signature and decoded-alpha checks. PNG gets the extra fallback because it is the default handoff format and the one users most often choose specifically for lossless transparency.
Verification itself is not allowed to destroy a successful export. If the browser cannot perform the diagnostic decode even though encoding produced a correctly identified file, the app does not throw away the finished blob solely because the inspection API was unavailable. The check is a guardrail, not a second single point of failure.
## Verify the file in the workflow that matters
No automated sample can predict every destination application. After downloading a cutout, test it where the asset will actually live:
- Drop it onto both a dark and a light background. Halos usually reveal themselves on the opposite tone from the original backdrop.
- Reopen it in the NSS [image editor](/editor). The import path preserves RGBA and recognises an existing cutout rather than treating transparent pixels as black.
- Run it through [Check Transparency](/tools/check-transparency) to see whether the file has any transparent pixels and whether it contains partial alpha.
- If Photoshop shows black, distinguish the canvas display from the file itself. Our guide to [transparent PNGs showing black in Photoshop](/blog/why-your-transparent-png-shows-black-in-photoshop) walks through that diagnosis.
- Confirm that the receiving platform accepts the chosen format. A platform that converts PNG to JPG will flatten transparency after a correct NSS export.
The last point is important: export integrity ends at the file we create. A social network, marketplace, email client, or CMS can recompress or flatten it later. Keep the original PNG when the transparent master matters, then make destination-specific copies from that master.
## A local guarantee needs local evidence
The source image, mask, compositing, encoding, decoded verification, and fallback all stay in the browser. No cutout is uploaded to an export service, and no server needs to receive the final pixels to validate them. The temporary decoded copy exists only in the local export path and its bitmap is released when the check is finished.
That is the useful meaning of "true transparency" for this app. It is not just a checkerboard in the interface or an `image/png` label on a download. It is a straight-alpha pixel pipeline, a format signature that matches the request, a round-trip comparison against the working mask, and another PNG encoder ready when the first path cannot prove it kept the edge intact.
Create a cutout with [NSS Background Remover](/background-remover), export it as PNG, and place it on a colour the original photo never contained. A clean edge there is the result that matters, and it has already been checked before the file reached your Downloads folder.
---
### Colourising Old Black-and-White Family Photos in Your Browser
URL: https://bgremover.novusstreamsolutions.com/blog/colorizing-old-black-and-white-family-photos
Published: 2026-07-24 | Category: Product & Mission | Author: Novus Stream Solutions Editorial Team
Most people have a box like it somewhere. A biscuit tin, a shoebox, an envelope at the back of a drawer: full of small grey photographs of people you half-recognise. A grandmother on a doorstep. A wedding party squinting into the sun. A child on a beach that could be anywhere. They are precious, but they are also a little remote, because the grey flattens them. Colour is how we remember being alive, and these photos never had any.
So we brought back the colorize tool, and we want to be honest about what it does before you get your hopes up. It does not restore the colours those photographs once had. Nothing can. What it does is make a careful, plausible guess, and sometimes that guess is enough to make a face feel present again.
## Two ways to add colour, and when each one fits
There are two separate paths inside [the colorize tool](/tools/colorize), and they work in completely different ways.
The first is an **AI model** (DDColor). It has looked at an enormous number of colour photographs and learned what tends to be what colour: skin, sky, grass, brick, wood. When you hand it a grey photo it predicts a full-colour version. It is the one that produces genuinely convincing skin tones and landscapes. The catch is its size: it is around 460 MB, so it is **consent-gated**. It will not download unless you opt in. That is deliberate. We are not going to pull half a gigabyte onto your phone without asking, and once it has downloaded it is cached, so you only pay that cost the first time.
The second is a **classical LAB tint**. This is not AI, and we will not call it that. It applies colour in the LAB colour space using the styles you pick, with no download at all. It is fast, it is light, and it is a good choice when you want a warm wash over a photo rather than a full reconstruction, or when you simply do not want to fetch a large model for one quick job.
A rough guide:
| You want... | Use |
| --- | --- |
| Convincing, realistic colour on faces and scenes | AI model (DDColor), consent-gated |
| A quick tint with no download | Classical LAB path |
| A period feel: sepia, vintage, faded | Either, with the matching style |
| To colour lots of photos with nothing to fetch | Classical LAB path |
## The honest part: it guesses, it does not remember
This is the rule we will not bend. **No tool recovers the true original colours of a black-and-white photograph, because those colours were never recorded.** The film captured brightness, not hue. There is no hidden layer to bring back.
What the model does is infer. Grass is usually green, so it paints the lawn green. Skin is usually somewhere in a known range, so it warms the faces. Most of the time this lands well. But it can be confidently wrong. Your grandmother's dress that everyone remembers as deep green might come back a soft blue, because a blue dress was statistically the safer bet and the model has no way to know your family history.
That is where **you** beat the model. If you remember that the front door was red, or that the car was that particular bottle green, that memory is worth more than any prediction. The tool gives you a believable starting point; your recollection is what makes it *true*. Treat the result as a first draft you get to correct, not a verdict.
## A gentle workflow for old prints
You will get far better colour if the grey image you start with is clean. Here is an unhurried way to do it.
- **Capture the print well.** If you are photographing it with a phone rather than scanning, use soft, even light. Near a window on an overcast day is ideal. Avoid direct glare and hard shadows. Fill the frame with the photo and hold the phone parallel to it so the edges stay square.
- **If the scan is tiny, enlarge it first.** A small or low-resolution scan gives the colour model very little to work with. Running it through [the upscaler](/upscale) beforehand can help. Choose the **Photo** source, which uses a real-world super-resolution model suited to camera scans, including ones that were compressed or previously shrunk. Be realistic here too: upscaling invents plausible detail, it does not recover detail the original never captured. A stamp-sized scan will not become a poster. But going from cramped to comfortable often gives the colouriser more to reason about.
- **Colourise.** Open [the colorize tool](/tools/colorize), drop the image in, and choose your path. Opt in to the AI model if you want the most convincing result, or stay on the classical tint if you would rather not download anything.
- **Pick a style.** There are five: realistic, vintage, sepia, saturated, and pastel. *Realistic* aims for natural colour. *Vintage* and *sepia* lean into a period look, which can suit an image that already feels of its era. *Saturated* pushes the colour harder; *pastel* keeps it gentle. Try more than one. They take moments.
- **Compare with the slider.** The tool page has a before/after slider. Drag it back and forth. This is not just for show. It is how you catch a colour that has gone wrong. If the slider tells you the jacket looks plastic or the skin has gone orange, switch styles or accept that this particular photo is a harder case.
- **Download, and you are done.** Nothing was uploaded, nothing was saved, nothing lingers.
## It lives in the editor too
Colorize is not only a standalone page. It sits inside [the image editor](/editor), right beside Grayscale, as one of the utility tools. That matters when a photo needs more than colour: a crop, a levels tweak, a metadata strip before you share it. In the editor the colorize result is a normal, **undoable** step: apply it, look at it against the rest of your edit, and if it is not right, undo and try another style. You are not committing to anything.
If you are also dealing with fading, spots, or heavy damage rather than just absent colour, our companion guide on [restoring old faded and scanned family photos](/blog/restoring-old-faded-scanned-family-photos-in-browser) walks through that side of the work, and the two tools pair naturally: clean the print up first, add colour last.
## Why this stays on your device
Family photos are the most private images most of us own. They show children, homes, the insides of houses, the faces of people who are no longer here. The idea of feeding them to some server to be processed, and quietly retained, sits badly with a lot of people, and rightly so.
So none of that happens here. **The photograph never leaves your device.** The colour model runs in your browser, on your own hardware, using WebGPU where it is available and falling back to WASM where it is not. The image is not uploaded, there is no account, and there is no server in the processing loop. When you close the tab, the session is gone. If you want to understand the machinery underneath, how a real AI model runs entirely on the page with nothing sent anywhere, we wrote about [what on-device AI actually means for creators](/blog/what-webgpu-on-device-ai-means-for-creators).
For a shoebox of irreplaceable prints, that is not a small detail. It is the whole reason to use a tool like this rather than the first colouriser a search turns up.
## Why we added it back: the honest-restoration idea
We took colorize out at one point, and bringing it back made us decide what we actually wanted it to be. It would have been easy to dress it up: promise "authentic restoration", imply the machine somehow knows what your grandmother wore. We did not want to build that, because it is a quiet lie, and a lie about someone's memories is a worse kind than most.
An honest restoration tool tells you where it stands. It offers you real, convincing colour and admits, plainly, that the colour is a guess. It gives you the slider so you can judge for yourself, keeps the classical path for people who want no download, and puts the correcting power, your memory, back where it belongs. The goal is not to fool you into thinking the photo was always in colour. It is to give you something warm and believable to sit alongside what you remember, and to be straight with you about the difference.
Dig out the tin. Pick one photo. The one you look at most. Give it colour, drag the slider, and see whether a face you thought you had lost to grey feels a little closer. When you are ready, start with [the colorize tool](/tools/colorize); it is free, it downloads nothing until you say so, and your photographs never leave your hands.
---
### Video Background Removal Is Back: How the New Recurrent Engine Works
URL: https://bgremover.novusstreamsolutions.com/blog/how-our-new-video-background-engine-works
Published: 2026-07-24 | Category: Technical Deep Dives | Author: Novus Stream Solutions Editorial Team
The old video background remover was one of the few tools we quietly stopped recommending. It worked on paper (mask every frame, drop the background), but the output shimmered. Edges crawled. Hair boiled. You could tell at a glance that the clip had been cut out, and no amount of tidying fixed it. So we took it out and rebuilt it from the ground up.
This is a technical write-up of what changed and why. The short version: the flicker was never a polish problem you could smooth away afterwards. It was baked into the approach. Fixing it meant changing the kind of model doing the work.
## Why per-frame masking flickers
A video is just a stack of still frames. The obvious way to remove a background is to run a still-image segmenter on each frame in turn. That is exactly what the old tool did, and it is what most quick browser tools still do.
The problem is that an image model has no memory. It looks at frame 100 with no knowledge of what it decided on frame 99. Every frame is a fresh, independent guess. In the easy middle of the subject that is fine. Those pixels are obviously foreground in every frame. The trouble lives at the boundary: the exact pixel where a strand of hair meets the wall, or where a shoulder blurs into a similar-coloured background.
At that boundary the model is genuinely uncertain, and its guess wobbles by a pixel or two from one frame to the next even when nothing in the scene has actually moved. Stack those independent wobbles back into a video and the eye reads the collective jitter as shimmer, crawl, and flickering fringes. It is the temporal equivalent of the "cut-out" look. The same failure we wrote about in [why good masks still look cut out](/blog/segmentation-vs-matting-why-good-masks-still-look-cut-out), only now it is moving.
The tempting fix is to smooth. Average each frame's mask with the previous few, an exponential moving average, so the jitter gets damped down. We tried that. It is a trap:
- **Smoothing hides jitter, it does not prevent it.** You are averaging bad guesses, so soft edges get softer and mushier.
- **Smoothing lags.** When the subject actually moves fast, the averaged mask trails behind the real edge, leaving a ghost or a chewed-off limb for a few frames.
- **It cannot tell wobble from motion.** The two look identical to an averaging filter, so it damps both or neither.
You end up trading one artefact for another. The honest conclusion was that afterwards is the wrong place to solve this.
## The core idea: recurrence instead of smoothing
The People tier, which is the default, uses **RVM: Robust Video Matting**. It is a recurrent network built on a mobilenetv3 backbone, and the important word is *recurrent*.
Instead of forgetting each frame, RVM carries a hidden state forward. Internally these are four recurrent tensors, call them r1 through r4, that travel from one frame into the next. When the model looks at frame 100 it also receives its own condensed memory of everything up to frame 99: where the edges were, how the subject was moving, which ambiguous pixels resolved which way. It resolves the current boundary *in the context of the recent past*.
The distinction matters, so it is worth being precise about it:
| | Per-frame + EMA smoothing | Recurrent (RVM) |
|---|---|---|
| Where consistency comes from | Bolted on after masking | Built into the architecture |
| Handles fast motion | Lags, leaves ghosts | State tracks the movement |
| Ambiguous edge pixels | Averaged into mush | Resolved with prior context |
| Failure mode | Soft, laggy, trailing | Degrades gracefully |
Temporal consistency stops being a filter you apply and becomes a property of how the model thinks. That is the whole reason the rebuilt tool does not shimmer where the old one did. Not a better smoothing pass, a different class of model. If you want the wider argument for why matting like this beats a hard keyed mask, we laid it out in [AI video background removal versus chroma key](/blog/ai-video-background-removal-vs-chroma-key).
## Three tiers, because one model is not right for everything
RVM is trained on people. It is very good at people, and it is fast, but point it at a product on a turntable or a pet and its assumptions do not hold. So the tool offers three tiers:
- **People (default): RVM.** The recurrent engine described above. Choose this for anyone on camera: talking heads, dancers, presenters, interviews.
- **Fast.** A lightweight per-frame model with edge smoothing, for when you want a quick result or the subject is not a person.
- **Best Quality.** A heavier per-frame model, again with edge smoothing, for the most accurate boundaries on arbitrary subjects.
The two per-frame tiers still work frame-by-frame, so they lean on edge smoothing for consistency and carry the trade-offs above. That is deliberate and honest: recurrence is the right tool for people, and for everything else you pick between speed and edge quality. There is no single model that wins on all three axes at once, and we would rather show you the choice than pretend one exists.
## Running it on your machine
The whole thing runs on-device, in the browser. Your video is never uploaded. It is decoded, matted, and re-encoded on your own hardware, and when you close the tab the session is gone.
- The RVM model is about **15 MB and self-hosted** by us, so there is no third-party CDN in the loop. It downloads once and is cached; the next visit starts without the wait.
- It runs on **WebGPU** where the browser and GPU support it, and falls back to **WASM** on the CPU where they do not. WebGPU is meaningfully faster, but the fallback keeps the tool usable rather than broken. (WebGPU is powerful and occasionally sharp-edged, we documented one such [shader bug that broke Best Quality](/blog/the-webgpu-shader-bug-that-broke-best-quality) if you want a sense of the terrain.)
We are not going to quote you a frames-per-second figure. It depends entirely on your GPU, the clip's resolution, and which tier you pick, and any single number we published would mislead most readers.
## The real constraints
Processing video in a browser tab means living inside a memory budget, and we would rather state the limits plainly than let you discover them mid-export:
- **About 60 seconds** of clip. Longer than that and memory pressure gets unsafe.
- Processed at up to **1280px on the long edge**. Larger frames are scaled to fit that ceiling.
- Frames are streamed through a small working buffer, so the pipeline holds only the handful it is actively processing rather than the whole decoded video: decode, mat, encode, release, repeat.
These are honest ceilings, not placeholders we intend to quietly lift. They are the price of keeping everything on your device instead of shipping your footage to a server farm.
## The alpha-output reality
Removing the background is only half the job; you then have to store the transparency, and here browsers force a genuine trade-off.
The tool's primary output is a **transparent WebM**: VP9 with a `yuva420p` alpha channel. It is real per-pixel transparency, and it drops straight onto any other layer. The catch, stated directly:
- **Transparent WebM plays most reliably with its alpha in Chromium browsers**: Chrome and Edge. Support varies in other players, where the transparency may appear as an opaque or black background.
We are not going to pretend that cost does not exist. So the tool also offers two alternatives:
- **A composited MP4**: your subject placed over a background colour or image you choose, flattened into a universally-playable file.
- **A PNG-sequence ZIP**: every frame as a PNG with full 8-bit alpha, for dropping into a proper editor.
If you are targeting Safari or the wider web, reach for the MP4 or the PNG ZIP. WebM is the right answer when you control the playback environment.
## Feeding the video editor
The recurrent engine is not only a standalone download tool. It is the same matting that powers scenes in the [video editor](/video-editor). When you drop a lifestyle background behind a clip that is still opaque, an amber prompt offers to remove that clip's background with the People model in place, so the layer beneath actually shows through instead of being hidden. The background removal and the compositing live in the same place, which is where you usually want them.
## Try it
The rebuilt tool is live. Bring a clip up to about a minute, pick the tier that matches your subject, and choose the output that suits where the video is going. Nothing leaves your device, and nothing is kept once you close the tab.
Open the [video background remover](/video-background-remover) and see how the recurrent engine handles your footage.
---
### Fast, Best Quality, or Glass? Choosing the Right Removal Mode
URL: https://bgremover.novusstreamsolutions.com/blog/fast-vs-best-quality-choosing-the-right-model
Published: 2026-07-22 | Category: Product & Mission | Author: Novus Stream Solutions Editorial Team
The background remover gives you three modes, and the most common question we get is a fair one: which one should I actually click? People tend to reach for whichever sounds strongest, run everything through it, and then wonder why the tab is chewing through memory on a stack of simple product shots.
This is a decision guide, not a sales page. Most of the time the fast option is the right one, and we would rather you know when it is than default to the heavy model out of caution. Here is how to pick, and how the tool now helps you pick without you having to think about it too hard.
## The three modes at a glance
Each mode is doing a different job. They are not "small, medium, large" versions of the same thing.
- **Fast**: a small, quick model. It handles subjects that are already easy to separate: a person against a plain wall, a product on a white sweep, anything with clear contrast between subject and background. It downloads quickly and runs quickly, which matters when you have a queue.
- **Best Quality**: this is BiRefNet-lite. It is slower and it is the one to reach for when edges are the whole problem: hair, fur, frayed fabric, foliage, a subject that half-blends into a busy background. It is more accurate at exactly the boundaries where Fast gets vague. On machines without WebGPU it runs on WASM, which is slower again, more on that trade-off below.
- **Glass**: not a separate model at all. It is a post-processing pass that preserves see-through interiors: the inside of a wine glass, a clear plastic bottle, a pair of glasses. Ordinary removal treats those transparent regions as background and punches a hole straight through them. Glass mode keeps them.
If you want the mechanics of what "removal" is actually doing under the hood, [how AI background removal actually works](/blog/how-ai-background-removal-actually-works) covers the pipeline. The short version: the model produces a mask, and better models produce better masks at the hard edges.
## Pick by subject
Most decisions collapse to what you are cutting out. This table covers the common cases.
| Your subject | Start with | Why |
| --- | --- | --- |
| Portrait, hair, fur, feathers | **Best Quality** | Fine strands are exactly where BiRefNet-lite earns its cost |
| Simple product on white or plain background | **Fast** | High contrast, clean edge, the small model nails it and finishes sooner |
| Glass, clear plastic, anything see-through | **Glass** | Preserves the transparent interior instead of filling it in |
| Busy or low-contrast background | **Best Quality** | The subject blends into the background; the small model gets uncertain |
| Hundreds of images at once | **Fast first** | Run the batch quickly, then escalate only the ones that failed |
That last row is the one people get wrong most often. If you have a large batch, do not put the whole thing through Best Quality on principle. Run it on Fast, look at the results, and re-do only the handful where the edge went soft. You will save a lot of time and compute, and the failures are usually obvious at a glance.
## Why "start Fast, escalate the failures" beats defaulting to Best
The instinct is understandable: pick the most accurate model, use it for everything, never think about it again. The problem is that Best Quality is not free. BiRefNet-lite is a larger model. It takes longer to download the first time, and it takes more compute per image every time. On a machine without WebGPU it falls back to WASM, and the gap widens further.
So if you push a queue of easy product shots through Best Quality, you pay that heavier cost on every single one. For images the small model would have cut out perfectly. The accuracy you bought made no difference on those, because there was nothing hard about them.
The honest framing is this: **Best Quality is worth it precisely when the edges are hard, and wasted when they are not.** Fast is not a lesser tool; it is the right tool for a large share of real work. We would rather you match the mode to the subject than treat "Best" as a safety blanket.
We wrote separately about why the best model runs on WASM at all, and what that means for speed on machines without a modern GPU. Worth a read if your results feel slow: [why Best Quality background removal runs on WASM](/blog/why-best-quality-bg-removal-runs-on-wasm).
## How the tool helps you choose
You do not have to get the mode right on the first try, because the tool watches the result and tells you when it looks uncertain.
If a cutout comes back with background left behind, or with soft, uncertain edges where the model could not commit, you will see a suggestion to retry in Best Quality, a one-click **Retry Best Quality** button. This matters, so we will be precise about it:
- The tool **suggests**. It does not silently switch models behind your back. If Fast gives you a clean result, nothing changes and you keep the fast path. You always know which model produced the image in front of you.
- The suggestion only appears when the result genuinely looks uncertain, so it is a real signal rather than a nag on every image.
This is the practical version of "start Fast, escalate the failures". The tool flags the failures for you, so you do not have to eyeball every image in the batch by hand.
## Refine edges: the last mile
Once you have a mask you are mostly happy with, there is a second pass called **Refine edges** with two presets:
- **Softer**: for hair and fur. It feathers the boundary so fine strands read naturally instead of ending in a hard chop.
- **Crisper**: for hard product edges. It tightens the boundary so a bottle or a box has a clean, definite line with no fringe.
Reach for Refine edges when the model got the subject right but the very edge is not quite the texture you want. A portrait that is nearly right but has a slightly ragged hairline is a Softer job. A phone case with a faint halo is a Crisper job.
Worth understanding: a mask can be correct in shape and still look slightly cut out, because the edge is where segmentation and matting part ways. If your results have that "pasted-on" quality even when the outline is right, [segmentation vs matting, why good masks still look cut out](/blog/segmentation-vs-matting-why-good-masks-still-look-cut-out) explains what is happening and why the Softer preset exists.
## A quick worked example
Say you are prepping a product catalogue: two hundred items on a white sweep, plus a dozen lifestyle portraits, plus a few glassware shots.
- **The products** go through the batch queue on **Fast**. They are high-contrast on white; the small model handles them and finishes far sooner than Best would. When they are done, **Export all as ZIP** bundles every cutout into one download. (If you have hit a crash on ZIP export before, that was a bug this cycle fixed, it holds now.)
- **The portraits** go through **Best Quality**, because hair is the one thing Fast reliably struggles with. Add a **Softer** refine pass on any that need it.
- **The glassware** goes through **Glass** mode so the transparent interiors survive instead of turning into holes.
Three modes, three jobs, no wasted compute. That is the whole idea. The point is not that one mode is better than another. It is that each is built for a different kind of edge, and matching the mode to the subject is what keeps a big job fast without giving up the quality where quality actually matters.
## It all stays on your device
Whichever mode you pick, none of it leaves your machine. The models run on-device through WebGPU, falling back to WASM where WebGPU is not available. The weights download once and are cached, so your second visit starts without waiting on that download again. Your images are never uploaded, there is no account, and there is no server in the processing loop.
The editor is one-time-use by design: nothing is saved on a server or held in the browser between sessions. You open the tool, do the removal, download the result, and when you close the tab the session is gone.
## The short version
- **Fast** for easy, high-contrast subjects and for bulk. Start here.
- **Best Quality** (BiRefNet-lite) for hair, fur, fine edges, and busy backgrounds. Slower, heavier. Spend it where the edges are actually hard.
- **Glass** for anything see-through.
- Let the tool flag the uncertain results and offer **Retry Best Quality**: do not pre-emptively run everything through the heavy model.
- Finish with **Refine edges** (Softer for hair, Crisper for hard edges) when the last millimetre matters.
Pick a subject, pick the matching mode, and adjust only when the result tells you to. Open the [background remover](/background-remover), drop in an image, and start on Fast. The tool will tell you if it is time to reach for something stronger.
---
### Rescuing Old Shaky Clips: Stabilise First, Then Upscale
URL: https://bgremover.novusstreamsolutions.com/blog/rescue-old-shaky-clips-stabilize-then-upscale
Published: 2026-07-20 | Category: Tutorials | Author: Novus Stream Solutions Editorial Team
You found the old clip. A birthday, a first-steps wobble, a gig you filmed on a phone that felt cutting-edge at the time. It is shaky, it is small, and it looks rough on a modern screen. The instinct is to make it bigger and sharper first, then worry about the shake. That order is backwards, and this post is about why.
Two of our tools can rescue footage like this: a **stabiliser** and an **upscaler**. Run them in the wrong sequence and you waste effort. Run them in the right sequence and you get the best version of the clip that the original pixels can honestly support. Everything below happens on your device. The video is never uploaded, and nothing is kept once you close the tab.
## Why order matters
Think about what each tool actually does to the frame.
Stabilising works by tracking how the frame drifts and jitters over time, then shifting and rotating each frame to cancel that motion out. To hide the shake at the edges, it has to **crop in slightly** and, on rough sections, warp the frame a little. The output is a steadier clip with a marginally tighter frame than the original.
Upscaling enlarges the frame and cleans it up. It commits you to a bigger resolution.
Now line those up:
- **Stabilise first.** You are cropping and warping while the frame is still at its original, lighter resolution. That is cheap and forgiving. Once the shake is gone, you can decide how big the final clip should be.
- **Upscale first (the wrong way).** You enlarge every wobble along with everything else. A bigger, sharper wobble is still a wobble. You have spent processing time making the shake more visible. Then the stabiliser crops into that enlarged frame anyway, throwing away pixels you just paid to invent.
The rule is simple: **fix the motion before you commit the resolution.** Steady the clip, then make it bigger.
## Step 1: Stabilise the shake
Open the [video stabiliser](/tools/video-stabilize) and drop your clip in. It analyses the camera's path across the clip and smooths that trajectory, so the jerky hand-held motion becomes a gentler drift. For longer clips there is an ffmpeg **deshake** fallback that handles the load without running you out of memory.
A few things to expect, honestly:
- **A mild crop.** The stabiliser hides shake by pushing the frame edges out of view, so the final image sits a little tighter than the original. This is normal and it is exactly why you do it before upscaling. You want the crop to happen while the frame is still at native size.
- **It steadies, it does not reshoot.** Very violent shake, or a whip-pan the tracker cannot follow, will not become a tripod shot. It calms motion; it does not invent a smoother camera move that was never there.
- **Watch the edges on rough sections.** Where the shake is worst, the warp works hardest, and you may see slight wobble at the frame boundary. If that bothers you, a slightly tighter starting crop usually settles it.
If you want a deeper walk-through of the stabiliser on its own (settings, edge cases, what the smoothing is doing frame by frame), the companion post [how to stabilise shaky video in your browser](/blog/how-to-stabilize-shaky-video-in-browser) goes further than this pipeline overview does.
Save the steadied clip. That file is now your input for step two.
## Step 2: Upscale, with realistic expectations
Take the stabilised clip to the [video upscaler](/video-upscale). Here is the honest part, and it is the most important paragraph in this post: **the video upscaler is a classical enhancement pipeline, not AI.** It runs denoise, then a Lanczos scale-up, then sharpening, then a levels pass. It enlarges and cleans the frame. It does **not** invent detail that the camera never captured.
That distinction matters for old footage. A soft, compressed clip from an old phone does not contain hidden sharpness waiting to be unlocked. The upscaler will make it larger and tidier and less noisy, genuinely better to look at, but it cannot reconstruct a face or a sign that was a blur in the source. Anyone promising to turn a thumbnail into a crisp 4K master is overselling. We would rather you know the ceiling going in.
There are three strength presets:
| Preset | Best for | Trade-off |
| --- | --- | --- |
| **Light** | Clips that are already fairly clean; you just want more size | Least smoothing, keeps the most original texture |
| **Balanced** | The usual choice for old phone footage | Sensible denoise and sharpen without going plasticky |
| **Strong** | Heavily compressed or noisy sources | Cleans the most, but can smear fine texture if pushed |
Start on **Balanced**. If the result looks waxy or the grain has been scrubbed into mush, drop to **Light**. If blocky compression noise is still crawling around, try **Strong** and accept a softer texture as the price.
Note the **1080p input cap**: the pipeline is built to enlarge modest footage, which is precisely the old-clip case, so that cap rarely bites here. And because it is classical rather than a learned model, there is no large weight download to wait on; it just runs.
If you want the fuller reasoning on what browser upscaling can and cannot do, [free 4K video upscaling in the browser](/blog/free-4k-video-upscaling-browser) lays out the same honest limits in more detail.
## Step 3 (optional) (Resize for where it is going
Once the clip is steady and enlarged, you may want it in a specific shape) a square for a feed, a vertical 9:16 for stories, a clean 16:9 for a share. The [video resizer](/tools/video-resizer) changes dimensions and aspect ratio to platform specs using ffmpeg compiled to run in the browser.
Two practical notes:
- The first run downloads a ffmpeg core (around 32 MB). That download now shows **real staged progress** rather than a bar that sticks and makes you wonder if it has frozen.
- If your clip uses an unsupported codec, it now **errors quickly with a clear message** instead of stalling, so you find out in seconds, not after a long wait.
Do this last, after stabilising and upscaling, so you are only ever cropping the final composition once.
## What old footage will and will not lose
Set your expectations before you start, so the result feels like a win rather than a disappointment. Old clips carry damage that no on-device pass fully erases:
- **Grain and sensor noise** get reduced, not removed. Push denoise too hard and you trade noise for a plasticky look. That is why the presets exist.
- **Compression artefacts**, the blocky mosquito noise around edges, soften but do not vanish. They were baked into the file when it was first saved.
- **Interlacing** from very old camcorder-era footage (those comb-teeth on motion) is not something this pipeline is built to reconstruct away.
- **Genuinely lost detail** stays lost. If a face was a smear at capture, it is a slightly larger, cleaner smear afterwards. Honest is better than hopeful here.
What you *do* gain is real: a clip that holds still, sits at a usable size, reads more cleanly, and fills a modern frame. For most old personal footage, that is the difference between unwatchable and worth keeping.
## The pipeline at a glance
- **Stabilise** at [/tools/video-stabilize](/tools/video-stabilize): smooth the motion, accept a mild crop, save the result.
- **Upscale** the steadied clip at [/video-upscale](/video-upscale): classical enlarge-and-clean, start on Balanced, no invented detail.
- **Resize** if needed at [/tools/video-resizer](/tools/video-resizer): final shape for the platform, done once at the end.
Every step runs on your machine. The footage stays with you, nothing is stored between sessions, and when you close the tab the working files are gone. You keep the download; we keep nothing.
## Start with the steady step
The single decision that separates a good rescue from a wasted afternoon is the order. Steady the frame while it is still small and forgiving, then enlarge what you have stabilised. Do it the other way and you sharpen the shake before throwing those pixels away in the crop.
Grab that old clip and start where the pipeline starts: [stabilise it first](/tools/video-stabilize), then come back for the upscale. Two honest tools, in the right order, on your own device.
---
### Batch Cutouts and ZIP Export for a Whole Store Catalogue
URL: https://bgremover.novusstreamsolutions.com/blog/batch-cutouts-and-zip-export-for-store-catalogs
Published: 2026-07-18 | Category: Tutorials | Author: Novus Stream Solutions Editorial Team
A single clean cutout is easy to admire. Forty of them, lined up in a shop grid, are where the real work shows, because the eye stops looking at any one product and starts reading the *set*. If one photo sits on pure white, the next on a faint grey haze, and a third has a sliver of the old background clinging to a handle, the whole page starts to feel homemade. Not because any individual image is bad, but because they don't match.
This is a tutorial about matching. Running a whole catalogue through background removal in one pass, keeping every result consistent, and pulling the lot down as a single ZIP, all of it on your own machine, with nothing uploaded. Let's walk through it the way you'd actually do it on a Tuesday afternoon with a folder of product shots and a deadline.
## Why a catalogue is a different job to a cutout
When you remove the background from one image, you judge it on its own. When you build a catalogue, you're really judging *difference*. A storefront, a marketplace listing, a printed line sheet. They all put products side by side, and inconsistency is the thing shoppers register first, usually without knowing why.
The mismatches that read as amateur are boring and specific:
- One shot on white, the next left transparent, so they sit differently on the page.
- Subjects at different scales: one mug fills the frame, the next floats tiny in the middle.
- Uneven padding, so some products kiss the edges and others swim in space.
- Stray background fringing on the tricky ones (hair, wire, mesh, glass) while the simple ones came out clean.
None of these is hard to fix. The trick is deciding the rules **before** you start, then applying the same rules to every image, so you're not making a hundred small aesthetic judgements one at a time. Consistency isn't a polish step at the end. It's a decision at the front.
## Set your rules before you drop the folder
Five minutes of decisions here saves you an hour of re-runs. Settle these first:
- **Transparent or white?** Transparent PNGs are the flexible master. They drop onto any background later. But many marketplaces want a solid white backdrop. Decide the *final* need. You can always composite a transparent cutout onto white afterwards; you can't cleanly pull white back out.
- **One mode for the whole set.** Pick a single [Background Remover](/background-remover) mode and use it for everything in the batch. Best Quality (BiRefNet-lite) gives the most accurate edges and is the right default for a catalogue, because it handles the awkward products without you babysitting each one. Mixing Fast and Best across a set is exactly how you get a grid where some edges are crisp and some are soft.
- **One output size.** Every image should land at the same dimensions. More on this below with the [image resizer](/tools/image-resizer).
- **One padding rule.** Same margin of empty space around every subject, so products feel like the same distance from the camera even when they aren't.
Write these down if you have to. The whole point of batch work is that you stop deciding and start applying.
## The queue workflow
Here's the actual run. Open the [Background Remover](/background-remover) and drop the whole folder in at once. The queue takes many images and works through them together.
1. **Load the set.** Drag the folder (or select all the files). They queue up together.
2. **Pick your one mode.** Best Quality for a mixed catalogue. Leave it there for the entire batch. This is the consistency decision from above, made once.
3. **Let it churn.** The queue processes image after image on your device. You don't need to sit on it; go make coffee. Because everything runs locally, there's no upload wait and no per-image round trip to a server.
4. **Spot-check the hard ones.** You don't need to inspect all hundred. You need to inspect the *awkward* ones: anything with hair, fur, wire, mesh, transparent packaging, or a busy original background. Those are where edges get uncertain.
For the awkward ones, two features earn their keep. If a result looks uncertain (background left behind, or soft muddy edges), the tool will **suggest** retrying in Best Quality with a one-click *Retry Best Quality*. It flags it and offers; it never silently swaps the model on you, so what you see is always the mode you chose. And the **Refine edges** second pass has two presets: *Softer* for hair and fabric, *Crisper* for hard product edges like a bottle or a boxed item. A watch strap and a wig want opposite treatments: refine each to suit, then move on.
If a product has genuinely see-through parts (a glass, a clear plastic bottle, a jar), reach for **Glass mode**. It's a post-processing pass that preserves see-through interiors rather than punching them out as background, so the drink inside the glass survives.
## Keep the set the same size
Consistent dimensions are half of "looks professional", and background removal on its own won't give you that. A 3000px shot and a 1200px shot come out cut cleanly but *different sizes*. Run the finished cutouts through the [image resizer](/tools/image-resizer) to normalise them.
Decide a target before you start. A rough guide for common needs:
| Where it's going | Sensible target | Notes |
| --- | --- | --- |
| Marketplace listing | Square, e.g. 2000 × 2000 | Many platforms want square + white |
| Your own storefront grid | Square or 4:5 | Pick one aspect ratio, keep it |
| Printed line sheet | Match your template's cell | Consistency matters more than size |
Same dimensions, same aspect ratio, same padding rule applied to all of them. That's what makes a grid read as one shoot rather than a scrapbook.
## Export all as ZIP
Once the queue is done, you don't save cutouts one file at a time. **Export all as ZIP** bundles every result into a single download. One file to keep instead of clicking through a hundred separate saves. Give your source files a tidy, ordered naming scheme before the run and unpacking stays easy, so matching cutouts back to the right products and SKUs doesn't turn into a guessing game.
One honest note worth stating plainly: there used to be a crash that could hit ZIP export on large batches. That's been fixed this cycle, so big sets now bundle and complete. If you tried this a while ago and got bitten, it's worth another run.
Because the editors are one-time-use, nothing is stored on a server or kept in the browser between sessions, that ZIP is your one chance to keep the work. Download it, check it, then the session's gone. Get the files onto disk before you close the tab.
## The honest limit: it runs on your device
Here's the trade-off, stated straight rather than hidden. All of this runs on your own hardware. That's the whole reason your images never leave the machine. The flip side is that a genuinely huge set takes genuine time and memory. There's no server farm quietly absorbing the load; it's your CPU, your GPU, your RAM.
So work in **sensible chunks**. A few hundred images in a sitting is fine on a capable machine. A few thousand in one go, on a modest laptop, will crawl or run the tab out of memory. Split the catalogue into batches of a manageable size, export a ZIP per batch, and you keep everything responsive. We wrote up the memory side of this in more depth in [batch-processing hundreds of images without crashing](/blog/batch-process-hundreds-images-browser-without-crashing). Worth a read if your set is large. Chunking isn't a workaround for a weakness; it's just how you use a local tool well.
## Handing off to a listing workflow
The ZIP is a means, not the end. Once you've got a folder of consistent, correctly-sized cutouts, the rest of the catalogue pipeline gets easier:
- **Matching to SKUs** is far easier when your source files were named or ordered sensibly before the run and your cutouts all share the same shape.
- **Compositing onto white or a branded backdrop** is a batch step you do once, on transparent masters.
- **Dropping into a template** (line sheet, storefront grid, listing manager) goes fast when every image is the same shape.
If you're going deeper on the product-photo side specifically, [batch-processing product photos](/blog/batch-processing-product-photos) covers the shooting-to-cutout flow, and [building a consistent product catalogue](/blog/consistent-product-catalog-ai-staging) gets into keeping a whole range visually coherent once the cutouts exist. Background removal is the first clean step; those pieces take it the rest of the way.
## Get your catalogue moving
The short version: decide your rules up front, pick one mode for the whole set, spot-check the awkward ones, normalise the sizes, and pull it all down as one ZIP. Consistency is a decision you make once and apply to everything, not a hundred small judgements.
Drop your folder into the [Background Remover](/background-remover) and let the queue do the churning. It runs on your device, your images stay with you, and when the ZIP is on disk the job's done.
---
### The WebGPU Shader Bug That Broke Best Quality: A Debugging Postmortem
URL: https://bgremover.novusstreamsolutions.com/blog/the-webgpu-shader-bug-that-broke-best-quality
Published: 2026-07-16 | Category: Technical Deep Dives | Author: Novus Stream Solutions Editorial Team
Every so often a bug is satisfying precisely because the error message is so hostile. This is the story of one that broke our highest-quality background-removal mode on a chunk of devices, produced a wall of WebGPU validation noise instead of a stack trace, and turned out to be a defect several layers below our own code. If you build anything on in-browser machine learning, the shape of this hunt may save you an afternoon.
If you just want the conceptual background on how Best Quality picks a runtime, we wrote that separately: [How Best Quality Uses WebGPU with a WASM Safety Net](/blog/why-best-quality-bg-removal-runs-on-wasm). This post is the incident report.
## The symptom
Fast mode worked everywhere. Best Quality (the mode that uses a heavier, sharper model for hair, fur, and fine edges) worked on some machines and, on others, returned "couldn't find a foreground subject" for an image that Fast had just cut out perfectly. Same image, same browser session, opposite result.
The console was not subtle. On the failing devices it filled with hundreds of lines like:
```
An uncaught WebGPU validation error was raised: Error while parsing WGSL:
error: no matching constructor for 'i32(vec4)'
index += i32(uniforms.input_dims[input_dim_idx]);
- While calling [Device].CreateShaderModule(...).
```
Followed by cascade after cascade of "invalid ComputePipeline," "invalid CommandBuffer," "invalid due to a previous error." When a GPU shader fails to compile, everything downstream that depended on it also fails, so a single root error metastasizes into a screenful.
## Reading the actual error
Strip away the noise and one line matters:
```
no matching constructor for 'i32(vec4)'
```
WGSL is the shading language WebGPU uses. This is a *type* error in generated shader code: something tried to construct a 32-bit signed integer (`i32`) out of a four-component vector of unsigned integers (`vec4`). There is no such constructor, you cannot turn four numbers into one that way, so the shader refuses to compile.
The important word is **generated**. We did not write that shader. Neither did the model. It was emitted at runtime by the machine-learning library that executes the model's math on the GPU. The offending expression indexed a `uniforms.input_dims` array and cast the result to `i32`. That is the fingerprint of a specific operation in the model's compute graph being lowered to a GPU program, and the lowering was buggy for that operation's shape.
## Following it down a layer
Our Best Quality model is a segmentation network run through a popular in-browser ML runtime. That runtime has, historically, two ways to run on the GPU: an older path where GPU programs are generated in JavaScript/TypeScript and handed to WebGPU as WGSL text, and a newer path where a native (C++) engine compiled into WebAssembly talks to WebGPU directly.
The version we shipped was pinned (indirectly, through a dependency) to a build from early 2025 that used the older, text-generation path. And in that build, the code that generates the shader for one particular tensor operation had exactly the bug the error described: for tensors above four dimensions it packed a shape array as `vec4` but then indexed and cast it as if it were a flat list of integers. Our model's graph hits that operation with a five-dimensional tensor. On a device where the GPU path was chosen, the broken shader was generated, compilation failed, the compute pipeline was invalid, and the model produced garbage, which our pipeline correctly read as "no subject here."
Why only *some* devices? Because the broken path only runs when the GPU path is selected. On machines that fell back to the CPU/WASM path (older browsers, certain drivers), the buggy shader was never generated, so Best Quality quietly worked. Same code, different runtime branch, opposite outcome. That is why it looked non-deterministic from the outside.
## The fix is a one-sentence idea
You might expect the fix to be "upgrade the runtime to a version where the shader generator is patched." We checked. The buggy generator is *still present* in the latest releases of that text-generation path. Upgrading the version number alone would not have helped.
But there was a better door. From a later runtime version onward, the GPU path was **rewritten**: instead of generating WGSL text in the browser, the newer builds run the GPU work through the native C++ engine compiled into WebAssembly. The broken text-generation code is still in the package. It simply never runs, because that whole strategy was replaced. The buggy shader generator became a dead code path.
So the fix was to point our runtime at the newer, native GPU build and pin the version that ships it. One redirect. The broken WGSL is never emitted because nothing in the new path emits WGSL at all. Best Quality on WebGPU went from "fails on a shape-five tensor" to "runs the operation in compiled native code that never had the bug."
## Making failure impossible to hide
A root-cause fix is necessary but not sufficient. The original bug was nasty specifically because it failed *silently*, no exception, just an empty result that looked like "no subject." So alongside the runtime change we added a layer that refuses to trust a suspiciously empty answer.
Now, when the GPU path returns a mask that is essentially blank, we do not accept it. We re-run the same image once on the CPU path and compare. If the CPU also says the subject is tiny or absent, we believe it. Some photos genuinely have almost no foreground. But if the CPU recovers a real subject that the GPU missed, we take the CPU's answer and move on. A broken backend can no longer quietly hand you an empty cutout; the worst it can do is make you wait a few seconds for the safety re-run.
We also stopped a related failure where a broken run inside the editor would clear your canvas back to a blank state. A failed removal now shows an in-place error card with a retry button, instead of silently dumping you onto an empty canvas.
## What to take from it
Three things generalize beyond this specific bug:
1. **When a generated-code error names an expression you did not write, go down a layer.** The bug is in whatever generated it, and the fix usually lives in that dependency's design, not yours.
2. **A newer version number is not the same as a fix.** We had to find the version where the *strategy* changed, not just where the patch count went up. Read release notes for rewrites, not just bug fixes.
3. **Silent wrongness is worse than a crash.** The most valuable part of this work was not the root-cause fix; it was making the failure mode loud, so the next time a backend misbehaves, it cannot pretend to have succeeded.
If Best Quality had been giving you trouble, it is fixed. Try it again on the image that used to fail. And watch the console stay quiet.
---
### Why AI Upscalers Leave Seams and Soft Edges, And How We Fixed Ours
URL: https://bgremover.novusstreamsolutions.com/blog/why-ai-upscalers-leave-seams-and-soft-edges
Published: 2026-07-16 | Category: Technical Deep Dives | Author: Novus Stream Solutions Editorial Team
If you have upscaled a photo with an AI tool and looked closely at the result, you may have seen one of two disappointments: a faint checkerboard-like grid laid over the whole image, or a subject that is sharp everywhere except its outline, which came out soft and blurry. Both are common, both look like the AI "didn't work," and both are actually artifacts of the plumbing *around* the AI, not the model itself. We recently hunted down both in our own [image upscaler](/upscale). Here is what causes them and how we fixed each.
## Why upscalers work in tiles at all
A super-resolution model is memory-hungry. Feeding it a whole 12-megapixel photo at once would blow past what a browser tab is allowed to allocate. So upscalers cut the image into tiles, say 256×256 pixels, enlarge each tile, and stitch the enlarged tiles back together. This keeps memory flat no matter how big the source is. It is the standard trick, and it is where the first artifact comes from.
## Artifact one: the faint grid (tile seams)
When you upscale each tile in isolation and lay the results next to each other, the model makes very slightly different decisions at the shared edge of two neighbouring tiles. The pixel at the right edge of tile A and the pixel at the left edge of tile B *should* be nearly identical, they were adjacent in the original, but the model saw different surroundings for each, so it reconstructs them a hair differently. Multiply that tiny discontinuity along every tile boundary and you get a faint grid.
Most tools already do one thing to reduce this: they give each tile a margin of overlapping context so the model can "see" a little past the tile's edge. That helps the model's *decisions*, but it does not fix the *seam*, because the tiles are still written into the final image with a hard cut between them. The context reduces the discontinuity; it does not blend it away.
**Our fix: feather the overlap.** Instead of writing each tile with a hard edge, we let neighbouring tiles overlap in the output and cross-fade across that overlap: the outgoing tile's contribution ramps down while the incoming tile's ramps up, a smooth linear blend over the shared band. Any residual difference at the boundary is now spread across dozens of pixels instead of concentrated on one line, which is exactly what makes it invisible to the eye. The trick was doing this blend without a huge memory cost: a naive implementation would need a full-image floating-point accumulator, which for an 8K output is about a gigabyte. We do it in place, in a single byte-per-channel buffer, by exploiting the fixed order tiles are processed in, each tile only ever blends against neighbours already written, so no accumulator is needed.
## Artifact two: the soft outline (the alpha problem)
The second artifact only shows up on images with **transparency**: a cutout, a logo, a product on a transparent background. The colour comes out crisp, but the *edge* of the subject looks soft, as if someone ran a light blur around the outline. This one is subtle in its cause and, once you see it, obvious.
An image with transparency has two parts: the colour (RGB) and the transparency mask (alpha), which says how opaque each pixel is. The AI super-resolution model only upscales the colour. It knows nothing about the alpha channel. That is not what it was trained on. So the alpha has to be enlarged separately, and the easy way to do that is a plain mathematical stretch (bilinear interpolation), the same smooth blur you would get from dragging the corner of an image in any editor.
That is the bug. You end up with **sharp AI colour and soft stretched alpha.** The subject's colour is crisp to the pixel, but its silhouette, which is defined by the alpha, is a soft gradient. The eye reads the whole edge as blurry, because the edge *is* the alpha, and the alpha was never sharpened.
**Our fix: sharpen the alpha using the colour as a guide.** There is a classic technique called joint-bilateral upsampling that fits this perfectly. Instead of stretching the alpha blindly, we upsample it while *looking at* the already-sharpened colour image. For each output pixel, we blend nearby alpha values, but we weight that blend by how similar the colour is, so the alpha edge is pulled to align with the crisp colour edge the model just produced. The transparency mask stops floating softly across the boundary and snaps onto the real, sharpened silhouette. Crisp colour, crisp edge. (When an image is fully opaque, an ordinary photo with no cutout, we skip this entirely; there is no edge to sharpen and no cost to pay.)
## A third thing: knowing when *not* to "clean up"
There is one more way upscalers accidentally soften an image: an over-eager denoise pass. It is tempting to run a strong noise-reduction step after upscaling to smooth out any grain. But a good super-resolution model already produces clean output, and a heavy denoise on top of it does not remove noise. It removes *detail*, smearing exactly the fine texture you upscaled to recover. So for the AI path we disable that denoise entirely; the model's output is already clean, and we leave its detail alone. Denoise only runs on the non-AI fast path, where there is real grain to tame.
## The takeaway
None of these three fixes touches the AI model. The model was always doing its job. The artifacts lived in the tiling, the alpha handling, and an unnecessary cleanup step, the unglamorous plumbing that surrounds the interesting part. That is often where "the AI looks broken" actually comes from: not the network, but everything you do to its input and output.
If your upscales have looked *bigger but soft*, give the [upscaler](/upscale) another run, especially on a cutout with a detailed edge. The colour and the outline should now be sharp together.
---
### One-Time-Use by Design: Why We Removed Saving and Collaboration
URL: https://bgremover.novusstreamsolutions.com/blog/one-time-use-by-design
Published: 2026-07-16 | Category: Product & Mission | Author: Novus Stream Solutions Editorial Team
Most feature announcements are about something we added. This one is about something we removed, deliberately, after deciding it made the product better: the editors no longer save your work anywhere: not on our servers, and not in your own browser. You open a tool, do the edit, download the result, and when you close the tab, the session is gone. We call it **one-time-use**, and we think it is the honest shape for a privacy-first tool.
Here is what changed, and why we chose it over the alternative.
## What we removed
Three things, all of which used to live in the image editor:
- **Named projects.** You could save an edit-in-progress to your browser's storage and reopen it later.
- **Session restore.** If you refreshed or came back, a banner offered to "Continue your previous session."
- **Live collaboration.** A peer-to-peer mode let a teammate join your edit over WebRTC.
They were real features, and some people used them. We took them out anyway.
## The privacy argument for storing *nothing*
The core promise of these tools has always been that your images never leave your device. Everything runs locally: the AI, the encoding, all of it. That promise was already true. But "your files never leave your device" and "your files are never stored anywhere" are two different guarantees, and we were only making the first one.
Session restore and named projects meant your images, and the masks and layers derived from them, were being written to your browser's IndexedDB so they could come back later. That is genuinely local; it never touched a server. But it is still *storage*. On a shared computer, a library machine, or a work laptop that gets handed to the next person, "the tool remembered your last session" is not a feature. It is a leak.
The strongest version of a privacy tool is the one that has nothing to leak because it kept nothing. When we asked ourselves "what is the most defensible thing we can tell a user about their data," the answer that needed no asterisk was: *we store nothing.* You cannot recover what was never written down, and neither can anyone else.
## The collaboration argument is about honesty
The collaboration mode was clever engineering: edits streamed peer-to-peer, and only *descriptions* of operations crossed the wire, never pixels. But it required a signaling server to introduce the two peers to each other, which meant the app was no longer purely client-side. It was one small server endpoint, but it was a real one, and it sat awkwardly next to a product whose entire pitch is "there is no server in the loop."
Removing collaboration let us delete that endpoint. The app is now genuinely static: the only server-side code left is the one that renders social-share preview images. "No server touches your work" went from *mostly true, with a footnote* to *true, full stop.* We would rather have the clean sentence.
## "But now I can't save my work"
Correct, and we want to be direct about the trade-off rather than pretend it costs nothing. If you were relying on session restore, this is a real change to your workflow. The mitigation is simple and it is the same discipline that has always applied to any download-based tool: **finish your edit and export the file.** The exported PNG, WebP, or MP4 is the durable artifact. It is the thing you own, on your disk, that no browser-cache clear can take from you.
We think this is actually the healthier model. Browser storage was never a safe place to keep work that matters. A cache clear, a "free up space" prompt, or a different browser profile would wipe it without warning. Treating the tool as one-time-use makes that reality explicit instead of letting you build a false sense of permanence on top of ephemeral storage.
## What we kept
We did not remove everything. Two things still persist locally, and both earn their place:
- **Downloaded AI models.** The background-removal and upscaling model weights are cached after the first download so you are not re-fetching tens of megabytes every visit. They contain no personal data, and you can delete them anytime from Downloads & storage.
- **Your preferences.** Theme choice and cookie-consent decision live in local storage. Small, non-sensitive, and yours to clear.
We also kept the **share button**, because sharing an *exported result* is not the same as storing your working session. You are choosing to send a finished file, deliberately, in that moment.
## The principle underneath
There is a design idea called data minimization: collect and retain the least you can while still doing the job. Usually it is framed as a compliance chore. We think it is also just good product design for a certain kind of tool. A background remover does not need to remember you. It needs to do one clean job and get out of the way. Every byte it *doesn't* keep is a byte that cannot be lost, leaked, subpoenaed, or sold.
So the editors forget you the moment you leave. That is not a limitation we are apologizing for. It is the feature.
Try it. Open the [background remover](/background-remover) or the [image editor](/editor), do your edit, download the result, and close the tab with the confidence that you left nothing behind.
---
### Appetising Food Cutouts for Delivery Apps and Digital Menus
URL: https://bgremover.novusstreamsolutions.com/blog/food-photography-cutouts-for-delivery-apps-and-menus
Published: 2026-07-15 | Category: Industry Guides | Author: Novus Stream Solutions Editorial Team
Open any delivery app and your carefully plated dish gets about a thumbnail's worth of screen: a small tile in a scrolling grid, wedged between nine other kitchens all chasing the same tap. At that size the moody shot you took on a reclaimed-wood table (linen napkin bunched to one side, a sprig of thyme just in frame), reads as brown food on brown noise. The napkin becomes a grey smudge. Nobody can tell what they're looking at, so they keep scrolling.
The fix is rarely a better camera. It's cleaner, more consistent presentation. And for a menu built from dozens of tiles, consistency is the part most kitchens get wrong.
## Why the tile format punishes a busy table
A delivery tile is small, roughly square, and surrounded by competitors. Whatever detail survives that shrink has to do the selling. Props that look charming at full size (cutlery, a folded cloth, a second glass out of focus) collapse into visual clutter once the image is a couple of hundred pixels wide.
Delivery-app tile sizes and crops change often and vary between platforms, so don't build your workflow around a specific pixel figure. The principle holds regardless: the smaller the tile, the more a clean, high-contrast subject wins. A dish that fills the frame against a calm background is legible at any size. A dish lost in a scene is not.
This is a different problem from general e-commerce product shots. If you want the broad tooling landscape (which removers handle fine edges, how the main services compare), read [best background removal tools for product photography](/blog/best-background-removal-tools-product-photography-2026). Food adds constraints that guide doesn't cover: appetite appeal, awkward subjects, and honesty at thumbnail scale rather than spec-sheet accuracy.
## Food is a genuinely awkward cut-out subject
Be warned before you start: some dishes cut cleanly and some fight you the whole way. An honest list of what tends to go wrong:
- **Steam.** Background removal treats your subject as opaque. Steam is semi-transparent and low-contrast, so it usually either vanishes entirely or leaves a milky halo along the top edge. If steam is the whole point of the shot, don't cut it out. Photograph it on the background you actually want.
- **Glossy sauces and glazes.** A cutout changes the outline, not the surface. If your kitchen ceiling is reflected in a lacquered glaze, that reflection stays baked in. You have to control it at capture, not afterwards.
- **Drinks and glassware.** Transparent glass with liquid confuses every remover. It either keeps the old background showing through the glass or hard-cuts the rim. Shoot drinks straight onto the target background if the glass matters.
- **Fine garnish.** Microgreens, dill fronds, and a light dusting of icing sugar behave like flyaway hair: thin, wispy, easy to lose. Some survive, some get shaved off.
- **Dark food on a dark plate.** A dark-crust pie on slate gives the edge detection almost nothing to work with. Lift the contrast underneath and the cut gets far more reliable.
None of this means give up. It means choose your battles: the dishes that cut well go to transparent tiles, and the ones that don't get shot on a fixed background from the start.
## Shooting for a clean cut
You control most of the outcome before you ever touch software. A short field guide:
- **Pick one angle for the whole menu.** Either a flat overhead or a consistent three-quarter hero angle, then use it for every dish. Mixing overheads and hero shots makes the finished grid feel jumbled even when each photo is good.
- **Contrast under the plate.** Shoot on a surface that differs in tone from the crockery so the outline is unambiguous. A white plate on a white table is the worst case you can hand a cutter.
- **Soft light from one side.** A diffused window or a softbox beats a bare bulb or on-camera flash, which throw a hard hotspot across anything glossy and blow out the edge you need.
- **Fill the frame, but leave a margin.** Crop tight to the plate and you give the cutter nothing to grab and leave yourself no room for a square recrop. A little breathing space around the food is worth the pixels.
- **Neutral crockery.** Busy patterned plates compete with the food at tile size. Plain white or a single house colour reads cleaner.
- **Shoot more frames than feels necessary.** Steam, drips, and garnish shift between exposures, and you want the frame where they landed well.
## Building a consistent menu
A coherent menu isn't twenty nice photos. It's twenty photos that look like they belong together. Decide these once and lock them for the whole shoot:
1. **Background**: one colour behind every tile, or transparent cutouts placed on a single brand colour.
2. **Angle**: all overhead, or all hero. No mixing.
3. **Framing and scale**: each dish occupies a similar share of the frame so the grid looks even.
4. **Lighting direction**: same side, same session.
5. **Plate style**: the same plate, or a small deliberate set.
Then the production workflow:
1. **Batch-shoot in one sitting** with a fixed setup: same spot, same light, same camera height. Nothing wrecks consistency faster than returning a week later and rebuilding the scene from memory.
2. **Remove the background** on each shot to a transparent PNG using the [background remover](/). It runs entirely in your browser. The photos never leave your device, there's no account, and it's free, which matters when you're pushing thirty dishes through in an afternoon.
3. **Place every cutout on one canvas** of the same size and brand colour in the [image editor](/), at the same position and scale. This is where a set of separate shots becomes a matching grid.
4. **Upscale the soft ones.** Older phone shots or tightly cropped frames can go a little soft; run them through the [image upscaler](/upscale) so the whole menu holds together instead of one blurry tile giving the game away.
5. **Export at one size** and hand the platform a uniform set.
The payoff is subtle but real: a menu where every tile shares a background, an angle, and a light direction looks professionally art-directed even when it was shot on a phone against a bit of card. A menu of mismatched scenes looks like a scrapbook, and scrapbooks don't convert.
## Keep it honest
The tempting mistakes are the ones that get you in trouble.
A cutout lets you clean a background. It does not let you invent a portion. Don't photograph one prawn and clone it into a dozen. Don't quietly crop out the fact that the curry arrives in a plastic tub. Delivery platforms and consumer-protection rules expect the listing image to match what turns up at the door, and a customer who feels misled leaves a one-star review that costs you far more than a tidy tile ever earned. Represent the real thing at the real size.
The other honest limit: a cutout can't rescue food that was badly styled or badly lit. If the dish looks tired in the raw frame (greying salad, split sauce, a bun gone flat), it will look exactly as tired on a spotless background. Clean presentation amplifies whatever you photographed; it doesn't repair it. When the raw shot is poor, the right move is to reshoot, not to reach for another slider.
Get the capture right, cut the dishes that cut well, shoot the awkward ones on their final background, and keep the whole grid to one set of rules. Do that and your menu stops looking like twenty separate kitchens and starts looking like one you'd want to order from.
---
### Removing Backgrounds From Glass and Transparent Products
URL: https://bgremover.novusstreamsolutions.com/blog/removing-backgrounds-from-glass-and-transparent-products
Published: 2026-07-14 | Category: Tutorials | Author: Novus Stream Solutions Editorial Team
Glass is the case that breaks ordinary background removers. A wine bottle, a perfume flacon, a clear plastic bottle of shampoo: you point a cutout tool at it, and one of two things goes wrong. Either the mask treats the whole shape as opaque and deletes everything you could see *through* the glass, or it hedges and leaves a grey, foggy halo where the edge should be crisp. Neither looks like a product photo. Both look like a mistake.
This is a practical guide to getting a clean cutout of transparent products using **Glass mode** in the [NSS Background Remover](/background-remover), what the mode actually does, how to shoot so the mode has a fighting chance, and where you'll still need to finish by hand. Everything here runs in your browser; your photos never get uploaded.
## Why transparent products are the hard case
Most cutouts rely on a simple idea: every pixel is either subject or background. A person's shoulder is opaque, the wall behind them is not, and a good mask draws the line between them. That assumption is what makes ordinary background removal work at all.
Glass breaks the assumption twice over.
- **The interior is genuinely see-through.** You can see the backdrop *through* the bottle. If the tool marks those pixels as "subject" it keeps a frozen copy of your old background trapped inside the glass. If it marks them as "background" it punches a hole clean through the product.
- **The edge is ambiguous.** The rim of a clear glass, the shoulder of a bottle, the lip of a jar, these are where refraction, reflection and the backdrop all pile up in a few pixels. A hard binary mask has to guess, and it guesses badly, which is where the grey fringe comes from.
If you want the deeper version of why a mask can be technically "correct" and still look pasted-on, we wrote about that in [segmentation vs matting](/blog/segmentation-vs-matting-why-good-masks-still-look-cut-out). The short version: transparent products need the tool to treat "partly see-through" as a real answer, not round it to fully-kept or fully-gone.
## What Glass mode actually does
Glass mode is a **transparency-preserving post-processing pass**, not a separate model. That distinction matters, so let's be precise about it.
You still run one of the normal background models to find the product. Glass mode then works on the alpha channel that model produced. Instead of forcing every pixel to fully opaque or fully deleted, it **preserves the see-through interior**: the parts where the backdrop shows through the glass stay partly transparent rather than getting flattened one way or the other. The result is a cutout where the product reads as glass: you can drop it on a new background and light passes through it, instead of it looking like a solid silhouette or a bottle full of the old studio wall.
Because it's a pass and not a different engine, you turn it on alongside your chosen quality mode rather than switching to some separate "glass tool". Two things follow from that:
- It works with the whole product, not just the obvious clear panel. Labels, caps and opaque bases stay solid while the clear body stays see-through.
- It can only work with the information in your photo. If the shot doesn't distinguish the glass edge from the backdrop, no post-pass can invent that distinction. Which is why the shoot matters more here than for any other subject.
## Shoot so the mode can do its job
You will save far more time at the camera than in the editor. The goal is a photo where the boundary between "glass" and "background" is actually visible to a model. Our companion guide on [photographing glossy and reflective products](/blog/photographing-glossy-reflective-products-jewelry-glass-metal) covers the lighting rig in detail; here's what specifically helps a *cutout*.
**Use a clean, gently graded backdrop.** A smooth white-to-grey gradient, or a plain sweep, gives the edge somewhere clean to sit. A busy backdrop shows through the glass and gets baked into the interior, and there is no way to separate it later.
**Control your reflections.** Glass is a mirror as much as a window. Every lamp, every bright window, every white shirt you're wearing shows up as a hard hot spot on the surface. A hard specular reflection reads to the tool as opaque product, so it stays behind after the cut: a bright smear with no bottle around it. Flag your lights, shoot through a scrim, and kill stray reflections at the source.
**Backlight clear liquids.** A bottle of water, gin or clear oil almost disappears against a bright field, and its edge vanishes with it. A controlled light behind the product renders the liquid and the glass wall as a clean, readable rim. That rim is exactly what Glass mode needs to trace.
**Give the edge contrast.** If your product is clear glass on a white sweep, the left and right edges can fall to nearly the same tone as the background. A subtle graduated backdrop, or thin dark gradient reflectors either side of the bottle, draw a faint dark line down each edge. That line is worth more than any slider.
| Shooting choice | Why it helps the cutout |
| --- | --- |
| Graded / plain backdrop | Nothing busy gets trapped inside the glass |
| Flagged, diffused lights | Fewer hard reflections left behind as opaque blobs |
| Backlight for clear liquids | Renders an edge the tool can actually find |
| Edge reflectors / gradient | Separates glass rim from a same-tone background |
| Product wiped clean, no fingerprints | Dust and smears become stray specks in the alpha |
## The workflow, step by step
Once you have a decent frame, the sequence is short.
1. **Load the image into the [Background Remover](/background-remover) and choose Best Quality.** Best Quality uses BiRefNet-lite, the model with the most accurate edges. Exactly what you want on an ambiguous rim. Fast mode is fine for opaque subjects, but glass isn't the place to save a few seconds.
2. **Turn on Glass mode.** This applies the transparency-preserving pass so the see-through interior survives instead of being filled or punched out.
3. **Run it, then check the result against both a light and a dark background.** Set the cutout against a pale field and then against a dark one. This is not optional for glass. A halo or a milky interior that hides against white jumps out instantly against black, and a thin dark fringe does the reverse. Check both before you trust the cut.
4. **Refine the rim with Refine edges → Crisper.** The Refine edges second pass has two presets. For hair you'd pick Softer; for a glass or bottle rim you want **Crisper**, which tightens the hard product edge and cleans up the shoulder. Apply it and re-check on both backgrounds.
5. **If the first pass looks uncertain, retry.** When a result comes back with obvious background left behind or soft, unsure edges, the tool suggests a one-click **Retry Best Quality**. It never silently swaps models on you. It asks, you decide. If you started in Fast for some reason, this is the moment to take the offer.
For a single hero bottle that's usually the whole job. If you're cutting out a whole shelf of products, the batch queue processes them together and **Export all as ZIP** bundles every cutout into one download.
## Where it still needs your hand
Glass mode gets you most of the way on a well-shot product. It does not solve everything, and it's worth being direct about the two cases it can't fully handle on its own.
- **Heavy mirror reflections.** A big, hard specular blow-out, a window reflected across the whole front of a bottle, is a region with no product detail underneath. The pass has nothing to reconstruct there, so a strong reflection can survive as an opaque patch or leave a scar when removed. You fix these by hand in the [image editor](/editor), painting the region out on the layer. Getting the reflection under control at the camera is far cheaper than repairing it later.
- **Printed-through logos and back labels.** When you can read the *back* label through the front of a clear bottle, that back-label ink sits visually inside the glass. The tool can't know whether you want it kept as part of the product or cleaned away as background bleed. That's a judgement call, and it's a manual touch-up in the editor.
Neither of these is a failure of the mode so much as a limit of what any cutout can infer from a flat photo. When the pixels are ambiguous, someone has to decide what they mean, and for these two cases that someone is you.
## Try it on your hardest bottle
Pick the shot that's beaten every other tool (the clear bottle, the perfume flacon, the tumbler of water), and run it through Best Quality with Glass mode, then Refine edges Crisper. Check it against both a light and a dark background before you commit. If the result still isn't there, the answer is almost always in the lighting, not the software.
Start with your trickiest product in the [Background Remover](/background-remover). It runs entirely on your device, nothing is uploaded, and when you close the tab the session is gone.
---
### Bringing Old, Faded Family Photos Back to Life in the Browser
URL: https://bgremover.novusstreamsolutions.com/blog/restoring-old-faded-scanned-family-photos-in-browser
Published: 2026-07-14 | Category: Tutorials | Author: Novus Stream Solutions Editorial Team
Pull a colour print from the 1970s out of a drawer and it has usually drifted towards the same shade of orange-brown. The cyan dye layer fades first, then the magenta, and what is left leans warm and flat, as if the whole picture were printed on weak tea. Black-and-white prints age differently: they yellow, they go brittle, and a hard white crease runs across someone's face where the print spent forty years folded into a wallet.
This is a different job from cleaning up a low-resolution digital photo. You are not starting with a file. You are starting with a physical object that has to be captured first, then coaxed back towards what it looked like when the shutter closed. And because these are heirloom photos, often of relatives still living, the last thing you want is to hand them to a cloud service. Everything below runs in your browser. The images never leave your device.
## Start with the capture, not the edit
The single biggest lever on the final result is the scan, not any correction you apply afterwards. A poor capture caps how good the restoration can be, and no amount of editing fixes a blurry or skewed source.
A flatbed scanner beats a phone camera for flat prints, every time. A few settings matter:
- **Scan at a high resolution.** If you only ever want to reprint at the same size, a moderate resolution is fine. If you plan to enlarge, a small print becoming a framed A4, scan at 600 dpi or higher so there are real pixels to work with. Confirm the maximum optical (not interpolated) resolution your scanner actually offers.
- **Save a lossless format.** Choose PNG or TIFF, not JPEG. You will be pushing tones and colour hard, and JPEG compression artefacts get amplified with every adjustment.
- **Turn off the scanner's "auto" everything.** Auto colour, auto contrast, "restore faded photo", auto sharpening. Switch them all off. You want the honest raw scan and full control over the corrections yourself.
- **Clean the glass and the print.** A blower and a microfibre cloth remove dust you would otherwise spend an hour spot-healing later. Close the lid to press the print flat.
No scanner? A phone camera works if you are disciplined. Lay the print on a flat, dark surface. Light it with soft, even daylight from a window. Two sides if you can, never direct sun. Shoot straight down so the camera is parallel to the print, fill the frame, and lock focus before you press the shutter. Glare and keystone distortion from shooting at an angle are the two things that will quietly ruin the file.
## Correct the tone and colour
Load the scan into the [image editor](/editor). Work in this order, because each step changes what the next one is looking at.
**Straighten and crop first.** Remove the scanner bed, the ragged white border, any stray thumb. A clean rectangle makes every later judgement easier.
**Reset the black and white points.** Faded prints have no true black and no true white. The histogram is a hump bunched in the middle, which is exactly why the image looks flat and milky. Pull the shadow and highlight sliders inward until they meet the ends of the actual data. This one move restores most of the apparent life in a faded photo, because you are giving it back its contrast.
**Neutralise the colour cast.** Find something that ought to be neutral (a white shirt, a grey wall, teeth, the whites of eyes), and balance towards it. For the classic orange 1970s cast you are pulling warmth down and lifting blue slightly. Go gently. Over-correcting swings skin towards grey and lifeless, which reads as obviously "restored". Aim for believable, not clinical.
**Denoise with restraint.** Scanner noise and film grain respond to a light touch of smoothing, but push it too far and faces turn to plastic. Grain is part of the original; a little of it is honest.
**Spot-heal the small stuff.** Dust specks, hairs and pinholes patch away quickly. Be clear-eyed about the big damage, though: a deep crease straight across a face is manual patch-and-clone work, and there is no honest one-click button for it.
## Recover size for a reprint
Only now, with tone and colour already right, should you think about upscaling, and only if you actually need to. A 600 dpi scan of a small print is already a large file, plenty for a same-size or modest reprint. Upscaling earns its place when you want a wall-sized print from a little original, or when the scan is soft and you want to smooth and enlarge it in one pass.
When you do need it, run the corrected file through the [image upscaler](/upscale). The reason order matters: upscaling amplifies whatever you feed it, colour cast and all, so you always correct first and enlarge second.
The mechanics of how upscaling adds pixels (2x versus 4x, why very small images need to be stepped up incrementally rather than in one giant leap) are covered in our guide to [upscaling old low-res photos to 4K](/blog/upscale-old-low-res-photos-to-4k-in-browser). That post is about digital images that were always small. This one is about a physical print you have just scanned well, where upscaling is the last mile of a restoration rather than the whole job.
## What restoration can and cannot do
This is the part most tutorials skip, so here it is plainly. Enhancement redistributes and cleans the information that is *present* in the scan. It cannot invent detail that the print never held.
- **A blurred face stays blurred.** If someone was out of focus, moving, or tiny in the frame, the sharp eyes were never recorded. No tool recovers them, and upscaling only produces a larger blur. The data is not there to find.
- **Fully faded colour cannot be truly recovered.** Where a dye layer has decayed to nothing, there is no information left to rebalance. You can produce a plausible approximation of the original colour, but you are estimating, not restoring.
- **Large missing areas are reconstruction, not restoration.** A dust speck is a repair. A torn-off corner or a face eaten by mould is guesswork: sometimes convincing, but it is you inventing pixels, and it is honest to say so.
- **Texture is part of the photo.** Paper grain and film grain are the fingerprint of the original. Scrub them out entirely and you lose the very thing that made it feel like a real print.
Know when to stop and re-capture instead of fighting the software. If the scan is soft because the phone was tilted, re-shoot it. That is ten minutes well spent versus an hour of frustration. And sometimes the print is simply too far gone, and that is all right. A clean, honestly corrected scan is itself an act of preservation, even if it will never look new.
One genuinely useful trick for keepsakes: if you want a single person lifted out of a crowded or damaged group shot (for a memorial card, say) the [background remover](/) can isolate that subject onto a transparent or plain background once the tones are fixed.
## Export, and never overwrite the original
- **Keep the raw scan forever.** It is the negative now. Save the untouched capture as PNG or TIFF and back it up somewhere separate from your working files.
- **Export the corrected version at full resolution.** PNG or a high-quality TIFF for a print lab; a high-quality JPEG is fine for sharing with family.
- **Give the lab the biggest file you have** and check their required dpi and dimensions on their own site before ordering: those specs vary by printer and by product.
A short checklist for the shoebox:
1. Scan flat, at high resolution, auto-corrections off, saved lossless.
2. Straighten and crop.
3. Reset black and white points, then neutralise the cast, gently.
4. Denoise and spot-heal lightly.
5. Upscale only if you need the size, and only after correcting.
6. Keep the raw scan; export a full-resolution copy for reprinting.
None of it touches the internet. For photographs this personal, that is the point.
---
### fp32, fp16 and int8: What Model Precision Means for Your Cutouts
URL: https://bgremover.novusstreamsolutions.com/blog/model-precision-fp16-fp32-int8-what-it-means-for-cutouts
Published: 2026-07-13 | Category: Technical Deep Dives | Author: Novus Stream Solutions Editorial Team
Flip the [background remover](/) from Fast to Best Quality and two things change that you can actually measure: the download gets bigger, and the first cutout takes a little longer to appear. Both trace back to a single decision made long before the model ever reached your browser, how many bits each of its numbers is allowed to use.
That decision has a name: **precision**. It is one of the least glamorous settings in machine learning and one of the most consequential for a tool like this, where the whole thing runs on your own device with your own memory and your own patience. This is a look at what fp32, fp16 and int8 mean in plain terms, and how each maps to download size, speed, memory and the quality of the edge you end up cutting.
## A model is millions of numbers
A background-removal model is, underneath, a very long list of numbers called **weights**: the values it learned during training. A mid-sized segmentation model might carry somewhere in the region of 40 to 200 million of them. To produce a cutout, your device multiplies your image against those numbers, over and over.
Precision is simply how much space each of those numbers gets. More bits per number means finer detail and a wider range of values; fewer bits means a coarser approximation that takes less room and less effort to crunch.
The three you will run into, from most generous to most frugal:
- **fp32**: 32-bit floating point. 4 bytes per weight. The format models are usually trained in.
- **fp16**: 16-bit floating point, sometimes called half precision. 2 bytes per weight.
- **int8**: 8-bit integer. 1 byte per weight. This is a **quantised** model: the smooth range of floating-point values has been squeezed onto 256 integer steps.
The arithmetic that follows is the whole story. Halve the bits and you roughly halve the download. Quarter them and you quarter it.
## fp32: the reference copy
fp32 is the model as trained, nothing thrown away. Every weight keeps its full range and its fine gradations, which is exactly what you want when the alpha channel has to describe a soft transition rather than a hard on/off. It is the benchmark the other two are measured against.
The cost is size and effort. It is the largest file to fetch and the heaviest to hold in memory, and on a CPU it is not fast. You rarely need the full 32 bits for a background cutout, but when you are chasing the cleanest possible edge on a difficult subject, it is the honest baseline.
## fp16: half the size, almost none of the loss
fp16 keeps floating-point behaviour but in half the space. For most segmentation work the visible difference against fp32 is close to nothing (the edges look the same, the semi-transparent regions behave the same), while the download and the memory footprint drop by roughly half.
The catch is hardware. fp16 shines on a GPU built to run it. On a plain CPU path there is often little speed benefit, and some devices need a specific capability flag before they will run 16-bit maths in a shader at all. It is a GPU-era format that happens to be very well suited to WebGPU when the device cooperates.
## int8: small, quick, and a little rougher
Quantisation to int8 is the aggressive option. Those millions of floating-point weights get mapped onto whole-number steps, shrinking the file to about a quarter of fp32 and letting a CPU tear through the maths, because integer arithmetic is cheap and integer-heavy code vectorises nicely with SIMD.
There is a real quality cost, but it is smaller and more specific than people expect. On a mug against a white sweep you will not see it. Where it turns up is in the fiddly places: a fringe of hair, pet fur, a chain-link of [jewellery](/), the soft blur at the trailing edge of a moving subject. Fewer available values can mean a slightly coarser alpha gradient: an edge that is a touch blockier, or faint banding where a clean feather should be. Whether that matters depends entirely on your subject.
## The tradeoff in one table
| Precision | Bits/weight | Download vs fp32 | CPU speed | Edge on hard subjects | Where it feels at home |
|---|---|---|---|---|---|
| **fp32** | 32 | 1× (largest) | Slowest | Best, most forgiving | High-fidelity, GPU or CPU |
| **fp16** | 16 | ~½× | Modest gain | Effectively as good | GPU / WebGPU with f16 support |
| **int8** | 8 | ~¼× | Fastest | Good; softer on fine detail | CPU / WASM, mobile, low memory |
Treat the download column as illustrative arithmetic, not a spec. A model with 44 million weights works out near 176 MB at fp32, about 88 MB at fp16 and roughly 44 MB at int8. The ratios hold regardless of the exact model.
## Which runtime pairs with which precision
Precision does not travel alone. It tends to arrive attached to a runtime: the engine that runs the model in your browser.
**WebGPU** talks to your graphics card. It is happiest with floating point, and when a device supports 16-bit shader maths it can run fp16 quickly with a small memory bill. That is the natural pairing: a capable GPU, a half-precision model, fast frames.
**WASM** runs on the CPU. It cannot match a GPU for raw throughput, but it is dependable and available on essentially every device, and it is very good at integer maths, which is precisely what a quantised int8 model needs. Small file, no GPU required, works on the phone in your pocket.
The tidy version (WebGPU for high precision, WASM for quantised) is a useful default but not a rule, and this site is the exception that proves it. Here, the **Best Quality** path runs on WASM by deliberate choice, not because WASM is the fast lane. The reason has nothing to do with precision and everything to do with a specific rendering bug on the GPU path, which we pull apart in [why Best Quality background removal runs on WASM](/blog/why-best-quality-bg-removal-runs-on-wasm). Read those two posts together: that one is about *which engine*, this one is about *how many bits*. They are separate knobs that happen to get set at the same time.
## Which should you pick
The Fast and Best Quality modes are precision-and-runtime choices dressed up as plain words. Fast leans on a lighter, quantised model that downloads quickly and runs anywhere; Best Quality reaches for a higher-precision one that costs more to fetch and more to compute, in exchange for a cleaner edge where it counts.
A quick way to decide:
- **Solid subject, clean background**: a bottle, a box, a phone. Fast is plenty. You will not see the extra bits, and you will not wait for them.
- **Hair, fur, feathers, foliage, motion blur, mesh**: reach for Best Quality. This is the exact situation where higher precision earns its download.
- **On mobile data or a tight-memory device**: start with Fast. The smaller model is the difference between a cutout and a stalled tab.
- **Doing it once, want it right**: Best Quality. Fetch the larger model, keep it cached, move on.
The same logic governs the [image upscaler](/upscale) and the [video upscaler](/video-upscale), where a heavier, higher-precision model resolves fine texture that a quantised one smears, at the usual price in download and time.
And the honest limit: precision cannot rescue a bad source. If the original edge is out of focus, blown out or compressed into mush, no number format invents the detail that the camera never captured. Higher precision sharpens a decision the model can already make; it does not conjure information that was never there. When the input is that far gone, the fix is not a bigger model. It is a better photo.
## The short version
- Precision = bits per weight. More bits: sharper edges, bigger download, more memory. Fewer bits: smaller, faster, slightly rougher on fine detail.
- **fp32** is the full-fidelity reference; **fp16** halves the size at almost no visible cost on a capable GPU; **int8** quarters it and flies on a CPU, with a small hit to the hardest edges.
- WebGPU favours float, WASM favours quantised int8, but the runtime and the precision are two separate choices, and here Best Quality runs on WASM on purpose.
- Match the mode to the subject, not to habit. Fast for solids, Best Quality for hair and fur, and a re-shoot for anything the model genuinely cannot see.
---
### Segmentation vs Matting: Why a "Good" Mask Can Still Look Cut Out
URL: https://bgremover.novusstreamsolutions.com/blog/segmentation-vs-matting-why-good-masks-still-look-cut-out
Published: 2026-07-12 | Category: Technical Deep Dives | Author: Novus Stream Solutions Editorial Team
A studio shot of a ceramic mug and a portrait of someone caught in a gust of wind can come out of the same background remover. The mug looks flawless. The portrait looks like it was trimmed with nail scissors: a hard, slightly too-clean line where windblown hair should feather away into nothing. The shape is correct. The edge is wrong.
That gap, between "the outline is right" and "the cutout looks real", is the difference between two jobs that get lumped under one word and really shouldn't be. One is **segmentation**. The other is **matting**. Most of the time when a cutout looks pasted despite having the right silhouette, you are looking at good segmentation doing a job that needed matting.
If you want the full pipeline (model, mask, edges, output), [how AI background removal actually works](/blog/how-ai-background-removal-actually-works) covers the whole chain. This piece drills into one link in it: the moment the model decides what each edge pixel is worth.
## Segmentation draws a line
Segmentation answers exactly one question, once per pixel: subject, or not subject. Yes or no. The result is a **binary mask**: a black-and-white image the same size as your photo, where white means keep and black means drop, and there is meant to be nothing in between.
For a mug, that is the whole job done. A mug has a definite ceramic boundary. Every pixel is either glaze or backdrop, and the handful of edge pixels that straddle the line get smoothed with a bit of anti-aliasing so the curve does not look like a staircase. You get a clean cutout because the object genuinely has a clean edge.
The trouble starts wherever the real edge is not a line. Consider a single pixel sitting on the outer wisp of a ponytail. Physically, that pixel might be 30% hair and 70% whatever was behind it: a window, a wall, a bit of sky. Segmentation has no way to say "30%". It must round: subject or background, one or zero. Multiply that forced rounding across thousands of boundary pixels along a head of hair, a fur collar, a fern, or the frayed edge of a knitted jumper, and you get the sensation everyone recognises but few can name. It does not look torn or jagged. It looks **cut out**: because it was, from a shape that was never a shape.
## The alpha channel is not a switch
Here is the part that reframes everything. A transparent PNG does not store "keep or drop". It stores an **alpha channel**: a per-pixel opacity value, typically 0 to 255 in an 8-bit image. Zero is fully transparent, 255 is fully opaque, and every value in between is partial coverage.
Segmentation only ever writes the two ends of that range. Matting fills in the middle. That is the entire distinction in one sentence: **segmentation gives you a mask, matting gives you an alpha.**
Matting treats each pixel as a mixture rather than a member. The classic way to write it is the compositing equation. The observed pixel colour I is the foreground colour F blended with the background colour B according to the alpha:
**I = αF + (1 − α)B**
For a hair pixel that is 30% strand over a bright window, alpha is about 0.3, and the pixel's colour is a genuine blend of dark hair and glare. Matting's job is to recover that alpha *and* estimate what the pure foreground colour F was underneath, so that when you drop the pixel onto a new background it blends correctly instead of dragging a rim of the old window with it.
This is why matting matters for exactly the subjects segmentation fails on:
- **Hair and fur**: thousands of edge strands, each partly covering the backdrop.
- **Motion blur**: a swinging hand or a wagging tail smears across pixels that are half subject, half background.
- **Glass, smoke, veils, water spray**: semi-transparent by nature, so even the *interior* pixels are not fully opaque.
- **Soft or defocused edges**: a shallow depth of field turns a crisp outline into a gradient the eye reads as depth.
Drop a matted cutout onto a new colour and the halo problem largely disappears, because the edge pixels carry honest partial transparency instead of a hard verdict.
## What a trimap actually is
The concept that connects the two is the **trimap**. Split the image into three regions rather than two:
1. **Definite foreground**: pixels you are certain are subject (alpha = 1).
2. **Definite background**: pixels you are certain are not (alpha = 0).
3. **Unknown**: a band along every soft edge where the answer is a fraction.
Segmentation, in effect, is a trimap with the unknown band crushed to zero width. Matting is the work of solving that unknown band: for every pixel in it, estimate the alpha and un-mix the colour.
The older generation of matting tools made *you* draw the trimap by hand: paint the sure-foreground, paint the sure-background, leave a rough band around the hair, and let the algorithm solve the rest. Modern in-browser models estimate the trimap themselves from a first-pass segmentation, then refine the edge band into a real alpha. You never see the trimap, but it is the quiet step that decides whether your ponytail feathers or snaps.
## Why the good version costs more
Matting is genuinely harder than segmentation, and not by a little. Two reasons.
First, it is **underdetermined**. Look again at I = αF + (1 − α)B. For a colour image you know I. The three RGB numbers you can see. You are trying to solve for alpha, for F, and often for B. That is up to seven unknowns per pixel against three knowns. There is no single correct answer; the model has to lean on context, learned priors, and neighbouring pixels to make a plausible guess. Segmentation, by contrast, is a straightforward classification: one label per pixel.
Second, it costs more **compute**. Producing a smooth, believable alpha across a whole head of hair needs a heavier model and more passes than deciding a coarse silhouette. That is precisely why serious tools ship a fast default and a slower **best quality** mode. On our [background remover](/) the higher-quality path is doing more matting work per edge pixel, so it takes longer and asks more of your device, a fair trade only when the subject has the kind of edge that needs it. For a solid product on a plain backdrop, the fast path already nails it and the extra cost buys you nothing.
The cost is even starker in video. A [video editor](/video-editor) has to solve this per frame, and edges wander frame to frame as the subject moves, so the alpha has to stay stable over time or the cutout shimmers. That is a lot of matting, many times a second.
## When segmentation is enough, and when nothing helps
Being honest about limits is the whole point here.
**Segmentation is plenty** for hard-edged objects: bottles, boxes, phones, tools, most packaged products, anything with a clean manufactured boundary. Reaching for matting there just spends time and can even soften an edge that should stay crisp.
**Matting earns its cost** on hair, fur, feathers, foliage, motion blur, and anything semi-transparent.
**Nothing will save some images.** Matting recovers detail that is *present but mixed* in the pixels; it cannot invent strands that a heavily compressed JPEG has already smeared into a grey mush, and no amount of edge refinement rescues a subject shot against a background the same colour as their hair. If F and B are identical, the equation has no signal to separate them. When alpha estimation has nothing to work with, you get either a hard line or a muddy smudge, and the right call is to re-shoot against a contrasting, evenly-lit backdrop rather than to keep clicking. Feeding a bigger image into an [upscaler](/upscale) first can widen a too-thin edge band and give the matting step more to chew on, but it is a workaround, not a fix for a photo that never held the detail.
## A short checklist for cleaner edges
- **Match the tool to the edge.** Hard-edged object? Fast segmentation is fine. Hair, fur, or blur? Use the best-quality/matting mode and accept the wait.
- **Shoot against contrast.** A background clearly different in colour and brightness from your subject's edges gives matting real signal to work with.
- **Kill the colour spill.** A coloured backdrop reflecting onto light hair poisons the foreground-colour estimate; neutral, diffuse light helps.
- **Give it resolution.** Wispy edges need pixels. A larger, less-compressed source has a wider unknown band to solve.
- **Judge on a new background, not the checkerboard.** Composite the cutout onto the colour you will actually use. Halos and hard lines only show up against real pixels.
Segmentation tells you *where* the subject is. Matting tells you *how much* of each edge pixel belongs to it. Both are useful; only one of them makes a windblown ponytail look like it was photographed rather than trimmed.
---
### Why Cutouts Get a Coloured Fringe, and What Edge Decontamination Does
URL: https://bgremover.novusstreamsolutions.com/blog/why-cutouts-get-a-colored-fringe-edge-decontamination
Published: 2026-07-11 | Category: Technical Deep Dives | Author: Novus Stream Solutions Editorial Team
A portrait shot against a green screen, cut out cleanly, dropped onto a white product page, and there it is: a faint green rind tracing the shoulder and threading through the flyaway hairs. Zoom to 300% and the culprit is obvious. The pixels right on the boundary aren't skin, and they aren't background either. They're a muddy blend of both, and the blend is green.
That thin halo has a name in compositing work: **spill**, or edge contamination. It isn't a flaw in your cut so much as a fact about how cameras record edges. Understanding why it happens tells you exactly how to get rid of it.
## An edge is never one pixel wide
Point a camera at a strand of hair and ask which pixels it covers. The honest answer is "partly, several of them." A sensor pixel integrates all the light falling on its little square. If half that square sees hair and half sees the green screen behind it, the pixel records the average of the two, a colour that is neither hair-brown nor screen-green but something in between.
This is not limited to hair. Any soft or fine edge (fur, feathers, motion blur, the fuzzy rim of an out-of-focus arm, the translucent edge of a glass) spreads the boundary across a band of **mixed pixels**. Each one is a weighted blend of foreground and background.
A good background remover doesn't try to force those pixels to be fully in or fully out. It assigns them a fractional transparency: this pixel is 40% subject, so its alpha is 0.4. That is what gives you soft, believable edges instead of a cardboard cut-out. [Our background remover](/) does exactly this, working entirely on your device.
But here's the catch. Getting the *transparency* right is only half the job.
## The old background colour is baked into the pixel
Think about what a mixed edge pixel actually contains. The camera recorded a single colour for it: call it the observed colour. That observed colour is itself a mixture:
> observed = (subject fraction × true subject colour) + (background fraction × old background colour)
For a pixel that's 40% hair against a green screen, roughly 60% of its colour *is* green screen. When a remover sets that pixel's alpha to 0.4 and stops there, it keeps the observed colour as the pixel's RGB. The transparency is now correct, but the colour still carries all that green.
You have made the pixel semi-transparent without removing the green that was mixed into it. The tint is sitting there, waiting.
## Why it only shows up on a contrasting background
Here's the part that surprises people. On the original green background, you'd never see the fringe. The green edge pixels sit against green and vanish. The contamination was invisible because it matched its surroundings.
The moment you composite onto a **new** background, the maths changes. A semi-transparent green-tinted pixel gets blended with whatever is now behind it. Against white, that leftover green is suddenly the odd one out and reads as a halo. Against a dark background, a white-studio "glow", the same effect from a bright backdrop, shows up as a pale rim.
The rule of thumb: **the fringe is as visible as the difference between your old and new backgrounds.** Cut a subject from a white studio and drop it on a light grey page and almost nothing shows. Drop that same cut-out on a black hero banner and the white edge lights up. Green screen onto white is close to the worst case, which is why it's the textbook example.
This also explains a common frustration: the cut-out looks perfect on the editor's transparent checkerboard, then looks haloed the instant you place it. Nothing changed about your cut. You just gave the contamination a contrasting backdrop to argue with.
## What decontamination actually does
**Decontamination**, also called spill suppression or colour unmixing, is the step that fixes the colour, not just the transparency.
It works backwards from the mixing equation. If you know the observed colour, you know roughly how transparent the pixel is (its alpha), and you can estimate the old background colour, then you can solve for the one remaining unknown: the pixel's *true* subject colour, with the background contribution subtracted out. Decontamination replaces the contaminated RGB with that estimated pure colour.
After decontamination, the 40%-hair pixel no longer stores "40% hair plus 60% green." It stores the best estimate of the hair's actual colour, at 40% opacity. Now when you composite it onto any background, it blends the *hair* colour with the new backdrop, no green passenger along for the ride.
This is a different problem from how the transparency itself is stored and multiplied through. If you want the deeper story on that, why an edge can look right in one app and wrong in another purely because of how alpha is packed, see [straight versus premultiplied alpha](/blog/the-difference-between-straight-and-premultiplied-alpha). Spill is about the *colour* in the edge pixel; that post is about the *bookkeeping* of the transparency value.
## What you can do about it
You have three levers, best used in order.
1. **Shoot to avoid it.** Contamination you never create needs no fixing. Put distance between subject and background so the backdrop falls out of focus and reflects less light onto your subject. Light the background separately and evenly. If you're not chroma-keying, a neutral mid-grey often spills less visibly than a saturated green or blue, because grey contamination is far less obvious against most new backgrounds.
2. **Choke or feather the matte.** Shrinking the cut-out mask inward by a pixel or two, a *choke* or *defringe*, simply eats the worst contaminated ring at the very edge. A light feather then softens what remains. You lose a sliver of the subject, which is fine on a shoulder and risky on fine hair.
3. **Decontaminate.** For soft edges you can't afford to trim (hair, fur, fabric wisps) colour unmixing is the proper fix. Where you're cleaning the boundary by hand, the [image editor](/editor) lets you work the edge and knock back a stubborn tint without flattening the whole cut.
A quick pre-composite checklist:
- View the cut-out against the **final** background colour, not the checkerboard, before you judge it.
- Look specifically at edges that meet the old background at a grazing angle: shoulders, hair tips, ear rims.
- If you see a consistent single-colour rim, that's spill, and a choke or a decontaminate will clear it.
- If the rim is dark and ragged rather than tinted, that's a matting error, not spill: a different fix.
## When to stop and re-shoot
Be honest with a bad source. Decontamination is an *estimate*, and it needs something to work with. A pixel that is genuinely 90% saturated green screen barely contains any subject colour to recover. There is almost nothing left underneath the green to reconstruct. Blonde hair, white fur, glassware and veils shot against a strong colour are the classic unrecoverable cases: the translucent subject and the coloured background are so entangled that no amount of unmixing gives a clean result.
Two more limits worth stating plainly. Upscaling won't help: running a contaminated cut-out through [an upscaler](/upscale) just renders a larger, sharper halo. And if the whole edge is soft because the shot is out of focus, no decontamination sharpens it; you're only unmixing a blur.
When the fringe survives a sensible choke and a decontaminate, that's your signal. Ten minutes re-shooting on a neutral, well-separated background beats an hour fighting green in post, and the second cut-out drops onto white without a word of complaint.
---
### Resizing Video for Every Platform's Specs Without Losing Quality
URL: https://bgremover.novusstreamsolutions.com/blog/resize-video-for-every-platform-without-quality-loss
Published: 2026-07-10 | Category: Tutorials | Author: Novus Stream Solutions Editorial Team
You have one clip. TikTok wants it tall, YouTube wants it wide, and the feed square you saw a friend post is a different shape again. Resize carelessly and you get black bars top and bottom, or a subject squashed until faces look wrong. The clip is fine. The framing decision is what went missing.
This is a practical walk through resizing video to platform specs in the browser, with the [video resizer](/tools/video-resizer). It runs on-device, so the clip never leaves your machine. But resizing is not a free operation, and the honest parts of that matter as much as the buttons. Let us go through the whole thing.
## The platform matrix
Most of the specs you will ever need collapse into four aspect ratios. Pixel dimensions vary, and platforms nudge their recommendations over time, but the **shape** is the thing that decides how your subject sits in frame.
| Ratio | Shape | Where it lives |
| --- | --- | --- |
| 9:16 | Tall portrait | Reels, TikTok, YouTube Shorts, Stories |
| 4:5 | Portrait, less extreme | Feed posts that want vertical reach |
| 1:1 | Square | Older feed grids, some ad slots |
| 16:9 | Wide landscape | YouTube, most desktop players, embeds |
The trap is treating these as interchangeable. A 16:9 interview cropped straight to 9:16 loses two-thirds of its width. If your speaker was framed to one side, they can end up half out of shot. Going the other way, a 9:16 phone clip forced into 16:9, leaves tall pillar bars down each side unless you crop or fill.
So before you touch a single setting, know the target ratio and know where the important part of your frame is. Everything after that is choosing how to reconcile the two.
## Fit, fill, or pad: the real choice
When the source ratio and the target ratio disagree, you have exactly three honest options. There is no fourth that magically keeps everything.
- **Fit** (letterbox / pillarbox): the whole frame is preserved and bars fill the gap. Nothing is cropped, nothing is stretched. You lose screen area to the bars. Fine when every part of the frame matters: a wide landscape, a chart, text near the edges.
- **Fill** (crop to fill): the frame is scaled up until it covers the whole target, and the overflow is cropped away. No bars, no distortion, but you lose the edges. This is the right call for most social resizes, provided your subject is near the centre.
- **Pad**: like fit, but the bars are a chosen colour instead of default black. Useful when a plain black border reads like a mistake and a solid colour reads as deliberate.
What you should almost never do is **stretch to fit**: scaling width and height by different amounts so the frame fills the target without cropping. That is where squashed faces and stretched logos come from. If a tool offers it, treat it as a last resort for abstract textures, not for anything with a person or straight lines in it.
A rule of thumb: **fill for social, fit for anything informational.** A talking-head reel wants fill so it uses the whole screen. A tutorial with on-screen text wants fit so nothing gets clipped.
## Keep faces in the safe zone
Fill only works if the thing you care about survives the crop. On vertical platforms, the top and bottom of the frame are often covered by interface: captions, the account handle, the like and share rail. That eats into the visible area.
Frame with that in mind:
- Keep faces and key action roughly in the **central band**, away from the extreme top and bottom.
- If you know a clip is heading for 9:16, avoid composing the subject hard against the left or right edge: a fill crop from a wider source will push them further out.
- Check the result before you export. If a fill crop lops off the top of someone's head, switch to fit, or recompose in the [video editor](/video-editor) first and resize afterwards.
The resizer changes dimensions; it does not reframe intelligently or follow a subject around. That framing judgement is yours, and it is easier to make deliberately than to fix after the fact.
## The honest note: resizing re-encodes
Here is the part a lot of tools skip. Changing a video's dimensions is not like cropping a photo. The pixels have to be scaled and the file written out again, which means the video is **re-encoded**. The resizer does this with ffmpeg compiled to run in the browser.
Re-encoding is lossy by nature. Every re-encode is a fresh compression pass, and each pass discards a little detail. One careful resize is not something viewers will notice. The problem is stacking passes: resize, then re-resize, then run it through something else, then resize again. That is when softness and blocky artefacts creep in.
So a few sensible habits:
- **Resize once, as the last step.** Do your cuts, colour, and background work first, then resize the finished clip to the platform spec. Do not resize early and re-edit later.
- **If you need several aspect ratios**, export each one from the same edited master rather than resizing a resize. Every version then has only a single re-encode between it and your edit.
- **Do not resize purely to "shrink the file".** Aggressive downsizing to save megabytes usually costs more in visible quality than it is worth.
This is the trade-off we would rather name than pretend away. Resizing is a re-encode; pick sensible settings and do it once.
## Upscale first, then resize, if you are enlarging
If your target is *bigger* than your source, say you shot at 720p and need clean 1080p, resizing alone cannot add detail. Scaling a small frame up just enlarges the pixels you already have, and any softness comes with them.
The better order is to enlarge first with a dedicated tool, then resize the result to the exact target ratio. Two things to keep in mind:
- [Video upscale](/video-upscale) is a **classical** enhancement pipeline (denoise, Lanczos scale, sharpen, levels) with Light, Balanced, and Strong presets. It is not AI and it cannot invent detail that was never captured, but a clean, sharpened enlargement is a far better thing to hand the resizer than a soft small frame. There is a fuller walkthrough in [our video upscaling guide](/blog/free-4k-video-upscaling-browser).
- Be realistic about what upscaling buys you. A soft 720p clip becomes a cleaner, larger clip: better than a raw stretch, but not magically sharp. It enlarges and tidies; it does not recover detail the camera never recorded. Set that expectation before you resize, not after.
Either way, the sequence matters: **enlarge, then resize.** Do it the other way and you are asking the resizer to stretch detail that is not there yet.
## What the progress bar is actually doing
If you have used browser video tools before, you may remember a progress bar that shot to 5% and sat there while you wondered whether it had died. That is fixed, and it is worth knowing why, because the honesty is the point.
The first time you resize in a session, the tool downloads a **ffmpeg core of roughly 32 MB**: the actual engine that does the encoding. That download used to happen invisibly behind a stuck bar. Now it is shown as **real progress**: you see the core coming down, and only then does the encode begin as its own stage. Two honest steps instead of one misleading one.
A couple of practical consequences:
- The first resize in a session includes that one-time download. Later resizes in the same session skip it and start straight into encoding.
- If your file uses a **codec the in-browser ffmpeg cannot read**, it now fails **fast with a clear message** instead of grinding away and stalling. That is a feature, not a fault: a quick, legible error beats a silent hang. If you hit one, re-export your source in a common codec and try again.
Everything happens locally. The 32 MB is the engine, not your video going anywhere. Your clip stays on your device the whole time.
## A sensible workflow, start to finish
Putting it together, the order that keeps quality intact:
- **Edit first.** Cut, composite, and correct in the [video editor](/video-editor) while the clip is still at full quality.
- **Enlarge if needed.** If the target is bigger than the source, run [video upscale](/video-upscale) before you resize.
- **Resize last.** Take the finished master into the [video resizer](/tools/video-resizer), pick the target ratio, and choose fit, fill, or pad deliberately based on where your subject sits.
- **Check the crop.** Confirm faces and key action survived, especially on 9:16.
- **Export one version per ratio** from the same master, not resizes of resizes.
Follow that and each platform version carries a single, careful re-encode, which is about as close to "without losing quality" as an honest video pipeline gets.
Ready to fit your clip to whatever the platform is asking for? Open the [video resizer](/tools/video-resizer), pick your ratio, and choose your framing with a progress bar that finally tells you the truth.
---
### Selling a Car Privately? Clean Up Your Listing Photos
URL: https://bgremover.novusstreamsolutions.com/blog/car-listing-photos-clean-vehicle-backgrounds
Published: 2026-07-10 | Category: Industry Guides | Author: Novus Stream Solutions Editorial Team
A 2015 Focus with fresh tyres, a full service history and one careful owner can still look like a £600 banger if there's a wheelie bin, a coiled hosepipe and next door's trampoline crowding the frame. The car is fine. The photo is doing it a disservice.
Buyers scroll fast. On Facebook Marketplace or a Craigslist grid, your listing gets a fraction of a second before someone flicks past. A clean, uncluttered shot buys you an extra beat of attention, and that beat is where the buttons and the mileage and the price actually get read.
This is worth getting right because a private car sale is a big-ticket transaction built almost entirely on trust between two strangers. The photos are the first trust signal. Clean framing helps. Deception does not, and there is a firm line between the two that we will come back to.
## Why the background is doing more work than you think
A house sells partly on the neighbourhood; a car sells on the car. When the background is busy, the buyer's eye has to do work to separate the vehicle from everything behind it, and a tired brain reads that friction as "scruffy". Kerbside clutter, other cars half in shot, a bin day skyline, harsh midday shadows across the bonnet: none of it is about your car, but all of it colours the impression.
This is a different problem from staging a property. With a room, you are often adding things to help a buyer imagine living there. With a car, you are almost always removing distraction so a single hard-edged object reads clearly. Our companion piece on [real estate photo staging in the browser](/blog/real-estate-photo-staging-in-browser) covers the property side; the pitfalls there are empty rooms and lighting, whereas here they are spoked alloys and glossy panels. Same instinct, very different subject.
## The shot list buyers actually expect
Before you touch any editing, get the coverage. A car listing with three blurry photos taken at dusk looks like something to hide. Aim for a consistent set, shot in even light. An overcast morning is kinder to paintwork than direct sun, which blows out highlights and hides swirl marks buyers will find anyway.
Work through these angles:
1. **The hero shot**: a three-quarter front, showing the front and one full side. This is your thumbnail. Make it count.
2. **Three-quarter rear**: the opposite corner, so buyers can read the whole shape.
3. **Both straight side profiles**: left and right, square on. This is where dents and panel gaps show, which is exactly why buyers want them.
4. **Straight front and straight rear**: bumpers, lights, number plate area.
5. **Interior**: dashboard, front seats, rear seats, and a clear shot of the odometer showing the mileage.
6. **Boot space**, seats up and, if relevant, folded down.
7. **Engine bay**, with the bonnet fully up.
8. **Wheels and tyre tread**: a close-up per corner if the alloys are a selling point, or an honest one if a kerbed rim is not.
9. **The honest extras**: service book, MOT paperwork, spare key, and clear photos of any damage.
That last point is not a suggestion. Photograph the scuffs, the stone chips, the tea stain on the back seat. A buyer who sees the flaw in the listing arrives ready to buy. A buyer who finds it on the driveway walks, and tells people.
## The background clean-up workflow
Once you have sharp, well-lit shots, the fastest improvement is usually not a dramatic edit at all. It is a crop.
Open a photo in the [image editor](/editor), straighten a wonky horizon, and crop tight so the car fills most of the frame with a little breathing room. Cropping out the bin and the neighbour's fence often does ninety per cent of the job with none of the risk. If a phone photo came out small or soft, the [image upscaler](/upscale) can add resolution before you crop, so a tighter crop still holds up on a big screen.
When a crop is not enough (the clutter is right behind the car, or you want a plain, consistent backdrop across every shot), that is where cutting the car out on the [background remover](/) comes in. Everything runs on your own device; nothing about your car or your driveway is uploaded anywhere, which matters more than usual when your photos may carry your home address in their metadata or in the background itself.
Then place the cutout on a neutral backdrop. A plain mid-grey or soft gradient reads as tidy without pretending to be a showroom.
## Where AI cutouts fight back on a car
Be realistic here, because a whole car is one of the harder subjects an automatic cutout will meet. The body panels come away cleanly. The trouble is everything thin, shiny or full of gaps:
- **Spoked alloy wheels**, where you can see road, grass or fence through the gaps between the spokes. The matte often smears these into a solid blob.
- **Wing mirrors and door handles**, small shapes that reflect their surroundings and confuse the edge.
- **Aerials and roof rails**, thin details a model tends to trim off or leave ragged.
- **Glossy paint and glass**, which mirror the sky and the very background you are trying to remove, so the edge wanders.
Expect a clean line along the doors and a scrappy one around the arches and spokes. You can tidy the worst of it by hand in the [image editor](/editor), but if you are spending twenty minutes rescuing one wheel, stop. The honest shortcut is almost always to **reshoot rather than cut out**: drive to an empty car park on a Sunday, a quiet industrial estate, or a plain wall, and let the real setting be the clean background. A genuine tidy backdrop beats a fought-over cutout every time, and it keeps the shadows and reflections consistent, which a paste-on background never quite manages.
One thing to avoid: dropping the car onto a fake polished showroom floor. The reflection underneath will not match the lighting on the car, buyers clock it instantly, and it reads as a dealer stock image rather than an honest private sale. Suspicion is the last thing you want in a listing.
## The line you do not cross
Clean framing is fair. Misrepresentation is not, and with a vehicle the stakes are higher than a scruffy thumbnail.
Never use editing to hide damage. Do not clone out a dent, paint over a scratch, erase a cracked bumper or disguise mismatched panels that hint at a past repair. A background swap that happens to bury a crumpled wing is not a tidy background; it is a lie the buyer will discover on the test drive, and in many places a materially misleading private sale is a legal problem, not just an awkward one.
The test is simple. Ask whether your edit changes the buyer's understanding of the car itself, or only cleans up what is around it.
- **Fine:** cropping out the bins, replacing a chaotic street with plain grey, straightening the shot, brightening a dim exposure to show the true colour.
- **Not fine:** removing rust, smoothing a dent, hiding a warning light on the dash, faking a lower mileage, or editing the paint to a condition the car is not in.
There is one edit worth making for your own protection, not the buyer's: obscure the number plate before you post. Crop it out or blur it in the editor so your registration is not sitting on a public listing. That protects you and misleads no one.
Get the coverage, light it evenly, tidy the frame, and be plain about the flaws. A clean background sells the car. Honesty sells it twice, because the buyer who trusts your photos is the one who turns up with the cash.
---
### Album and Podcast Cover Art: Sizes, Safe Zones and Clean Graphics
URL: https://bgremover.novusstreamsolutions.com/blog/album-and-podcast-cover-art-sizes-and-safe-zones
Published: 2026-07-09 | Category: Industry Guides | Author: Novus Stream Solutions Editorial Team
Your cover art will spend most of its life smaller than a postage stamp. In a playlist row it sits at roughly the size of a fingernail; on a lock screen it's a little bigger; on a smartwatch, a car display or a voice-assistant screen it can be smaller still, sometimes with a translucent play triangle parked over one corner. The 3000-pixel master you carefully exported is almost never what a listener actually sees.
That gap, between the file you upload and the tiny square people scroll past, is the whole problem. Design for the master and your art turns to mud at thumbnail size. Design for the thumbnail and it holds up everywhere.
## The square is the only thing you control
Every major audio platform (Spotify, Apple Music, Apple Podcasts, Bandcamp, YouTube Music) wants a **1:1 square**. That is the one constant. Everything downstream of it (the crop, the overlay, the display size) is out of your hands, so the square has to do all the work.
For the master file, export big. A **3000 × 3000 pixel** square is a safe, widely accepted target; many distributors accept anything from around 1400 pixels a side up to 3000, in **RGB** colour (never CMYK, which is for print), saved as JPEG or PNG. Those exact minimums and maximums drift, and each distributor has its own rules, so confirm the current numbers with whoever you upload through rather than trusting a figure you read once.
One more thing distributors care about: content. Many routinely reject artwork that contains a web address, a social handle, a price, or anything that looks blurry or pixelated. Check your distributor's artwork guidelines before you finalise. A rejection can cost you a release date.
## Where your art actually gets shown
Before you place a single element, picture the surfaces it has to survive:
- **Playlist and library rows**: a small square next to a track title, often the smallest it ever appears.
- **Now Playing and lock screens**: larger, but frequently with playback controls overlaid along the bottom.
- **Search results and thumbnails**: small, dense, competing with dozens of neighbours.
- **Circular crops**: artist avatars, some app widgets, and certain watch and car interfaces clip your square into a **circle**, quietly deleting the corners.
- **Play-button overlays**: web players and hover states drop a play control over the art, usually centre or bottom-corner.
You cannot predict which surface a given listener uses. So design for the meanest one: tiny, circle-cropped, with a button on top.
## Safe-zone thinking
Borrow the idea from broadcast. Imagine a **circle inscribed inside your square**, touching the middle of each edge. Keep anything that must not be lost, your subject's face and any text, inside that circle. The four corners are expendable; treat them as bleed.
Then leave a margin. Elements shoved against the edge look cramped at full size and get shaved off at small ones. And keep text clear of the **bottom-centre**, where play buttons and progress bars tend to land.
## Make it read at thumbnail size
This is where most home-made covers fall down. They're designed at 3000 pixels on a big monitor and never checked small.
- **One subject, big and simple.** A single face, object or bold shape survives shrinking. A busy collage becomes noise.
- **High contrast.** Strong separation between subject and background is what keeps the image legible at 48 pixels.
- **A tight palette.** Two or three colours read as a recognisable identity in a scroll; a rainbow reads as sludge.
- **Minimal text, set large.** Your name and title already appear as metadata beside the art, so you often need less type than you think, or none. If you do add text, make it big and heavy. Thin, delicate fonts vanish first.
- **Avoid fine detail and banding.** Hairline textures disappear; smooth gradients can band into ugly stripes on cheaper screens.
Then run the only test that matters: shrink your design to roughly 64 pixels, or just step back from the monitor and squint. If you can't tell what it is, neither can a listener thumbing through a playlist.
## A clean-subject workflow
A lot of strong covers are one isolated subject on a flat or simple background. Here's how to build that without uploading your work to anyone's server. Every step below runs in your browser.
1. **Cut the subject out.** Drop your portrait or product shot into the [background remover](/) to lift the subject onto transparency. A clean edge here is what lets you place it confidently inside the safe circle.
2. **Compose it.** Take the cutout into the [image editor](/editor): set a background colour or texture, position the subject within the safe zone, add your title if you want it, and check the balance with the corners mentally clipped.
3. **Master it.** If your source was small (a phone snap, an old logo) finish in the [image upscaler](/upscale) to reach a clean 3000-pixel square.
Be honest about that last step. Upscaling enlarges what's there; it does not invent detail that was never captured. A crisp 1500-pixel source scales up nicely. A soft, compressed 400-pixel screenshot will still look soft, just bigger. If that's all you have, re-shoot or re-export from the original vector or master rather than hoping the upscaler rescues it.
## Podcast art plays by the same rules
Podcast show art is the same square, shown in the same small rows and circular crops inside Apple Podcasts, Spotify and every other player. The sizing logic is identical: a large RGB square, commonly somewhere in that 1400-to-3000-pixel range, confirmed against the platform's current spec.
The one difference is text weight. A podcast lives or dies on its **name** being readable, because there's no track list doing that job for you. Set the show title large, keep it inside the safe circle, and test it at row size. If the name isn't legible small, the art isn't finished.
## A note on motion
Spotify's Canvas, that short looping visual behind a track, is a different discipline: a **vertical 9:16 clip**, a few seconds long, silent and looping. It's not your cover art rotated; it's its own composition with its own safe zone, since controls sit over the lower third. Length and format specifics change, so check the current requirement before you export. It's still just pixels, though, and the same in-browser tools apply if you want to build or tidy one up.
## Quick checklist
- Square 1:1 master, exported large (3000 × 3000 is safe), RGB, JPEG or PNG.
- Confirm the exact size, format and content rules with your distributor.
- Keep face and text inside a centred circle; treat corners as expendable.
- Clear the bottom-centre for play controls.
- One subject, high contrast, tight palette, minimal large text.
- Test at around 64 pixels before you upload.
Cover art and YouTube thumbnails get lumped together as "the picture on the thing," but they pull in opposite directions. A thumbnail is a wide **16:9** panel built to be clicked, where more text and a busier composition can work; cover art is a small square built to be recognised, often circle-cropped and never clicked at all. If you make both, read our [YouTube thumbnail design guide](/blog/youtube-thumbnail-design-2026) for the wide-format side, then design each for the shape it actually lives in.
---
### You Upscaled to 4x and It's Still Soft: Pick the Right Source Mode
URL: https://bgremover.novusstreamsolutions.com/blog/why-your-upscaled-photo-still-looks-soft-source-modes
Published: 2026-07-08 | Category: Tutorials | Author: Novus Stream Solutions Editorial Team
You bumped it to 4x, waited for the model to run, and the result came back... soft. Not pixelated, not blocky: just vaguely smeared, like someone wiped a thumb across the fine detail. So you reach for the sharpening slider, crank it, and now it looks soft *and* crunchy.
Here is the thing most people get wrong: when an upscale looks mushy, the fix is almost never more sharpening. It is telling the upscaler **what it is looking at**. A photo and a logo want completely different treatment, and until recently the tool had no way to know which one you fed it. That is what the Source selector on the [Upscale tool](/upscale) fixes, and this post walks through when to pick each mode.
## The misconception: a bigger number means a sharper picture
4x is not a sharpness dial. It is a size multiplier. It tells the model to output four times the width and four times the height, sixteen times the pixels. Whether those extra pixels look sharp depends entirely on whether the model guessed the right detail to put in them.
And here is the honest part, up front: **upscaling invents plausible detail. It does not recover detail that was never captured.** If the fine texture of a brick wall was smeared into a beige blur in your source, no upscaler is reading the original bricks back out of it. A good model paints on *convincing* bricks. That is a different thing, and it is worth being clear-eyed about. We go deeper on the gap between "invented" and "recovered" in the piece on [why AI upscalers leave seams and soft edges](/blog/why-ai-upscalers-leave-seams-and-soft-edges).
So when 4x comes back soft, the question is not "how do I sharpen it". It is "did I point the right model at this image?"
## The Source selector, one mode at a time
The Source dropdown has four options. Each routes your image to a different processing path built for a different kind of picture.
### Auto
Auto analyses the image and picks the path for you. It looks at the characteristics of what you dropped in. Is this a continuous-tone photograph, or a flat-shaded graphic with hard edges?, and routes accordingly. If you are not sure what your image counts as, start here. It is the safe default, and for most everyday photos it lands on the right choice without you thinking about it.
Use Auto when you genuinely do not know, or when you are batching a mixed pile of images and cannot hand-classify each one.
### Photo
Photo runs a real-world super-resolution model (Swin2SR real-world / BSRGAN-trained). "Real-world" is the important word. These models were trained on images that have been through the wringer (JPEG compression, resizing, the soft haze a phone camera leaves), so they expect that damage and work to undo it.
This is the mode for anything that came out of a camera: portraits, product shots, landscapes, screenshots of *photos*, and especially images that have already been **compressed or downscaled** somewhere along the way (saved off social media, pulled from a chat thread, exported small years ago). If your source is a real photograph and the result looks soft, and you were on Graphic or Exact, this is very likely your fix.
### Graphic
Graphic is an edge-preserving path for flat art: logos, icons, screenshots of interfaces, diagrams, flat illustration. It is built to keep hard edges hard and flat colour flat.
Why does this deserve its own mode? Because **feeding a graphic to a photo model gives you mush.** A photo model expects texture and gradient everywhere; hand it a crisp logo with dead-flat fills and razor edges, and it "helpfully" invents micro-texture that was never there and softens the edges it should have kept knife-sharp. The output looks like your logo got wet. The Graphic path avoids that smeary "SR mush" by treating the edges as edges instead of as blurry photo detail to be reinterpreted.
If your clean logo came back looking soft and slightly organic, you were almost certainly on a photo path. Switch to Graphic.
### Exact / Faithful
Exact runs classical Swin2SR and stays faithful to the source pixels: minimal invention. This is the one for **pixel art and clean screenshots** where every pixel is deliberate and you do not want the tool to hallucinate anything new into the gaps. Where Photo is happy to imagine detail and Graphic protects edges while smoothing, Exact keeps things honest and literal. If invention is the enemy (you want a bigger version of *exactly* this, not a reinterpretation), pick Exact.
## Your source looks like X, pick Y
A quick lookup for the common cases:
| Your source looks like... | Pick | Why |
| --- | --- | --- |
| Phone or camera photo, portrait, product shot | **Photo** | Real-world model, trained on camera-style images |
| Photo saved off social media / already compressed | **Photo** | Built to undo JPEG and downscale damage |
| Logo, icon, app screenshot, flat illustration | **Graphic** | Keeps hard edges hard, avoids SR mush |
| Pixel art, clean UI screenshot, sprite | **Exact / Faithful** | Faithful, minimal invention, no hallucinated texture |
| Genuinely not sure / mixed batch | **Auto** | Analyses and routes for you |
If a result disappoints, the first move is not the sharpening slider. It is trying the *next most likely* mode from this table. A soft logo? Try Graphic. A soft photo? Try Photo. Very often that single switch is the whole fix.
## The hard limit nobody's Source mode can beat
Picking the right mode gets you the best possible result *for your source*. It cannot get you a better result than your source can support.
**A very small source cannot gain real detail.** This is not a limitation of one mode. It is physics. If the information was never captured, no amount of clever routing conjures it back. That is why the tool enforces roughly an **8x effective-scale cap** and shows you a warning as you approach it. Past that point you are not enhancing a picture, you are asking the model to make one up almost from scratch, and it shows.
The classic failure: a 64px icon blown up to 4096px through a **photo** model. That is a photo path being asked to invent texture across an enormous gap with almost nothing to go on, the definition of mush. Two lessons live inside that one example:
- It was the **wrong mode** (an icon is a Graphic, not a Photo).
- It was also **too big a jump** from too little source. The Graphic path and the scale cap both exist precisely to keep you out of this territory.
4x is the multiplier where mode choice starts to matter most, because you are asking for four times the linear size and the model has more blank space to fill. If you want the fuller picture on how 2x and 4x actually differ in what they demand of your source, the [2x vs 4x upscaler guide](/blog/ai-image-upscaler-guide-2x-vs-4x) breaks it down.
## Practical tips that beat cranking the sharpener
- **Upscale from the largest original you have.** This is the single highest-leverage move. Do not upscale the small export when the big original is sitting in a folder. More captured detail going in means less invented detail coming out, and invented detail is what reads as soft.
- **2x twice is not the same as one clean 4x, and it is not magic.** Chaining passes stacks each pass's guesses on top of the previous pass's guesses; errors compound and edges get progressively softer. We ran the actual maths on this in [the incremental-upscaling piece](/blog/incremental-upscaling-math-small-images). Worth reading before you reach for a second pass on a tiny image.
- **Match the mode to the *content*, not the file type.** A screenshot *of a photograph* is a Photo, even though it is technically a screenshot. A photo of a logo on a billboard is a Photo (it has real-world lighting and texture). Ask what the pixels *are*, not what the extension says.
- **If it is soft, change the mode before you change the sliders.** Sharpening a mode mismatch does not fix the mismatch. It just adds crunch on top of mush.
## Try it on the image that disappointed you
If you have a 4x result sitting in your downloads that came back soft, this is a two-minute experiment. Open the [Upscale tool](/upscale), drop the *original* (the biggest version you own) back in, and this time set the Source deliberately: Photo for a camera shot, Graphic for a logo or screenshot, Exact for pixel art, or let Auto route it. Everything runs on your own device; the image never uploads anywhere, and the model weights download once and cache for next time.
You will not always get a miracle. A tiny source is still a tiny source, and we would rather tell you that than pretend otherwise. But the difference between the wrong mode and the right one is usually the difference between "still soft" and "actually usable."
---
### Image Prep for Self-Publishing: Covers and Interiors That Pass Review
URL: https://bgremover.novusstreamsolutions.com/blog/kdp-self-publishing-cover-and-interior-image-prep
Published: 2026-07-07 | Category: Industry Guides | Author: Novus Stream Solutions Editorial Team
A transparent-background diagram that looked clean in your manuscript renders as a solid black rectangle in the Kindle preview. A cover photo that filled your laptop screen gets flagged "low resolution" the second you switch to the print previewer. Neither problem shows up early. Both wait until you are most of the way to hitting publish, which is exactly why they catch first-time authors out.
The root cause is that self-publishing asks one set of source files to do two very different jobs. An ebook is light on a backlit screen; a paperback is ink on trimmed paper. The same image behaves differently in each, and the platform's review tools check for both. Here is what each asset needs, by type.
## Ebook and print are not the same picture
Before the asset-by-asset detail, hold one distinction in your head:
- **Ebook** images live on screens. They are **RGB**, judged in pixels, and viewed on everything from a bright phone to a grey e-ink slab. Backlit and variable.
- **Print** images are ink on paper. They need enough **resolution** to survive printing (300 DPI is the long-standing print target), they need **bleed** if they touch the page edge, and their colour is **CMYK** whether you prepare for that or not.
Prepare each asset for the format it actually lands in. A file that is perfect for one is often wrong for the other.
## The cover
### Ebook cover
An ebook cover is a tall portrait rectangle in RGB. Platforms publish a minimum long-edge pixel count and a preferred aspect ratio (roughly one and a half to one point six times as tall as it is wide is common). Confirm the current numbers on the platform's own cover spec sheet rather than trusting a figure you read in a forum two years ago.
Start from the largest, sharpest source you have. You can always scale a big cover down; you cannot invent detail that was never captured. If your only artwork is small and soft, run it through the [image upscaler](/upscale) **before** you add the title text, upscaling a cover after the type is baked in softens the lettering along with everything else. Be honest about the ceiling, though: a 400-pixel scribble blown up to full cover size is still a 400-pixel scribble with more pixels. Upscaling buys headroom, not miracles.
### Print cover
A print cover is one flat wraparound file (back cover, spine and front, in a single image), and it is where guessing does the most damage.
- **Let the platform build the template.** Spine width depends on your page count and paper stock, so you cannot finalise it until the interior is locked. The platform generates a template with the exact trim, spine and bleed dimensions for your book. Use it. Do not eyeball the spine.
- **Run art into the bleed.** Anything that reaches the page edge (a background colour, a full-bleed photo) must extend past the trim line so the cutting blade cannot leave a thin white sliver. Keep titles, faces and anything you care about well inside the safe margin.
- **Resolution is not optional.** A cover that looks crisp on screen at 72 DPI can hold a fraction of the pixels print needs. When the previewer flags low resolution, believe it and go back to a bigger source.
- **Colour will shift, so order a proof.** Screens emit light; paper reflects ink. Most KDP-style platforms accept an RGB cover and convert it to CMYK for you, and in that conversion the punchiest colours (electric blue, hot orange, pure red) tend to dull or drift. The only reliable way to judge the final colour is a physical proof copy in your hands. Do not approve print colour from your monitor.
## The author photo
Your headshot is almost always a screen asset (the author page, the "about the author" block, a retailer profile), so RGB at a sensible screen size is fine.
The one thing worth doing is cleaning up the background. At thumbnail size a busy kitchen or a distracting doorway reads as clutter; a plain, even backdrop looks deliberate. Removing the original background and dropping in a flat tone takes a couple of minutes, and it reads as more professional exactly where people first size you up. Flatten the result onto a solid background before you place it. A headshot saved with transparency can trigger the same black-box surprise as any other image (more on that next).
If the same photo also goes into a print interior, an about-the-author page in the paperback, it now has to clear the print resolution bar as well. Check the pixel count and upscale it if it is thin.
## Interior images
Interiors are where the black rectangle comes from.
**Flatten everything.** A PNG that carries transparency can render as a black or unpredictable block in some e-readers and print pipelines, because the reader does not composite the alpha channel the way your editor does on screen. The fix is boring and reliable: flatten every interior image onto a solid background, usually white, before you place it in the manuscript. The [image editor](/editor) does this in one step. If you want to understand why transparent files turn black in the first place, [why your transparent PNG shows black in Photoshop](/blog/why-your-transparent-png-shows-black-in-photoshop) walks through the alpha-channel mechanics.
This is the opposite of merch. On a print-on-demand sticker or T-shirt you fight to *preserve* transparency so the artwork sits cleanly on the product, see [transparent PNG for print on demand](/blog/transparent-png-for-print-on-demand), but inside a book you almost always want the transparency gone.
**Check your diagrams in greyscale.** Print interiors are frequently mono, because colour interior printing costs considerably more. A chart where a red line and a green line carry different meanings collapses into two identical grey lines when it is printed in black and white. Convert to greyscale and look before you commit; e-ink screens are low-contrast too, so a pale-grey diagram can wash out entirely. If the meaning survives, good. If it does not, redraw with labels, dashes or fill patterns instead of relying on colour.
**Size for how the book flows.** A reflowable ebook lets the reader change the font size, and your images ride along at whatever width the device gives them, so a diagram full of tiny text can become unreadable on a phone. A fixed-layout book holds your design but is heavier and less flexible. Know which one you are making, and size and label interior images so they still work at the smallest screen they might land on.
**Give line art the resolution it wants.** Photographs are forgiving; crisp line drawings, diagrams and hand-lettering are not. Fine lines need noticeably higher resolution than a photograph to stay sharp, and a pen sketch scanned at photo resolution comes out furry. Scan or export line art high.
**Keep ebook files lean.** Some royalty models charge a per-download delivery fee based on file size, so a bloated 20 MB full-page image quietly taxes every sale. Compress interior images sensibly rather than dropping in camera-original files.
## A pre-upload checklist
- [ ] Start every asset from the largest, sharpest source; upscale small art **before** adding text.
- [ ] Cover in RGB; use the platform's generated template for spine and bleed; order a physical proof to judge colour.
- [ ] Trust the low-resolution warning: do not talk yourself past it.
- [ ] Flatten every interior image (and your headshot) onto a solid background.
- [ ] View colour diagrams in greyscale and confirm they still make sense.
- [ ] Keep ebook image files compressed and lean.
None of this is glamorous, and that is the point. The images that pass review on the first try are the ones prepared for the medium they land in, screen or paper, rather than the ones that merely looked right in the window where you made them. Confirm the exact pixel, trim and bleed numbers against the platform's current spec sheet, prepare each asset for its real destination, and the previewer stops arguing with you.
---
### What's Actually Inside an AI-Generated Image, and How to Strip It
URL: https://bgremover.novusstreamsolutions.com/blog/whats-inside-an-ai-generated-image-metadata
Published: 2026-07-05 | Category: Technical Deep Dives | Author: Novus Stream Solutions Editorial Team
Open any AI-generated image in a text editor and scroll past the pixel data, and you often find a surprising amount of writing: the exact prompt you typed, the sampler and seed, the tool that made it, sometimes a signed manifest tracing the file back to its generator. None of that is in the picture you can see. It sits in the file's metadata: separate blocks bolted onto the image, quietly travelling with it wherever you send it.
That can be useful. It can also leak more than you meant to share. This post is about what actually lives inside a generated image, why some of it is worth keeping, and how to inspect and strip the rest without touching a single pixel.
## Metadata 101: the writing that isn't the picture
An image file is not one thing. It is a container. The pixels, the part you look at, are one segment. Around them sit other segments that describe the file, and most viewers never show them to you.
- **EXIF**: the camera-and-settings block. Shutter speed, ISO, lens, the make and model of the device, timestamps. On a photo taken with a phone this is dense; on a generated image it is often sparse or faked.
- **GPS**: technically part of EXIF, but worth naming on its own. Latitude and longitude, sometimes to a few metres. This is the block that turns "a photo of my desk" into "a photo of my desk at this address".
- **XMP** (an Adobe-originated block that holds structured text: editing history, captions, ratings, and) importantly for generated images: provenance tags.
- **ICC**: the colour profile. This one describes how the numbers in the pixels map to actual colours, so a screen or printer renders them faithfully. Strip it carelessly and colours can shift.
The key idea: **these blocks live around the pixels, not inside them.** You can remove the writing and leave the picture untouched. That distinction is the whole reason a good stripper does not have to degrade your image, which we will come back to.
## What AI generators add on top
A generated image carries the four blocks above, but generators also write their own. This is where privacy and provenance meet, and where the choices get interesting.
- **C2PA content credentials.** A cryptographically signed manifest, the "Content Credentials" standard, that records that the file was made or edited by AI, by which tool, and sometimes the chain of edits after. It is designed to be tamper-evident and to travel with the file.
- **Stable Diffusion "parameters".** Many local generators embed a plain-text block containing your full prompt, your negative prompt, the model checkpoint, sampler, steps, CFG scale, and seed. It is human-readable. Anyone who opens the file properly can read exactly how you made it.
- **XMP `digitalSourceType=trainedAlgorithmicMedia`.** A standardised XMP tag that flags the image as generated by a trained algorithm rather than captured by a camera. Platforms increasingly read this to label AI content automatically.
- **Generator and software tags.** Simple strings naming the app, the version, the pipeline. Individually harmless; collectively a fingerprint of your tooling.
Here is a rough map of what each block reveals:
| Block | What it can expose | Keep or strip? |
| --- | --- | --- |
| EXIF / GPS | Device, timestamps, location | Usually strip (GPS especially |
| Stable Diffusion parameters | Your full prompt, seed, model | Strip if the prompt is private |
| C2PA manifest | Signed AI-provenance chain | A deliberate choice) see below |
| XMP `digitalSourceType` | "This is AI" flag | A deliberate choice |
| ICC profile | Colour accuracy | Usually keep |
## Why this matters: in both directions
The privacy risk is easy to state. Your prompt is your working method, and sometimes your intellectual property. Post a generated image to a forum or a client and, unless you have stripped it, you may be handing over the exact recipe, including any private notes you tucked into the prompt. If the source image was a real photo you fed in, an inherited GPS tag can point at where you live or work. Our [guide to stripping EXIF from photos](/blog/strip-exif-metadata-photos-privacy) covers the location angle in more depth.
But provenance is not simply a leak to be plugged. C2PA and the `digitalSourceType` flag exist for good reasons. If you are an artist labelling your work honestly, a newsroom preserving a chain of custody, or a platform that wants generated images marked as such, that manifest is a **feature you want to keep**. Stripping it is a legitimate choice, and so is leaving it in.
That is precisely why we treat metadata removal as a choice rather than a default. A tool that silently scrubs everything would quietly destroy provenance that some users are trying hard to maintain. The honest design is to show you what is there and let you decide.
## Inspect before you strip
The [metadata remover](/tools/metadata-remover) starts by reading, not deleting. Drop an image in and it inspects the file and reports every block it finds, grouped by type: the camera EXIF, any GPS coordinates, the XMP, the ICC colour profile, and, called out on their own, the AI-provenance markers. That last group specifically looks for:
- C2PA manifests
- Stable Diffusion `parameters` / prompt strings
- XMP `digitalSourceType=trainedAlgorithmicMedia`
- generator and software tags
You see what is actually in your file before you change anything. No guessing, no "trust us". Like everything we build, this runs entirely in your browser. The image is never uploaded, there is no account, and nothing is stored between sessions. The reasoning behind that approach is laid out in our note on [privacy-first image editing](/blog/privacy-first-image-editing).
## Three ways to strip, so you keep what you mean to
Once you have seen the report, you choose what goes:
- **Everything.** The clean slate. Every non-pixel block removed. Good for a photo you want to share with nothing attached.
- **AI-provenance only.** Removes the C2PA manifest, the Stable Diffusion parameters, the `digitalSourceType` tag and generator strings, while leaving ordinary EXIF and the colour profile alone. This is the option for "I want my prompt private but I do not need to nuke the whole file".
- **Custom selection.** Pick block by block. Keep the ICC profile so colours stay accurate and keep orientation so the image does not rotate, but drop GPS and the prompt string. This is the surgical option.
The custom path is there because the blocks are not equally disposable. The ICC profile is the clearest example: it carries no personal information, and removing it can shift your colours on the next screen that opens the file. Keeping it while stripping everything sensitive is a perfectly sensible combination.
## Lossless removal beats re-encoding
Here is the part that matters for image quality, and it follows directly from metadata living *around* the pixels rather than inside them.
Many strippers work by re-saving the image: decoding it and encoding a fresh copy without the metadata. For a JPEG that means re-running lossy compression, which throws away a little more detail every time. Do it repeatedly and the image visibly softens.
The metadata remover does **lossless block-removal** instead. It excises the metadata segments and leaves the compressed pixel data exactly as it was. No decode, no re-encode, no quality loss. A re-encode fallback exists only for a few exotic formats that cannot be edited in place; for the common cases, your pixels come out byte-for-byte identical.
## Verify, don't assume
Stripping metadata is only useful if it actually worked, and different tools write these blocks in slightly different places. So after removing anything, the tool **re-inspects the output** and shows you the fresh report. If a block survived, you will see it. You are not trusting that the strip succeeded. You are looking at the confirmation.
The same metadata controls live inside the [image editor](/editor) too, alongside an export toggle, so you can inspect and strip as the final step of a larger edit rather than as a separate errand. And for video, there is a sibling tool that handles the equivalent container tags.
## The short version
Generated images carry more than they show: your prompt, your tooling, sometimes a location inherited from a source photo, and a provenance manifest that may be an asset or a liability depending on who you are. The right move is not "strip everything by reflex". It is to look first, understand what each block does, and remove only what you mean to, without degrading the picture in the process.
When you are ready to see what your files are actually carrying, open the [metadata remover](/tools/metadata-remover), drop an image in, and read the report before you decide. It all happens on your device, and when you close the tab, nothing is left behind.
---
### Scanning Trading and Sports Cards: Clean Backgrounds and Sharp Detail
URL: https://bgremover.novusstreamsolutions.com/blog/trading-and-sports-card-scans-clean-and-sharp
Published: 2026-07-05 | Category: Industry Guides | Author: Novus Stream Solutions Editorial Team
A 1989 rookie card in a penny sleeve, shot on a phone over a wood kitchen table, half of it catching the glare off a window: the corners melt into the grain, the foil goes white, and the one question a buyer actually has. Is that a print line, or a scratch on the surface?, is impossible to answer. The card might be near-mint. The photo says "unknown", and unknown sells low.
Two faults are usually at work at once on card photos, and they feed each other. Fix them in the right order and most cards need nothing else.
## What a buyer is actually judging
Before touching anything, it helps to know what the photo has to communicate. Grading companies (PSA, Beckett, CGC, SGC) score a card on four things: **centring** (are the borders even?), **corners** (sharp, or soft and rounded?), **edges** (clean, or chipped and whitening?), and **surface** (scratches, print lines, indentations, gloss). A buyer scanning your listing is running the same assessment by eye, faster and more suspiciously.
Every one of those four is a fine-detail judgement. And every one is wrecked by a soft capture or a busy background.
## The two failure modes
**The background.** A card is a small rectangle sitting inside a large frame of whatever was behind it: a playmat, a keyboard, a hand. Most marketplaces crop the gallery image to a square thumbnail, so an off-centre card in a cluttered surround shrinks to a postage stamp. Uneven light across that surround also fools the camera's meter: it exposes for the bright table, and the card itself goes dark.
**The capture.** Phones focus on the nearest high-contrast thing, which on a sleeved card is often the plastic, not the print underneath. Foil and chrome throw glare. And the real resolution of the card, the pixels actually spanning those 2.5 by 3.5 inches of a standard-size card, is usually far lower than the file size implies, because the card fills maybe a third of the frame. Zoom in to read a set symbol or a serial number and it dissolves into mush.
The two compound. A distracting background makes you crop harder, and cropping a low-resolution capture leaves even fewer pixels on the card. Now you have a small, soft picture of the one thing that had to be crisp.
## Step one: isolate the card
Start by removing everything that is not the card. A standard-size card is close to the easiest possible subject for background removal (four straight edges, high contrast against most surfaces), so the [background remover](/) will usually cut it cleanly in a single pass. Two things trip it up:
- **Glossy sleeves and toploaders** reflect the surround, and a strong reflection can read as part of the background rather than the card. Shoot with the light source behind you instead of off to the side and the reflection shrinks.
- **White-bordered cards on a white table** give the tool nothing to separate. Put a dark, matte surface underneath (a mouse mat, a sheet of black card), and the edge becomes unmistakable.
Once the card is isolated, drop it onto a plain background in the [image editor](/editor). Pure white or a neutral grey is what most marketplaces expect, and it keeps the buyer's eye on the card and nowhere else. Straighten any slight rotation, then crop tight to the card's edges. A dead-straight, centred card on clean white reads as "careful seller" before a word of the description is read.
## Step two: upscale, but honestly
Now the harder problem. The card is clean but soft, and the detail a buyer judges (corner sharpness, edge whitening, print lines, centring) is smeared. This is where an [image upscaler](/upscale) earns its place: enlarging the isolated card and letting the model reconstruct edges can make a set symbol legible and a corner's condition readable where before it was a grey blur.
Two honest limits, and they matter more here than anywhere else.
**An upscaler cannot invent detail that was never captured.** If the print is blurred past reading, the model guesses at what the characters probably are. On a landscape photo a plausible guess is harmless. On a card, a hallucinated serial number, or a scratch quietly smoothed away because the model decided it was noise, is worse than the blur it replaced. Treat upscaling as sharpening what is faintly present, never as recovering what is gone.
**If the capture is genuinely low-resolution, re-scan instead.** A flatbed scanner at 600 DPI turns a standard card into roughly 1,500 by 2,100 pixels of real, measured detail: no guessing involved. That beats any upscale of a soft phone photo, and it kills the glare that no amount of post-processing reliably removes. If you are listing in volume, a flatbed is the single biggest upgrade you can make. Keep the upscaler for the cards you have already shot and cannot easily re-capture.
For the general mechanics (DPI, how far you can push a small source, what the model is doing when it enlarges), see [upscaling old low-resolution photos to 4K](/blog/upscale-old-low-res-photos-to-4k-in-browser). The card workflow is the collectibles-specific version of that: remove first, then a restrained upscale, with a hard line at honesty.
## The line you do not cross
Everything above cleans the photograph. None of it should touch the card.
The distinction is real, and it matters legally as much as ethically:
- **Fine:** removing the background, straightening, cropping, correcting colour so it matches what the card looks like in daylight, and upscaling to make existing detail legible.
- **Not fine:** cloning out a scratch, softening a crease, painting a sharp corner back on, whitening a yellowed edge, or "tidying up" surface wear. That is not editing a photo. It is misrepresenting the item.
On a card offered for sale, and especially one photographed for a grading submission, editing away a flaw is misrepresentation. On most marketplaces it is grounds for a return, a claim, or a ban. Graders photograph the slab themselves under controlled light; a listing photo that flatters the card past the truth only guarantees a disappointed buyer and a card coming back to you.
A simple test: would the photo still be accurate if the buyer laid the card down beside it? Sharpen and clean the image as much as you like. The moment an edit changes what the buyer would conclude about condition, stop.
## A quick checklist
- Shoot on a **dark, matte surface** with the light behind you, card filling as much of the frame as you can.
- Remove the background, then check the **corners survived** the cut: they are the first thing to get clipped.
- Place on **plain white or grey**, straighten, and crop tight.
- Upscale only to make **real detail** legible; if the print is unreadable, re-scan rather than let the model guess.
- Never retouch the **card itself**: condition is the buyer's to judge, not yours to improve.
Get the first three right and most cards need nothing more. The upscaler is for the ones where the detail is faint but genuinely there, and the one edit you should never make is the one that makes the card look better than it is.
---
### From Photo to Cut File: Prepping Clean Cutouts for Cricut and Silhouette
URL: https://bgremover.novusstreamsolutions.com/blog/cricut-silhouette-cut-ready-cutouts-from-photos
Published: 2026-07-03 | Category: Tutorials | Author: Novus Stream Solutions Editorial Team
A cutting blade has no opinion about your artwork. It follows one line, the edge of the shape you feed it, and it follows that line exactly, every jaggy pixel and stray fringe included. Cricut Design Space and Silhouette Studio both work the same way at heart: their trace tool looks at your image, decides where the subject stops and the background starts, and turns that boundary into a cut path. Hand the software a clean transparent PNG and you get a clean path. Hand it a haloed, feathered cut-out and you get a furry decal that looks chewed rather than cut.
So the quality of a die-cut sticker or vinyl decal is decided long before the mat goes into the machine. It's decided at the edge of your PNG. Here's how to get that edge right.
## What the trace tool actually sees
When you import a picture, the machine's trace function doesn't understand "cat" or "logo". It measures contrast, or reads the transparency, and picks a threshold: everything on one side becomes the shape, everything on the other is discarded. There is no half-cut. A pixel is either inside the path or outside it.
That threshold is where soft edges betray you. If your cut-out has a six-pixel feathered edge or a pale matte fringe left over from a sloppy background removal, the trace has to guess where the real boundary sits. Nudge the threshold one way and the path bloats; nudge it the other and it eats into the subject. Either way the outline wobbles. A crisp alpha edge (subject fully opaque, background fully transparent, only a thin band of anti-aliasing between) gives the trace nothing to argue with.
## Start with a genuinely clean cut-out
Everything downstream depends on the removal. Run your photo through the [background remover](/) and check the edge at 100% zoom, not the thumbnail. Look for three things: a light halo where the old background is still clinging on, chunks missing from thin features like handles or ears, and stray transparent holes inside the subject.
Hair, fur and anything wispy is where cut files get hard, and it is worth being blunt: a machine blade cannot cut individual strands of hair. Even a perfect PNG of a fluffy dog becomes a smoothed silhouette once it is a path. If your subject has a soft outline, plan for the cut to simplify it, or choose a subject with a firmer edge.
## Full-colour sticker or solid silhouette?
This is the fork that changes everything, and most tutorials skip it.
If you are making a **print-then-cut sticker** (the full-colour image printed on sticker paper, then cut out), you keep the photo and its transparent background. The trace follows the alpha edge to produce the cut line around your printed art.
If you are cutting **single-colour vinyl** (a decal, a label, a shirt transfer), you don't need the photo at all. You need the shape. The blade cuts one colour of material, so the smartest move is to throw the colours away and trace a **solid silhouette**: the subject filled flat, sitting on transparency. A solid shape gives the trace a single unambiguous boundary and no internal detail to trip over, which is exactly what you want for a decal. You can flatten a cut-out to a solid fill in the [image editor](/editor) before you export.
Deciding this first saves you fighting the trace tool later.
## Tighten the edge, and rescue small sources
Two quick jobs before export.
First, the edge. If the removal left a faint fringe, contract or refine the alpha by a pixel or so, so the boundary is the subject and not the ghost of its old background. A clean edge here is worth more than any setting inside the cutting software.
Second, resolution. A tiny 240-pixel logo pulled off a website will trace into a jagged, stair-stepped path because there simply isn't enough edge information to describe a smooth curve. Enlarging it first with the [image upscaler](/upscale) gives the trace more pixels to follow and a smoother line. Be realistic about what that buys you, though: upscaling adds resolution, not detail that was never captured. If the source is a blurry, low-contrast thumbnail, a bigger version is still blurry, and no trace threshold will invent a crisp edge. Sometimes the honest answer is to find or re-shoot a better original.
## Padding and the sticker border
Two different things get muddled here, so keep them separate.
**Padding** is transparent margin around the whole image. Add a border of empty space so your subject isn't pressed against the canvas edge. A shape touching the frame can confuse the trace and get clipped, and print-then-cut wants a little room around the art anyway. Extending the canvas in the editor takes seconds.
The **white sticker border**, that even outline hugging the contour of a die-cut sticker, is a different operation. It is an *offset*: a second path pushed outward from the shape by a fixed distance. Canvas padding cannot produce it, because padding is rectangular and the border needs to follow every curve. That offset is built inside Design Space or Silhouette Studio, where you tell it how far out to push the outline. What you export from here is the clean shape; the machine software grows the border from it.
Kiss-cut, by the way, just describes the cut depth: the blade cuts the vinyl and adhesive but leaves the backing sheet, so the sticker peels away and the backing stays flat. It is a setting on the machine, not something baked into your PNG.
## Export the file the machine will trust
Export as **PNG with transparency**. Not JPEG. JPEG has no alpha channel, so it fills your background with white and smears compression fringing along the very edge you worked to clean, which is the last thing a trace tool needs. PNG keeps the alpha exact.
That true, unpremultiplied alpha edge is the whole game for cutting. If you want the deeper version of why a transparent edge behaves the way it does, and how the same file behaves when it is *printed* onto a product rather than cut, a genuinely different pipeline, our guide to [transparent PNGs for print-on-demand](/blog/transparent-png-for-print-on-demand) covers that side.
## Handing it to the trace tool
Import your PNG, open the trace or image-trace function, and look for a threshold or detail slider. Because your edge is already clean, you should barely need it. Nudge it just enough that the preview outline sits on the subject with no fringe caught outside it. Delete any stray traced specks, confirm the path is a single continuous outline, then send it to cut. Do a test cut on offcut material before you commit a full sheet of vinyl; blades and materials vary, and five minutes of testing saves a wasted roll.
## Pre-cut checklist
- Edge checked at 100% zoom: no halo, no missing thin parts
- Decided: full-colour print-then-cut, or solid silhouette for vinyl
- Small or soft source upscaled, or replaced with a better original
- Transparent padding added so the shape clears the canvas edge
- Exported as PNG with transparency, never JPEG
- Test cut on scrap before the real material
Get the PNG right and the machine does the boring part perfectly. The blade will follow whatever line you give it, so give it a good one.
---
### Making Animated GIF Stickers With Clean Transparency
URL: https://bgremover.novusstreamsolutions.com/blog/animated-gif-stickers-with-clean-transparency
Published: 2026-07-02 | Category: Tutorials | Author: Novus Stream Solutions Editorial Team
A good animated sticker has to do a lot with very little. It sits in a chat bubble at maybe 128 pixels wide, loops forever, and still has to read at a glance: a wave, a thumbs-up, a bouncing logo. The background has to be gone, and gone cleanly, because a stray fringe of the old backdrop looks worse at sticker size than it ever did full-frame.
This is a hands-on guide to cutting animated GIF stickers with transparency using the revamped [GIF background remover](/gif-background-remover). It also covers the one hard limit of the GIF format that no tool can engineer around, and what to do instead when that limit gets in your way.
## What actually makes a sticker work
Before touching the tool, it helps to know what you are aiming for. A sticker that lands well tends to share three traits.
- **It is legible at tiny sizes.** Fine detail vanishes when the image is scaled down to chat dimensions. Bold shapes and strong contrast survive; thin lines and subtle texture do not.
- **It has clean edges against any background.** Your sticker will land on a white chat, a dark chat, a photo wallpaper. You do not get to choose. A halo or a coloured fringe that was invisible on one background screams on another.
- **It loops without a jolt.** If the first and last frames do not line up, the eye catches the seam on every repeat. That is a property of the source animation, not the cutout, so pick or trim a clip that already loops before you start.
The transparency work handles the second point. The first and third are yours to get right in the source GIF.
## The workflow, step by step
Open the [GIF background remover](/gif-background-remover), drop in your animated GIF, and the tool works through it frame by frame. There are two paths it can take, and which one runs depends on your source.
- **Colour-key fast path.** If your GIF already sits on a solid, flat background (a single green, a plain white) the tool keys that colour out first. This is quick and exact, because there is no guessing involved: the background is one known value.
- **Per-frame model path.** For busy or photographic backgrounds, it falls back to the same Fast and Best Quality model ladder used for still images. Fast is a small, quick model; Best Quality is slower but holds edges better. Same choice you would make on the [image background remover](/background-remover). Best Quality is worth the extra wait when edges matter, and for a sticker they almost always do.
Because each frame is cut separately, independent frames can wobble, an edge that sits one pixel out here, another pixel out there, flickering as the loop plays. To counter that, the tool applies **temporal smoothing** across frames, so the cutout stays consistent from one frame to the next rather than shimmering. For an animation that repeats endlessly, that stability is the difference between a clean sticker and a jittery one.
Once the frames are processed, you choose an output format. And this is where the honest part of the tutorial begins.
## The one hard truth about GIF transparency
Here is the trade-off, stated plainly rather than glossed over: **the GIF format only supports 1-bit alpha.** Every single pixel is either fully opaque or fully transparent. There is no in-between. No pixel that is 60% there. Partial transparency simply cannot be stored in a GIF.
For hard-edged subjects (a logo, a solid icon, a bold cartoon character), this is fine. The edge is a clean boundary, and a hard on/off cutout represents it perfectly.
For soft edges it is a real problem. Wispy hair, motion blur on a moving limb, a fuzzy plush toy, a feathered glow. All of those rely on pixels that are *partly* transparent to blend smoothly. Force them to be either fully on or fully off and you get a jagged, aliased edge or a chewed-up fringe. No setting fixes this, because it is the format, not the tool. A GIF that needs soft edges is a GIF asking for something the container cannot hold.
The tool gives you two mitigations that make the best of 1-bit alpha, and one escape hatch that avoids it entirely.
## Mitigation one: Bayer dithering on the edge band
Instead of drawing a single hard line where the cutout ends, the tool can **dither** the ambiguous edge band, the ring of pixels that were partly transparent. Using a Bayer pattern, it scatters opaque and transparent pixels in a fine checker across that band, so at a distance the eye reads a gradient even though every individual pixel is strictly on or off.
Dithering trades a crisp-but-jagged edge for a softer-but-speckled one. At sticker size, where the whole thing is small anyway, the speckle often reads as a natural soft edge and the result looks kinder than a hard cut through hair. It is not true softness, nothing in a GIF can be, but it is a convincing stand-in.
## Mitigation two: a matte colour for a known background
The second mitigation works when you *do* know where the sticker will live. If your sticker is destined for a chat with a consistent bubble colour, or a marketing banner with a fixed background, set a **matte colour** to match it.
The matte pre-composites the soft edge against that colour before flattening to 1-bit alpha. The half-transparent fringe pixels get blended into the matte colour rather than left to fend for themselves, which kills the halo, on that background. The catch is that it only looks right on that background. Put a sticker matted for a white bubble onto a dark theme and the old white fringe reappears. Match the matte to the destination and it is invisible; guess wrong and it is obvious.
A rough guide to which lever to pull:
| Your situation | Best choice |
| --- | --- |
| Hard-edged logo or solid icon | Plain 1-bit cutout, no mitigation needed |
| Soft edges, destination background unknown | Bayer dithering |
| Soft edges, destination background known and fixed | Matte colour matched to it |
| Soft edges, you want them to actually stay soft | Export APNG instead (see below) |
## When to just export APNG instead
If clean soft transparency matters more than universal GIF support, stop fighting the format and switch. The format picker offers **GIF, APNG, and PNG-ZIP**, and APNG is the honest answer for feathered edges.
APNG carries full **8-bit alpha**, 256 levels of transparency per pixel, so hair, glow and motion blur survive with real smoothness. It is encoded client-side in the browser, and modern browsers render it natively. Support inside messaging and social apps varies, though, so check that your target platform accepts APNG before you commit to it. The frame-by-frame processing is identical; only the container changes.
The decision comes down to where the sticker is going:
- **Choose GIF** when you need the broadest possible compatibility and your subject is hard-edged, or when dithering and a matte get you close enough.
- **Choose APNG** when soft edges are the whole point and your destination app supports it.
- **Choose PNG-ZIP** when you want every frame as a separate file to drop into another editor or animation pipeline.
If you are unsure which containers your target platform accepts, our rundown of [PNG vs WebP vs AVIF for transparency](/blog/png-vs-webp-vs-avif-which-format-for-transparency) covers how these formats handle alpha and where each is safe to use.
## Sizing and looping tips
A few practical things that decide whether the sticker feels finished.
- **Keep the source animation short and loop-clean.** Trim so the last frame flows back into the first. A visible seam is far more distracting once the background is transparent and there is nothing to hide it.
- **Design for the small view.** Preview at chat size, not full size. If the gesture does not read at 128px, simplify it, fewer, bolder movements beat busy detail that turns to noise.
- **Mind the frame count.** GIFs balloon in file size with more frames and more colours. Every transparent-edge dither pattern also costs palette entries. Fewer frames and a restrained palette keep the file light, which matters when a platform caps sticker size.
- **Match your matte to the real destination**, not to the editor's checkerboard. The transparent preview is a convenience; the chat bubble is the truth.
For the broader craft of building a cutout that works as a small graphic (cropping, padding, framing), the walkthrough on [making social cutouts, stickers, emojis and avatars](/blog/make-social-cutouts-stickers-emojis-avatars) pairs well with this one. And if your target is specifically a Twitch or Discord emote, where tiny sizes and clean edges are the entire brief, the [emote prep guide](/blog/twitch-discord-emote-prep-transparent-clean-edges) goes deeper on that use case.
## Try it
The honest summary: GIF is a universal, widely-supported format with one real constraint, and the revamped tool gives you the fast paths, the temporal smoothing, and the dither-and-matte mitigations to work with that constraint, plus an APNG exit when the constraint is the wrong fit. Drop your animation into the [GIF background remover](/gif-background-remover), try Best Quality with dithering first, and if your edges are too soft to survive 1-bit alpha, switch the format picker to APNG and keep them.
---
### Prepping VTuber and Avatar Assets: Transparent PNGs That Layer Cleanly
URL: https://bgremover.novusstreamsolutions.com/blog/vtuber-avatar-asset-prep-transparent-pngs
Published: 2026-07-01 | Category: Tutorials | Author: Novus Stream Solutions Editorial Team
A PNGtuber opens their mouth to talk and the whole head hops three pixels to the right. Nobody planned that hop. It happens because the "mouth open" sprite was exported trimmed to its own edges while the "mouth closed" one kept a little more headroom, and the avatar software pins both to the same anchor point. The art is fine. The alpha is fine. The framing drifted, and now the character twitches every time they speak.
That twitch, along with the pale outline that shows up the moment a cutout lands on a dark scene, is the whole difference between a rig that looks built and one that looks pasted on. This is about prepping avatar art into transparent PNGs that stack cleanly, hold their registration across every expression state, and don't announce their edges.
## Your avatar is a stack, not an image
A VTuber or PNGtuber setup is rarely one picture. It's a pile of transparent layers composited live: an idle pose, a talking pose, maybe a blink, a set of expression swaps (happy, deadpan, panic), and then the furniture around them: a chat box, a "be right back" card, a webcam frame, alert graphics.
Mic-reactive apps like Veadotube mini or PNGTuber Plus do the swapping for you: they watch your input level and flip between a closed-mouth and open-mouth sprite. OBS then layers everything else on top. Every one of those pieces is a separate PNG with its own alpha channel, and every one has to sit in exactly the right place relative to the others.
Which means the job isn't "remove one background". It's "cut a *set* so the set behaves like a rig". Two things carry that: consistent framing and clean edges. If you only take one idea from this piece, make it those two.
If you just need a single cutout (a Discord emoji, a sticker, a profile avatar), that's a simpler job, and the [social cutouts and stickers guide](/blog/make-social-cutouts-stickers-emojis-avatars) covers it directly. Come back here when you have a multi-state rig to keep in register.
## Start from the cleanest source you can
Before you cut anything, be honest about what you're cutting.
If your artist gave you a layered file (PSD, Clip Studio, Procreate) with the character already on its own transparent layer, use that. Export each state straight from the layers and you never touch a background remover at all. The alpha is already correct, including the soft wisps of hair and any glow effects. Nothing beats real vector or layered transparency.
You reach for [the background remover](/) when you *don't* have that: a flat render, a commissioned piece delivered as a single JPEG, a photo of yourself for a face-cam PNGtuber, or reference art on a solid colour. Those flatten the character onto a background, and pulling it back off is exactly what an in-browser cutout is for. No upload, no account, the art never leaves your machine.
A candid limit: flattened line art on a plain colour sometimes cuts *cleaner* with a colour-key or magic-wand selection than with an AI matte, because the boundary is a hard edge, not a photographic gradient. And semi-transparent bits (glass visors, wispy hair tips, additive glow) are where any automatic cut struggles. If those matter to your design, get them from a layered source rather than trying to recover them from a flat image.
## Cut every state on an identical canvas
This is the registration rule, and it is the one most people get wrong.
When you cut a sprite, resist the urge to trim it to its own bounding box. If "mouth closed" ends up 900×1100 and "mouth open" ends up 902×1094, your avatar software anchors them differently and the character jitters. Keep **the same canvas size and the same anchor position for every state in a set.**
The clean way to do it:
1. Cut each state so the character has a correct transparent edge.
2. Drop each cutout onto a shared canvas of fixed dimensions: the same width and height for all of them.
3. Position the character identically on every one. The head, shoulders, and pivot point should land on the same pixels in every sprite.
4. Export each as its own PNG. Same dimensions out, same alignment.
The [image editor](/editor) is where you standardise this: set a canvas size once, then place each cutout so its anchor matches. Extra transparent space around the character is not wasted. It *is* the shared coordinate system that keeps the stack from drifting.
### The anchor test
Quick check before you commit a set: open two states as layers and flick the top one's visibility on and off. Only the mouth (or eyes, or whatever changed) should move. If the whole body shifts, your framing isn't matched yet. Fix it now. It is far worse to discover it mid-stream when the head is bouncing on every syllable.
## Kill the white halo
The pale fringe around a cutout is **matte contamination**: leftover background colour clinging to the semi-transparent edge pixels. It's invisible on a white scene and glaringly obvious on a dark one, which is why it always seems to appear *after* you've dropped the avatar onto your actual overlay.
To keep it under control:
- **Don't cut art that was drawn on pure white if you can avoid it.** White contaminates edges the most and is the hardest to hide against a dark scene.
- After cutting, **pull the alpha edge in by a pixel or two** (a slight erode/contract) so the outermost, most-contaminated ring is dropped rather than left semi-transparent.
- Preview the cutout **against the darkest background it'll ever sit on**, not against the editor's default checkerboard. A halo you can't see on grey will jump out on a near-black scene.
If your rig lives on both bright and dark scenes, test against both. An edge tuned only for one can look wrong on the other.
## Low-res art: upscale first, then cut
If your only source is a small render, a 512-pixel-wide avatar from an old commission, enlarge it *before* you cut, not after. Cutting first and scaling the transparent result up tends to smear the alpha edge into mush.
Run the source through the [image upscaler](/upscale) to get to a sensible working resolution, then do your cutting and framing on the larger version. Two honest caveats: upscaling invents detail that was never captured, so a tiny or heavily compressed source won't come back as crisp linework, and if the original is genuinely tiny, re-commissioning or re-exporting at a proper size beats any amount of enlarging.
## Keep expression sets consistent
An expression set is a batch, and it should be treated like one. Every sprite in the set wants the same canvas size, the same anchor, the same edge treatment, and the same colour handling. If you brighten or warm one expression, do the same to all of them. Otherwise the character subtly changes tone every time they react, which reads as a flicker.
Name them predictably too (`idle`, `talk`, `blink`, `angry`) so your avatar software and your future self can tell them apart at a glance.
## Animated mouths and looping props
Most PNGtuber apps do the animation themselves by swapping discrete PNGs off your mic level, so you usually don't need a baked animation for basic mouth flap. You need clean, well-registered still frames. That's the common case and the simplest.
For looping props (an animated badge, a shimmering border, a bouncing mascot), you do need a moving format, and the format matters for transparency:
- **APNG** (animated PNG) keeps a full alpha channel and looks clean, but not every tool reads it.
- **Animated WebP** also carries full alpha and is widely supported now.
- **GIF** only supports on/off transparency, every pixel is either fully opaque or fully invisible, so soft edges turn into a jagged, fringed outline. Fine for hard-edged pixel art; poor for anything with a feathered boundary.
If your animated element is genuinely a short video clip rather than a sprite loop, keep it as a video layer in OBS instead of forcing it into an image format.
## A quick pre-stream checklist
- [ ] Every state in a set exports at the **same dimensions** with the **same anchor**.
- [ ] Flicking between states moves **only** the part that changed: no whole-body jump.
- [ ] Edges checked against your **darkest** scene, not just the checkerboard.
- [ ] Alpha pulled in a pixel or two on cutouts that came off a light background.
- [ ] Low-res source upscaled **before** cutting, not after.
- [ ] Animated props saved as APNG or WebP if they have soft edges: never GIF.
- [ ] Files named so you can find `talk` versus `idle` at 2 a.m.
Get the framing matched and the edges clean, and the stack does what a good rig should: it disappears. Nobody watching thinks about your layers. They just see a character who sits properly in the scene and doesn't twitch when they speak.
---
### Shooting Glossy and Reflective Products: Jewellery, Glass and Metal
URL: https://bgremover.novusstreamsolutions.com/blog/photographing-glossy-reflective-products-jewelry-glass-metal
Published: 2026-06-28 | Category: Industry Guides | Author: Novus Stream Solutions Editorial Team
Put a polished silver band on a white sweep, fire the shutter, and look closely at the metal. You will find the window behind you, a pink smear that turns out to be your own hand, and a bright ceiling light, all wrapped around a curved mirror the width of a fingernail. The ring photographed everything in the room except itself. That is the whole problem with shiny products in one image: the surface has no colour of its own, it borrows the colours around it.
It is also why background removal, [the tool this site is built around](/), struggles more with jewellery, glass and metal than with almost anything else. A cutout needs a clear edge between subject and background. On a chrome watch case or a wine glass, that edge is genuinely ambiguous. The metal contains a reflection of the backdrop; the glass lets the backdrop show straight through. The model has to guess where the object stops, and guesses are where cutouts go wrong.
Here is what causes the trouble, and how to shoot each material so the guess becomes easy.
## Why the edge goes missing
Two separate things confuse an automatic cutout on shiny goods.
**Reflection.** A mirror-finish surface shows you the room. If your grey studio wall is reflected in a silver bracelet, part of the "subject" is literally the same colour as the "background." The model may cut into the metal, or it may keep a halo of reflected wall clinging to the outline.
**Transparency.** Glass and clear acrylic let the backdrop pass through them. Most segmentation models output an opaque mask, deciding each pixel is either in or out. Feed one a wine glass and it will happily hand back a solid glass-shaped blob, killing the very see-through quality that made it glass. You lose the thing you were selling.
Neither is a flaw you can prompt away. You reduce them at capture time, before the file ever reaches an editor.
## Reflective metal: jewellery, watches, cutlery
The camera, the tripod and you are all in the reflection. You cannot remove them, but you can tame them.
- **Shrink your own reflection.** Shoot from further back with a longer focal length. Your reflection in the metal becomes smaller and less defined, which is far easier to tidy than a full-length portrait of you crouched over the piece.
- **Wrap the piece in soft white.** A light tent or a simple diffusion box surrounds the metal with even white, so the reflections it picks up are clean and neutral rather than a cluttered workshop. The reflections do not vanish; they become a smooth gradient, which separates from the background far better than a reflection of your ceiling.
- **Shape a deliberate edge with card.** A strip of black card placed just out of frame gives a ring or a watch case that classic dark gradient down one side. That defined line is exactly what a cutout wants to trace.
- **Try a circular polariser, but do not expect miracles.** It cuts glare from glossy non-metallic surfaces such as gemstones and watch glass. On bare polished metal its effect is limited, so treat it as a bonus rather than a fix.
- **Focus stack tiny pieces.** Small jewellery at close range has paper-thin depth of field. Several frames focused front to back, merged, give a fully sharp piece with a crisp outline all the way round.
**The cutout caveat.** Even with a clean tent reflection, the AI cannot always tell where reflected-white-tent ends and white-background begins along the outer edge. Expect to tidy the outline by hand where a bright reflection meets a bright backdrop. A mid-grey sweep often separates a silver piece better than pure white, precisely because the metal is not busy mirroring the same colour it sits on.
## Transparent glass: bottles, glassware
Glass is the hardest of the three, because there is no honest edge for the model to find. You build one with light.
- **Choose bright-field or dark-field, deliberately.** In bright-field lighting you light the background bright and let the glass render its edges as dark contour lines, which reads cleanly on white. In dark-field you use a dark background and rim-light the edges so they glow against black. Either way you are drawing a defined outline around otherwise invisible glass.
- **Give the model an anchor.** A filled bottle with a label gives the cutout something opaque and unambiguous to lock onto. Empty, unlabelled glassware offers it almost nothing.
- **Shoot on the colour you will actually publish on.** If your listing background is white, photograph the glass on a clean white sweep. The transparent body already shows white through it, and you may not need to cut anything at all.
**The cutout caveat.** An automatic pass will not preserve genuine transparency. If you need a viewer to see through the glass to a white page, the honest route is usually not to remove the background: shoot on white and leave it. If you must place the glass on another colour, accept that the see-through areas will take manual alpha work, or that they will look faintly pasted-on. This is a close cousin of clear packaging, and the same limits apply. We go deeper on that specific case in [removing backgrounds from clear and transparent packaging](/blog/remove-background-clear-transparent-packaging).
## Glossy plastic and ceramic
Good news after the glass: these are opaque, so the edge is real and the cutout has an easy time. Your enemy here is a single blown-out hotspot.
- **Make the light large and soft.** A big softbox or a diffusion panel spreads the highlight into a gentle gradient instead of a hard white dot that clips to pure white.
- **Move the hotspot off the silhouette.** Rotate the product or the light so the brightest specular blob falls on a face of the object, not along its outline. A blown highlight sitting on the edge is where the cutout will wander.
**The cutout caveat.** Glossy opaque products cut well, but watch two spots. A hotspot bleeding over the edge looks like the background eating into the product, and a dark reflection on the underside can be read as shadow and trimmed away. Both are quick fixes rather than lost causes.
## Refining ambiguous and semi-transparent edges
This is where the manual work lives, and on shiny goods there is always some.
Load the cutout into the [image editor](/editor) and zoom to at least 100 per cent, then walk the outline. Three things to look for: metal the model cut into, a halo of reflected background it kept, and an edge so crisp it looks stamped on. A slight feather settles that last one so the piece sits naturally on its new background.
Semi-transparent edges are the genuinely hard part. A frosted rim, the fire in a gemstone, the soft fall-off at the lip of a glass. A hard on-or-off mask always looks wrong on these. What you actually want is partial alpha, pixels that are, say, 40 per cent opaque rather than fully in or fully out. That is fiddly to paint by hand, and it is the moment to decide honestly whether the shot is worth saving or worth re-taking on the right background.
If you cropped in hard on a small piece and the file is now short on resolution, run it through the [image upscaler](/upscale) before you refine edges, so you are tracing a clean outline rather than a mushy one.
**The honest limit.** Some shots are unrecoverable. A cut-crystal decanter photographed against a bookshelf, full of refractions of the whole room, cannot be cleanly separated and made to look real on a new background. Re-shooting it on your final colour is faster than an hour of masking, and the result is better.
## A short pre-shoot checklist
- Diffuse the light large and soft; no bare hard sources near shiny surfaces.
- Shoot on the colour you will publish on, so reflections and see-through areas already match.
- Shrink your own reflection with a longer lens and more distance.
- Give the model an anchor: a label, liquid, or an opaque core.
- For glass, pick bright-field or dark-field on purpose, not by accident.
- Budget time for hand-tidying the outline. On reflective goods, plan for it rather than hoping.
The camera and the cutout want the same thing from a shiny product: an unambiguous edge, and a surface that is not secretly showing them the room. Give them that at capture and the automatic pass gets you most of the way there. The last stretch is you, a zoomed-in editor and a steady hand. On the hardest transparent pieces, the bravest edit is the one you do not make: leave it on white and move on.
---
### Passport and ID Photo Backgrounds: Getting the Plain White or Blue Right
URL: https://bgremover.novusstreamsolutions.com/blog/passport-and-id-photo-backgrounds-getting-it-right
Published: 2026-06-26 | Category: Tutorials | Author: Novus Stream Solutions Editorial Team
The online checker rejected it in under a second. Not the expression, not the light on your face, those were fine, but the wall behind you was a faint magnolia with a light switch just visible over one shoulder, and a soft shadow pooled where your head met the plaster. *Background not uniform. Please try again.*
That is the pattern. The background is the single most common reason a home-shot passport or ID photo gets bounced, and it is also the part people assume they got right because the wall "looked white" at the time. It rarely photographs white. It photographs cream, or grey, or faintly blue, with a shadow you never noticed until a machine drew a red box around it.
The good news is that the background is fixable at your desk. The important news is that fixing it responsibly means knowing exactly what you are allowed to change, and what you must leave completely alone.
## What officials actually check
Automated checkers and human reviewers are looking at far more than the backdrop. A photo can have a perfect background and still fail. In broad terms, expect scrutiny of:
- **The background itself**: plain, a single light colour, evenly lit, with no patterns, objects, other people, or shadows behind the head. The exact colour required depends on the country and the document.
- **Head size and position**: your head must fill a specified proportion of the frame, be centred, face the camera straight on, and sit within a defined size band. This varies between authorities and is measured precisely.
- **Expression and eyes**: usually neutral, mouth closed, both eyes open and clearly visible, looking directly at the lens. Some authorities now permit a natural, closed-mouth smile; many still do not.
- **Glasses**: increasingly not allowed at all. Where they are, no glare and nothing obscuring the eyes.
- **Head coverings**: generally only for religious or medical reasons, and the full face must remain visible.
- **Lighting on the face**: even, with no shadows across the face, no red-eye, and no blown-out or muddy exposure.
- **Recency and print specs**: an exact pixel size or print dimension, a minimum resolution, and often a rule that the photo was taken within a recent window.
- **No alterations**: the photo must be a true, current likeness. Digital edits that change how you look are prohibited.
That last point is the one that governs everything below, so hold onto it.
## Why the background is where home photos fail
Walls are almost never the flat, uniform colour they appear to be. Up close a camera records skirting boards, sockets, picture rails, faint texture, and a colour cast thrown by whatever light is in the room. Your phone's automatic white balance then shifts that colour again, so a genuinely white wall can come out warm cream under a bulb or cold blue near a window.
Shadows are the other culprit. Stand close to a wall with a single light source and your head casts a dark halo onto it. Booth photos avoid this by lighting the backdrop separately and standing you well clear of it, something most hallways cannot replicate.
So even a careful home photo tends to arrive with a tinted, textured, faintly shadowed background. That is a background problem, not a face problem, which is precisely why it is the safest thing to correct.
## Which colour: white, off-white, or blue
There is no universal answer, and guessing is how photos get rejected twice.
Many Western passports (including a number of European, North American, and Commonwealth documents) call for a plain white, off-white, cream, or light grey background. A range of national ID cards and some visa photos instead specify a defined **blue**. A few want light grey specifically, not white.
Do not assume, and do not copy what a friend from another country used. The required colour is written into each authority's photo guidance for each document. Find that guidance, note the exact wording, and match it. "Light and plain" is not good enough when the rules say "white" or "light blue".
## The safe background-replacement workflow
The principle here is minimal intervention: shoot as well as you can, then change only the backdrop.
1. **Get the source right first.** Even, soft light on your face. Stand an arm's length or more from the wall to keep shadows off it. Head straight, neutral expression, hair back from the eyes. The better the original, the less you touch, and the more the result looks like an honest photo rather than an edited one.
2. **Remove the existing background.** Load the photo into the [background remover](/) on the homepage. It runs entirely in your browser. A photo of your own face never leaves your device, which is the point of doing this at home rather than uploading your likeness to a server you do not control.
3. **Place a flat, compliant colour behind you.** In the [image editor](/editor), drop a solid fill of the exact colour the document requires (a true white, or the specified blue) as a single flat layer. No gradient, no texture, no vignette. Officials want uniform; give them uniform.
4. **Inspect the hair edges closely.** This is where an automatic cut-out can betray you. Zoom in around the hairline and shoulders and look for a coloured fringe, a faint halo of the old wall, or hair that has been chewed into a hard, unnatural edge. A ragged or haloed edge can make a photo read as manipulated. If the edge is poor, re-shoot against a cleaner wall rather than force it.
5. **Crop and size to spec.** Still in the [image editor](/editor), frame the head to the required proportion and set the final dimensions. Get the head-size band right: a compliant background will not rescue a head that is too large or too small in the frame.
6. **Run it through an official checker.** Where the issuing authority provides one, use it. Better to be told no by the checker than by the office weeks later.
One distinction worth drawing: this is *not* the same as blurring a background. A passport photo needs a hard, flat replacement with the subject fully sharp: the opposite of the soft, defocused look people apply to portraits. If you are weighing the two techniques for other photos, [portrait blur versus background removal](/blog/portrait-blur-vs-background-removal) walks through when each one is the right tool. For compliance work, blur is never the answer.
## What this tool will not do
Be clear-eyed about the limits, because the stakes here are a rejected application or worse.
- **It will not make your photo compliant.** It changes the background and nothing else. Head size, expression, glasses, head coverings, and the lighting on your face are entirely on you.
- **It cannot guarantee acceptance.** No third-party tool can, and anything that promises a "guaranteed pass" is overselling. The only verdict that counts is the issuing authority's.
- **Some authorities forbid digital editing altogether.** If the guidance requires an unaltered photo, a digitally replaced background may itself be grounds for rejection. In that case, do not edit. Hang a plain sheet in the required colour, stand well back from it, and re-shoot.
- **Never touch your face or appearance.** No skin smoothing, no slimming, no removing a spot, no whitening teeth or brightening eyes. Removing a blemish that will be gone next week still changes your likeness in the eyes of many authorities, and that is the line between fixing a background and falsifying a document. Do not cross it.
Finally, and this cannot be repeated too often: requirements differ by country, by document, and over time. Verify every specific (colour, head size, expression, glasses, recency, dimensions) against the official guidance for your document, and use an official checker where one exists.
## Before you submit: a quick check
- [ ] Background is a single flat colour, and it is the exact colour your document specifies
- [ ] No shadow, object, or fringe of the old wall behind the head
- [ ] Hair edges look natural at full zoom: no halo, no hard-chewed outline
- [ ] Head size, position, and frame dimensions match the official spec
- [ ] Expression, eyes, glasses, and head coverings all meet the rules
- [ ] Your face and appearance are completely unedited
- [ ] You have confirmed the current requirements on the official source, and passed the official checker if there is one
Fix the wall. Leave the face. Verify everything.
---
### WebGPU, Explained for Creators: Why Your Browser Can Suddenly Run Real AI
URL: https://bgremover.novusstreamsolutions.com/blog/what-webgpu-on-device-ai-means-for-creators
Published: 2026-06-25 | Category: Tutorials | Author: Novus Stream Solutions Editorial Team
If you make things (thumbnails, product shots, short videos), you've probably noticed AI editing tools quietly moving *into the browser* over the last couple of years. No download, no install, and somehow they're not slow. The thing that made that possible has an unglamorous name: **WebGPU**. This is a creator's explanation of what it is and why it changed what your browser can do, with as little jargon as the topic allows.
## The one-sentence version
WebGPU is a way for a web page to use your computer's **graphics chip (GPU)** for general number-crunching, not just drawing graphics, but the kind of heavy math that AI models are made of.
That's the whole idea. Everything else is consequence.
## Why that's a bigger deal than it sounds
Your GPU is the most powerful piece of math hardware in your device. It's why your laptop can play a game or scrub 4K video. AI models (the ones that remove backgrounds, upscale, colourise) are also, underneath, enormous piles of the same kind of math (multiplying grids of numbers, millions of times).
For years, web pages could only reach the GPU for actual graphics. AI in the browser had to run on the CPU, which is like doing a thousand sums one at a time instead of all at once. It worked, but it was slow enough that everyone shipped AI as a cloud service: you uploaded your photo, a server's GPU did the work, and you waited for the result to come back.
WebGPU unlocked the door. Now a web page can hand AI math directly to *your* GPU. The server stops being necessary, because the powerful hardware was sitting in your lap the whole time.
## What this actually changes for you
Three concrete things:
**1. Your files stop leaving your device.** When the AI runs on your GPU, there's nothing to upload. Your product photos, your kid's birthday video, your client's NDA work, none of it travels to someone else's computer. That's not a privacy *promise*; it's just how the architecture works. Nothing was sent because nothing needed to be sent.
**2. It's free to run, as often as you like.** A cloud tool pays for every GPU-second on its servers and bills you for it. When your own GPU does the work, the marginal cost is zero. Process one image or a thousand: same price.
**3. It works offline.** Once the AI model has downloaded and cached, you can edit on a plane, a train, or a campsite with no signal. The model lives in your browser; the internet was only ever needed to fetch it the first time.
## "Faster" deserves an honest footnote
You'll see "WebGPU acceleration" sold as *fast*, and on a decent modern machine it genuinely is, background removal in a few seconds, upscaling in tens of seconds. But speed depends entirely on your hardware. A flagship laptop and a six-year-old budget machine will both finish the job; one just makes you wait longer.
There's also a subtlety the marketing skips: **not every AI graph fits every browser backend.** Our original 1024px Best Quality graph exceeded browser working memory even when its weights loaded successfully. We wrote a detailed follow-up on the browser-ready replacement: [How Best Quality Uses WebGPU with a WASM Safety Net](/blog/why-best-quality-bg-removal-runs-on-wasm). The takeaway for you as a creator: a good tool picks a graph and runtime path that can complete on your device automatically. You don't manage it.
## How to tell if your device has WebGPU
The short answer: if you're on a reasonably current browser and machine, you almost certainly do.
- **Chrome and Edge** (version 113 and up, 2023 onward) have WebGPU on by default on most desktops.
- **Safari** added it in recent versions on Mac, iPhone, and iPad.
- **Firefox** has been rolling it out.
You don't need to check a setting. When you open a tool like the [background remover](/background-remover) or the [AI upscaler](/upscale), it detects WebGPU, confirms your GPU is healthy, and uses it. If your device doesn't have it (an older browser, a locked-down work machine), the same tool falls back to the CPU path and still works, just slower. Nothing breaks; you simply wait a bit more.
## What "on-device" lets creators do that cloud never did
Put the three changes together and you get workflows that weren't practical before:
- **Iterate freely.** When every cutout is free and instant-ish, you stop rationing. Try five crops, three backgrounds, two upscale settings. There's no credit counter ticking.
- **Handle sensitive work.** Client photos under NDA, pre-launch products, images of people. You can edit them without the legal and ethical knot of uploading to a third party.
- **Build offline into your routine.** Prep a whole catalogue on a flight. The model's already cached.
## The trade you're making
It's worth being clear-eyed. On-device AI asks two things of you:
- **A one-time download.** The AI model is tens to hundreds of megabytes. You pay that once in bandwidth and a short wait, then it's cached.
- **Your device's effort.** Your fans will spin on a long batch. That work used to happen on a server you were paying for. Now it happens on hardware you already own.
For most creators that's a trade worth making many times over. The privacy is structural, the cost is gone, and the only thing you gave up is a server you didn't want in the loop anyway.
## Try it and watch the network tab
The convincing demo is to prove it to yourself. Open the [background remover](/background-remover), then open your browser's developer tools to the Network panel, and process an image. Watch for an upload of your photo. You won't see one, because WebGPU let the work stay home.
---
### A Clean, Professional Headshot Background Without a Photographer
URL: https://bgremover.novusstreamsolutions.com/blog/clean-professional-headshot-backgrounds-in-browser
Published: 2026-06-24 | Category: Tutorials | Author: Novus Stream Solutions Editorial Team
You know the photo. Arm outstretched, phone held slightly too low, and behind your head a drying rack draped with a grey towel, a half-open wardrobe, and the corner of a poster you have been meaning to take down since 2022. It is the picture that ends up on your LinkedIn profile because the deadline for that job application was yesterday and it was the least bad option in your camera roll.
The good news is that most of what makes that photo look amateur is the room, not you. Fix the background and you are surprisingly close to something you would be happy to put next to your name. The honest news is that the background is only about half the job, and no amount of editing rescues a photo shot in the dark. Let's do both halves properly.
## What a clean background actually fixes
A messy background does two things to a headshot. It pulls the viewer's eye away from your face, and it signals "snapshot" rather than "considered". Replacing it with a plain or softly blurred backdrop removes the distraction and quietly raises the whole image a grade.
What it does **not** fix: hard shadows across half your face, a blown-out window behind you, a camera angle that looks up your nose, or a photo so small and soft that your eyes are a smear. Those are lighting and framing problems, and they happen in the room before you ever open an editor. So we start there.
## Step 1: Shoot near a window, not under the ceiling light
Overhead lights cast shadows straight down: under your brow, under your nose, under your chin. That is why kitchen-selfie faces look tired. A large window does the opposite: soft, even light that wraps around your face.
- Stand a metre or so back from a window, **facing it**, so the daylight lands on your face. Not with the window behind you, or you become a silhouette.
- Aim for **soft, indirect** light. Bright overcast days are ideal. Harsh direct sun makes squinty eyes and hard-edged shadows.
- Hold the phone at **eye level or a touch above**, not below. Below-the-chin angles flatter no one.
- Frame from roughly **mid-chest to just above the head**, with a little space above your hair. Do not crop so tight that the top of your head is cut off. You want room to work with later.
- Use the **rear camera** if someone can hold it, or a self-timer propped on a stack of books. Rear cameras are almost always sharper than the front-facing one.
Take twenty frames, not two. Shift your weight, drop your shoulders, try a small genuine smile and a neutral one. You are looking for the shot where your eyes are sharp and your expression is relaxed. Everything after this assumes you already have that frame.
## Step 2: Remove the background
Once you have a keeper, open the [background remover](/) and drop the photo in. It cuts you out from the room and leaves a transparent PNG, just you, on a checkerboard of nothing.
Everything runs in your browser. The image never leaves your device, which matters more than usual here: a headshot is your face and often your home behind you, and neither needs to be uploaded to somebody's server to have a wall swapped out.
Check the edges before you move on. Shoulders and jaw usually cut cleanly. The place it struggles is hair: more on flyaways in a moment.
## Step 3: Choose a background colour that suits the platform
With yourself isolated, drop a new background behind you in the [image editor](/editor). Resist the urge to get creative. Professional headshots live in a narrow, boring, effective range:
- **Soft light grey** is the safest choice going. It reads as neutral and considered on almost any platform, and it never fights your clothing.
- **Off-white** looks crisp and modern, good for a company team page. Pure bright white can tip into passport-photo territory. Slightly warm or slightly grey is friendlier.
- **A muted, desaturated colour** (deep navy, warm taupe, forest green) adds a little personality without shouting. Pick something that does not clash with what you are wearing.
- **A soft blur of the original room** keeps a sense of place and looks natural, provided the room was tidy enough to blur rather than delete. This is the "shallow depth of field" look a portrait lens gives you.
That last option raises a fair question: if you can just blur the background, why cut it out at all? The two approaches solve different problems, and it is worth understanding when each wins, we walk through exactly that in [portrait blur vs background removal](/blog/portrait-blur-vs-background-removal). Short version: blur keeps context and looks organic but cannot hide clutter; a clean replacement removes distraction completely but can look flat if the edges are rough. For a headshot destined for a tiny circular avatar, a plain replacement usually wins.
## Step 4: Soften the edges around flyaway hair
Hair is where cutouts betray themselves. Strands that lift away from your head get chopped into a jagged fringe, or a thin pale halo of the old background clings to your outline. On a light-grey backdrop a dark halo is glaring.
In the editor, work the edge rather than the whole image:
- Nudge the cutout edge **inward** by a pixel or two to eat the halo left by the old background.
- Add a **very slight feather** to the outline so hair meets the backdrop softly instead of with a hard cookie-cutter line.
- If a chunk of hair went missing, a **soft-blurred background** hides the loss far better than a flat colour: the eye stops looking for a crisp edge.
Do not chase perfection strand by strand. At the size a headshot is actually viewed (a small circle on a profile, a thumbnail beside your email), nobody counts hairs. They notice halos and hard edges, so fix those and stop.
## Step 5: Export at the right size, or upscale first
Different homes want different shapes:
- **LinkedIn and most social profiles** crop your photo into a **circle**. Keep your face centred with breathing room on all sides, or the crop will clip your forehead. Export a **square**.
- **CVs, email signatures and website "about" pages** usually want a **rectangle** or square: check what the specific template expects rather than guessing.
- Export **larger than you think you need**. A generous square that a platform downscales always looks sharper than a small one it has to stretch. Confirm any minimum dimension on the platform itself, since those specs change.
If your original phone shot was small or soft (an old photo, a heavy crop), run it through the [image upscaler](/upscale) before exporting. It rebuilds detail so a tight crop of your face does not turn to mush.
## The one line you should not cross
You can fix a background. You can even out skin lightly. What you should not do is **change your face**: slim the jaw, swap the eyes, generate a version of you that a colleague would not recognise across a meeting room. A headshot's entire job is to say "this is who will turn up". Edit the room all you like. Leave the person in it honest.
Get the light right, cut cleanly, pick a dull sensible backdrop, and you have a headshot that costs nothing and looks like you meant it.
---
### Depop, Vinted and Poshmark: Listing Photos That Actually Sell
URL: https://bgremover.novusstreamsolutions.com/blog/depop-vinted-poshmark-listing-photos-that-sell
Published: 2026-06-21 | Category: Industry Guides | Author: Novus Stream Solutions Editorial Team
A £4 charity-shop tee and a £180 designer coat too often get the same listing photo: shot on a crumpled duvet, lit by the ceiling bulb, one soft frame, no measurements. On Depop, Vinted and Poshmark that single photo is the whole shop window. The buyer can't feel the fabric, hold it up to the light or check the seams, so your pictures have to do every job at once. Sell the item, and prove its condition.
That second job is the one most sellers skip, and it's the one that separates listings that sell from listings that sit. Resale is not retail. A catalogue shopper wants aspiration; a resale buyer wants to know exactly what turns up in the parcel. Over-polish a £6 pre-loved top with a flawless white cutout and a drop shadow and you don't look professional. You look like a dropshipper, or worse. Authenticity and clarity outsell gloss every time here.
## Shoot for two things: desire and proof
Every good resale listing balances two kinds of photo.
**Desire shots** make someone want the item. The cover image, a flat-lay, an on-body picture showing how it drapes.
**Proof shots** answer the questions a careful buyer asks before spending: the label, the true colour, the measurements, and any flaw. Get both and you head off the "is this genuine?" and "does it really look like that?" messages before they ever arrive.
## A shot list for one listing
All three apps let you upload a stack of photos, not one or two, so use the slots. Here's an order that works for most clothing.
1. **The cover shot.** The whole garment, front-on, filling the frame. This is your thumbnail in the feed, so shoot it clean and well-lit. On Depop especially the grid is square, so keep the item centred with breathing room around it and nothing important near the edges.
2. **The on-body or full-length shot.** Worn, or on a hanger against a plain door. This shows fit, length and drape, things a flat photo hides. Leave the background exactly as it is here (more on why below).
3. **The brand and size label.** A close, sharp crop of the neck or waistband tag. Buyers search by brand and size; showing the label proves both.
4. **The composition and care label.** "100% wool" or "viscose blend" matters for buyers with allergies, budgets or laundry standards. One quick close-up saves a dozen questions.
5. **Condition close-ups.** Photograph any flaw honestly and in focus: pilling under the arms, a faded print, a small mark, a missing button, a re-stitched hem. A flaw you've clearly photographed is a flaw the buyer accepted; a flaw they find at home is a return or a bad rating.
6. **A detail or texture shot.** Hardware, buttons, a print close-up, the weave of a knit. This is where an item earns its price.
7. **Measurements.** Lay the garment flat and photograph it with a tape measure across the chest, waist and length, or note the numbers in the description. Sizing drifts wildly across decades and brands, and measurements prevent the single most common resale dispute.
You won't need all seven for a plain white tee. A vintage leather jacket deserves every one.
## When a clean background helps, and when it quietly hurts
Removing the background is a genuinely useful move, but only in the right slot. The trick is knowing which.
### Where it helps
- **The cover shot.** If your only clear photo is on a busy carpet or a cluttered bed, cutting the item out and dropping it onto plain white or a soft neutral makes the thumbnail read instantly in a crowded feed. Run it through the [background remover](/) and place it on a clean colour.
- **Flat-lays.** A row of listings that all share the same calm background gives your shop a coherent, considered look, worth having if you sell in volume.
- **Killing distraction.** A stray charging cable, a pet wandering through, a reflection of you in a mirror. Sometimes the cleanest fix is to remove the lot.
### Where it hurts
- **On-body shots.** Cut yourself out from behind a garment and the result looks uncanny, a floating top with smeared edges where your arm used to be. On-body pictures sell fit and realness; a background swap destroys both.
- **Condition shots.** This is the important one. Background removal works by deciding what's item and what isn't, and near a fuzzy or damaged edge it guesses. It can smooth over the exact pill, fray or mark you're trying to document, and a buyer who spots an obviously edited condition photo stops trusting the whole listing. Leave proof shots untouched.
- **Fuzzy, sheer or wispy items.** Faux fur, mohair, lace, tulle, marabou trim, anything with hair-like edges. Automatic cutouts leave halos and chewed outlines on these. Often a plain in-shot background, hung against a white door, beats a rough extraction.
Be honest with yourself on that last point. If the cutout comes out with a ragged edge, don't ship it. A clean photo on a messy-but-neutral background sells better than a bad cutout every time.
## Editing on your phone, in two minutes
You do not need a laptop or a subscription. The whole thing runs in your phone's browser, and nothing you shoot ever leaves the device.
1. **Shoot in daylight.** Stand near a window during the day, not under a warm ceiling bulb. Daylight gives you true colour, and true colour is the single biggest thing you can do to prevent "it looked different in the photos" complaints.
2. **Straighten and crop.** Level the horizon, crop close, and keep the cover shot safe for a square. The [image editor](/editor) handles rotate, crop and a brightness or white-balance nudge in the browser.
3. **Adjust lightly.** Lift the exposure if it's dim; neutralise a colour cast so white reads white. Stop there. Don't push a dusky pink into hot fuchsia. You'll be the one dealing with the return.
4. **Remove the background only where it earns it.** Cover shot and flat-lays, yes. Condition and on-body shots, never.
5. **Rescue a soft crop, sparingly.** If you've cropped hard into a label and it's gone mushy, the [upscaler](/upscale) can firm it up, but shooting the detail close in the first place always beats fixing it afterwards.
## This is not the Etsy playbook
If you're selling handmade or brand-new goods rather than pre-loved, most of this inverts: styled sets, props, consistent studio lighting and aspirational staging are the whole point, and there's no condition to disclose. That's a different craft. Our [Etsy photo guide for handmade sellers](/blog/etsy-photo-guide-for-handmade-sellers) covers it. Resale is the opposite discipline: less styling, more evidence.
## Quick checklist before you hit publish
- Cover shot fills the frame and works as a square
- One on-body or hung shot for fit: background left alone
- Brand, size and composition labels are sharp and readable
- Every flaw photographed honestly and unedited
- Colour matches the real item, checked in daylight
- Measurements shown or written into the description
- Background removed only on the cover or flat-lays, and the edges are clean
Get the proof shots right and you'll spend far less time answering questions and far more time posting parcels. The buyer who can see exactly what they're getting is the one who doesn't haggle, doesn't message twice, and doesn't open a return.
---
### Building Transparent PNG Overlays for OBS and Live Streaming
URL: https://bgremover.novusstreamsolutions.com/blog/transparent-png-overlays-for-obs-streaming
Published: 2026-06-19 | Category: Tutorials | Author: Novus Stream Solutions Editorial Team
A good webcam frame is mostly empty. It might be a 1920 by 1080 PNG where the vast majority of the pixels are transparent: a decorative border, a name plate, a small logo bug in one corner, and a large clear hole in the middle where your camera feed shows through. Getting that hole clean, and getting the file into OBS so it lands exactly where you drew it, is most of the work.
This is a different job from compositing a subject onto a new background. If you want the fundamentals of dropping an image behind a transparent cut-out, the walkthrough in [add a background to a transparent PNG](/blog/add-background-to-transparent-png) covers it. Here the goal is the opposite. You are building assets that sit *over* a live video feed, and the transparent parts have to stay genuinely transparent all the way into OBS.
## The pieces of a stream overlay
Most channels end up with four or five separate assets, not one giant image:
- A **webcam frame**: the border and name plate around your camera.
- A **starting-soon / be-right-back screen**: usually a full opaque background, so transparency barely matters on the base layer, though you may still want a transparent logo sitting on top of it.
- A **logo bug**: a small mark in a corner, often present on every scene.
- **Alert graphics**: follower and subscriber pop-ups. These are usually animated and belong to a different pipeline (a browser source or an alpha video), not a static PNG.
Keeping them as separate files is deliberate. You can reposition the logo without re-exporting the whole frame, and OBS can reuse the same logo file across every scene rather than baking a copy into each one.
## Design at canvas resolution
OBS composites everything onto a base canvas: commonly 1920 by 1080. If you build your frame at that exact size, every pixel maps one-to-one and OBS never has to scale it. Scaling a frame up softens the edges; scaling down can make thin borders shimmer once the stream is encoded.
So decide your canvas size first, then build the asset to match. In the [image editor](/editor) you can set the canvas to your streaming resolution, block out where the camera hole sits, and keep the border elements inside the safe area. Leave the middle genuinely empty. Delete those pixels to transparency rather than painting them a colour you plan to key out later. A real transparent hole is always cleaner than a keyed one.
If part of your frame comes from a photo (a textured border, a mascot, a product shot), cut it out first with the [background remover](/) and drop the result in. That keeps the edges of the decorative element as crisp as the hole in the middle.
A logo that only exists at 200 pixels will look mushy blown up to sit as a corner bug. Rather than accept the blur, run it through the [image upscaler](/upscale) once, then place the larger version. Do not expect miracles from a tiny source, though, if the original is 60 pixels of JPEG artefacts, upscaling gives you larger, smoother artefacts, not detail that was never captured. When the source is that far gone, remaking the logo cleanly beats rescuing it.
## Export a PNG with a clean alpha
PNG is the right format here because it carries a full alpha channel. Export at the canvas size, and check two things before you call it done:
1. **The hole is fully transparent**, not a near-white or checkerboard-coloured fill. Load the PNG on a dark background and a light one; if you see a pale halo around the border edges, that is matte fringing and it will show in OBS.
2. **The edges are anti-aliased, not hard-cut.** Thin borders and text should have soft transitions, or they will crawl and buzz once the encoder gets hold of them.
WebP and AVIF also support transparency and produce smaller files, but OBS's Image Source is most reliable with PNG. Keep your master as PNG; you can experiment with WebP later once you have confirmed it loads and keys correctly on your build.
## Bring it into OBS and layer it correctly
In OBS the source list is a stack: whatever sits higher in the list renders on top. So the order for a framed webcam is, top to bottom:
1. **Logo bug** (Image Source), if you want it above everything.
2. **Webcam frame** (Image Source): the PNG with the hole.
3. **Video Capture Device**: your actual camera, underneath the frame.
4. Background image or scene colour at the bottom.
Add the frame with **Sources → + → Image**, point it at your PNG, then right-click it and use **Transform → Fit to screen** so it maps to the full canvas. Position the camera underneath so it fills the transparent hole, then lock both sources once they line up, so a stray click cannot nudge them mid-stream.
If the frame looks right but the transparency renders as black, the file was almost certainly flattened on export rather than saved with its alpha channel. Re-export and confirm the transparent areas are actually empty, not white.
Before you go live, watch the preview for a minute with the camera moving. Any fringing on the frame edges, or a logo that is a touch too soft, is far cheaper to fix now than after you notice it in a VOD.
## The fork: transparent frame or green screen?
There are two ways to make your camera feed blend into a scene, and they solve different problems.
**A transparent PNG frame** puts a fixed decorative border around a rectangular camera feed. Your background, the actual room behind you, is still visible inside the frame. This is the right choice when you are happy to show your room, or when the frame itself is the point: themed borders, name plates, seasonal edges.
**A green screen with chroma key** removes your physical background entirely, so only *you* remain and the scene shows through around your body. In OBS you add a **Chroma Key** filter to the camera source and pick the green. This is what you want when you need to sit *in front of* gameplay or artwork, with no rectangular camera box at all.
They stack, too, a chroma-keyed camera placed inside a decorative PNG frame is a common combination.
Be honest about what green screen demands: even, flat lighting on the cloth, and a bit of distance between you and it so it does not cast green onto your hair and shoulders. Without that, chroma key leaves a ragged, fringed edge that no filter slider fully rescues. If you cannot light a screen properly, a transparent PNG frame around your real background will look cleaner than a badly keyed cut-out. There is no software substitute for physical lighting here.
Note also that OBS's chroma key is a **live, per-frame** operation on your moving camera. It is not the same as removing the background from a single exported still. Static PNG assets and live keying are separate tools; use each for what it is built for.
## Keep the scene responsive
OBS holds your image sources in memory and composites them every frame, so a bloated overlay taxes the scene for no benefit.
- **Match the file to the canvas.** A 1920 by 1080 frame is plenty; there is no reason to export a 4000-pixel-wide overlay for a 1080p stream.
- **Large transparent areas cost almost nothing.** PNG compresses flat, empty regions well, so a mostly-empty frame stays small on disk despite its full dimensions.
- **Split static from animated.** Keep your still frame as a PNG and handle animated alerts separately, rather than reaching for a heavy format to do both jobs at once.
- **Reuse one logo file** across scenes instead of baking it into every frame export.
## Quick checklist
- [ ] Asset built at the same resolution as your OBS canvas.
- [ ] Camera hole deleted to true transparency, not filled with a colour.
- [ ] Exported as PNG; transparent areas verified on both dark and light backgrounds.
- [ ] Frame source sits above the camera in the OBS source list.
- [ ] Frame set to Fit to screen; both sources locked.
- [ ] Green screen used only if you can light it: otherwise a framed feed looks cleaner.
Build the frame once, get the alpha clean, and the OBS side is a two-minute job of stacking and locking. The mistakes that cost you an evening are nearly always upstream: a hole that was filled instead of emptied, or an asset exported at the wrong size and left for OBS to scale.
---
### Emote Prep for Twitch and Discord: Transparency, Sizing, and Clean Edges
URL: https://bgremover.novusstreamsolutions.com/blog/twitch-discord-emote-prep-transparent-clean-edges
Published: 2026-06-17 | Category: Tutorials | Author: Novus Stream Solutions Editorial Team
A Twitch subscriber emote is delivered to chat at 28 pixels square. That is smaller than the favicon in your browser tab, and roughly the width of the cursor you are reading with. At that size an emote stops being a picture and becomes a silhouette with a bit of colour attached: about 784 pixels of information total, and most of them are carrying no weight at all.
This is the thing nobody tells you before your first emote submission gets waved through and then reads as a brown smudge in a fast-scrolling chat. The problem is almost never resolution. It is that the design was judged at the size you drew it, not the size it ships at.
## Why tiny display changes everything
At full size, a soft anti-aliased edge looks tidy. At 28 pixels, that same soft edge is now three or four semi-transparent pixels wide, a meaningful fraction of the whole image, and it turns your crisp cutout into a hazy blob that bleeds into the chat background. Fine internal details (a thin outline, a tiny highlight, lettering) simply vanish. Contrast that looked fine against your white canvas disappears against Twitch's dark chat or Discord's near-black.
So the two things that matter most for emotes are the two things that matter least everywhere else: **edge cleanliness** and a **readable silhouette**. Get those right and a simple design sings. Get them wrong and no amount of detail rescues it, because the detail is gone by the time anyone sees it.
## Sizes and formats: what each platform actually wants
Treat everything below as a starting map, not gospel: platforms revise these rules, and the only authority is the upload dialog in front of you. Confirm the current spec in each dashboard before you export a full set.
**Twitch emotes** render at three sizes: **28, 56, and 112 pixels** square. In practice you design and export at 112 and let the platform produce the smaller two, but you should always preview your own 28-pixel version, because that is where designs fail. Emotes want transparent PNG, with a per-file size cap you should check in the creator dashboard.
**Twitch sub badges** are a separate, even smaller set: commonly **18, 36, and 72 pixels**. A badge is basically a tiny icon and should be designed like one: one shape, one or two colours, no lettering.
**Discord custom emoji** are typically prepared around **128 pixels** square and displayed far smaller in chat, with a strict per-file weight limit (Discord is notably stingy here, so expect to compress). **Discord stickers** are larger and have their own dimensions and format rules. Check the server settings page, as sticker specs differ from emoji and change more often than you would like.
**Animated emotes** are a different animal. Twitch supports animated emotes, and Discord animated emoji and BTTV/FFZ entries lean on GIF or APNG. These carry tight frame-count, dimension, and file-size limits, and honestly they are fiddly enough that you will often re-time and re-size them in a dedicated animated-GIF exporter. The cut-out and edge work below still applies to every frame, but do not expect a still-image workflow to hand you a compliant animated file.
**BTTV and FFZ** are third-party and more permissive, often allowing larger frames and animation your channel emotes can't use. Read each extension's own limits; do not assume Twitch's rules carry over.
## The cut-out and export workflow
For a static emote, the pipeline is short and forgiving.
1. **Start from the largest clean source you have.** Ideally the art was drawn or shot with an emote in mind: bold, centred, uncluttered. If your only source is a small existing logo or avatar, run it through the [image upscaler](/upscale) first so you have real pixels to cut and clean, rather than trying to carve a crisp edge out of a blurry 60-pixel original.
2. **Remove the background.** Drop the image into the [background remover](/) to get a transparent PNG. Everything is processed on your own device, nothing is uploaded, which is worth knowing when the source is unreleased channel art or a commissioned design you would rather not post to a stranger's server.
3. **Tighten, centre, and pad in the editor.** Open the cutout in the [image editor](/editor) and crop close to the subject, then add a small, even margin so the artwork does not kiss the frame edge. Emotes that touch their own border look cramped and clip awkwardly against chat UI. Centre the subject; a badge or emote that sits off to one side reads as a mistake at small sizes.
4. **Add a contrasting outline while you are here.** A thin stroke that separates the subject from whatever is behind it is the single most effective emote trick. More on getting it right below.
5. **Export as PNG, then preview at the real size.** Export your master, then look at it shrunk to 28 pixels (or 18 for a badge) before you submit anything. Squint. If you cannot tell what it is, neither can chat.
If you are making general stickers, avatars, or Instagram cutouts rather than platform emotes, the [broader cutout workflow](/blog/make-social-cutouts-stickers-emojis-avatars) covers the general case. This guide stays fixated on the specific tyranny of the 28-pixel render.
## Make it read at 28 pixels
Everything in this section is about surviving the downscale.
**Simplify the silhouette.** Before colour or detail, ask whether the outline shape alone communicates the emote. A pog face, a raised fist, a mug, recognisable as a black shape on white. If the silhouette is mush, the emote is mush.
**Design for both dark and light backgrounds.** Twitch chat is dark; Discord can be either. A dark-outlined subject that looks great on white may disappear against a near-black chat. This is why an outline matters so much.
**Add a proportional outline, not a fixed one.** A 3-pixel stroke on a 112-pixel export becomes barely a pixel at 28 and vanishes. Think in proportion: a border thick enough to still register after a 4x reduction. A pale or white outline reads on dark backgrounds; a subtle dark inner edge keeps it from glowing on light ones. Some designers use both: a light halo with a thin dark keyline.
**Kill fine detail and small text.** Thin whiskers, single-pixel highlights, and lettering under a few characters are all lost at emote scale. If a word is essential, it needs to be short, bold, and huge relative to the frame, or dropped entirely.
**Push contrast harder than feels natural.** Muted, tasteful palettes turn to grey sludge when the pixels are this few. Bump saturation and tonal separation so shapes stay distinct after downscaling.
**Test at size, on the actual background.** Paste your 28-pixel export onto a swatch of Twitch-dark and Discord-dark and look at it small. This one habit catches more failures than any checklist.
### Quick pre-submission checklist
- Silhouette is recognisable as a solid shape
- Transparent PNG, edges crisp with no leftover halo or fringe
- Subject centred with a small even margin
- Outline still visible at the smallest render size
- Reads against both dark and light chat
- Previewed at 28 px (or 18 px for a badge) before upload
- File size within the platform's current cap
One honest limit to close on: if the source art is genuinely low-resolution or was never designed to work small, no cutout or upscale will save it. An emote that depends on detail the format cannot show is not a prep problem. It is a design problem, and the fix is to redraw it bolder, not to fight the exporter.
---
### Stabilize Shaky Handheld Video in Your Browser (and Keep the Audio)
URL: https://bgremover.novusstreamsolutions.com/blog/stabilize-shaky-video-in-browser
Published: 2026-06-14 | Category: Tutorials | Author: Novus Stream Solutions Editorial Team
Handheld footage is jittery because your hands are not a tripod. Every micro-movement shifts the frame a few pixels in a slightly different direction. Stabilization undoes that. It figures out how the camera actually moved, then counter-shifts each frame so the result looks locked down. Here is how it works when it runs entirely in your browser.
## Three phases: estimate, smooth, render
Stabilization is not one algorithm; it is a pipeline.
**1. Estimate the motion.** For each pair of consecutive frames, the tool measures how far the image shifted. It does this with *block matching*: sample a grid of points, then search a small window around each one in the next frame for the offset that best lines them up. Run that at quarter resolution and you get a fast, robust per-frame `(dx, dy)`: the camera's apparent movement.
**2. Smooth the trajectory.** Add up those per-frame offsets and you get the camera's *path* over time. A shaky path looks like a scribble; a smooth path looks like a gentle curve. Subtract one from the other and the difference is exactly the correction each frame needs. A moving-average window does the smoothing. A wider window (higher strength) produces calmer footage but needs more crop room.
**3. Render and crop.** Apply each correction by shifting the frame, then crop inward so the shifted edges never reveal blank borders. The stronger the shake, the more crop budget you spend.
## The detail most tools get wrong: the export
A surprising number of browser tools "export" stabilized video by replaying the corrected frames into a `MediaRecorder` in real time. That means a 30-second clip takes *at least* 30 seconds to encode, and the captured stream usually drops your **audio** entirely.
The faster, cleaner approach is to render each corrected frame to a JPEG and hand the whole sequence to an in-browser FFmpeg build, which encodes an H.264 MP4 at its own pace, far quicker than real time, and **muxes your original audio track back in**. Same privacy (nothing uploaded), much better output.
## Practical tips
- **Leave headroom.** Stabilization always crops. If a shot is critical edge-to-edge, shoot a little wider so there is room to correct.
- **Match strength to the shake.** Gentle handheld needs a small window; walking shots need a wider one. Too much smoothing on a slow pan can feel like the footage is "floating."
- **Stabilize before you grade.** Crop and motion changes first; colour and filters last, so your grade is applied to the final framing.
Stabilization will not rescue motion blur, if individual frames are blurry from a slow shutter, smoothing the path cannot sharpen them. But for the common case of "my hands were not steady," a good three-phase pipeline turns unusable footage into something you would actually post.
---
### Non-Destructive Editing: How Undo Actually Works in a Layer-Based Editor
URL: https://bgremover.novusstreamsolutions.com/blog/non-destructive-editing-undo-explained
Published: 2026-06-14 | Category: Technical Deep Dives | Author: Novus Stream Solutions Editorial Team
Undo feels simple: press Ctrl+Z, the last thing reverts. Under the hood, an editor that mixes background removal, filters, colour sliders, and layers has to be careful about *what* "the last thing" was. Get it wrong and undoing a brightness tweak wipes your hand-painted mask. Here is how a coherent history stack handles it.
## Destructive vs. non-destructive
A **destructive** edit changes pixels permanently: erasing part of a mask, baking in a crop. A **non-destructive** edit is a setting layered on top of the original: a filter preset, a brightness value, a saturation slider. The original pixels are untouched; the look is recomputed live from the settings.
A good editor keeps both kinds reversible, but they cannot share one naive "snapshot the pixels" history, because that would be enormous and would conflate independent dimensions.
## A typed history stack
The trick is to make each history entry know *what kind* of change it represents:
- A **mask** entry stores the mask values after a brush or wand stroke.
- A **layers** entry stores the layer stack after an add/reorder/transform.
- An **adjustments** entry stores the grade: filter preset, intensity, and the brightness/contrast/saturation/temperature sliders.
When you undo, the editor looks at the entry it is reverting and restores *only that dimension*. Undo a filter change and your mask is left exactly as it was. Undo a brush stroke and your grade is untouched.
## Making grade changes self-contained
Sliders are continuous, so dragging brightness from 100 to 140 should record **one** undo step, not forty. Two ideas make this clean:
1. **Debounce.** Wait until the slider settles, then push a single entry.
2. **Store both ends.** Each grade entry remembers the value *before* and *after* the change. That makes undo/redo correct even when mask or layer edits sit between two grade edits. The entry does not depend on its neighbours.
## Why this matters for your work
Non-destructive editing is what lets you experiment fearlessly. Try an aggressive cinematic grade, paint a tricky edge, add a text layer, and walk any of it back independently, in any order, without losing the rest. The original image and your cut-out mask are always recoverable, because the looks were never baked in until you exported.
The practical upside: keep editing live. Apply filters and adjustments freely, knowing each is one keystroke from reverting, and only flatten everything at export time.
---
### Virtual Staging in the Browser: Add Furniture to Empty Rooms as Layers
URL: https://bgremover.novusstreamsolutions.com/blog/real-estate-photo-staging-in-browser
Published: 2026-06-14 | Category: Industry Guides | Author: Novus Stream Solutions Editorial Team
Empty rooms photograph poorly. Buyers struggle to judge scale, and bare floors read as "unfinished" rather than "blank canvas." Virtual staging fixes that by compositing furniture into the photo. You do not need a desktop suite or an outsourced service: a layer-based browser editor handles the core workflow.
## Staging is a layering problem
At its heart, virtual staging is: take a room photo, place cut-out furniture on top, and make it sit believably in the space. That maps directly onto an **image-layer** model:
- The **room photo** is the base.
- Each **piece of furniture** is its own image layer with transparency.
- You position, scale, and rotate each layer until it fits the perspective and lighting of the room.
Because every item is a separate layer, nothing is permanent: move the sofa, swap the rug, delete the plant, reorder what sits in front of what.
## The workflow
1. **Open the room** as your base image.
2. **Switch to the Real Estate environment** so the editor foregrounds the layer tools.
3. **Add furniture as layers.** Each piece comes in as its own transparent image you can drag into place.
4. **Match the perspective.** Scale the piece to plausible real-world size and nudge its position so it rests on the floor plane, not floating.
5. **Order the stack.** Items closer to the camera go on top; a rug goes under the coffee table.
6. **Check it in 3D.** A flat composite can hide perspective mistakes; viewing the staged scene as billboarded layers in a 3D preview makes scale errors obvious.
## Making it believable
A few habits separate convincing staging from the obvious paste-job:
- **Respect the light.** If the room is lit from the left, furniture with shadows on the right will look wrong. Prefer items shot in similar lighting.
- **Mind the contact point.** The single biggest tell is furniture that floats. Make sure legs and bases meet the floor.
- **Do not overfill.** Stagers leave breathing room; a sparse, intentional layout sells better than a crammed one.
## Disclosure matters
Virtual staging is a marketing aid, not a misrepresentation. List photos that are digitally staged should be labelled as such. Most regions expect it, and buyers appreciate the honesty. Stage to help people imagine the space, not to hide its condition.
Because the whole workflow runs in the browser, the listing photos never leave your machine. Useful when you are working with a client's property before it goes public.
---
### Browser AI vs. Cloud API: Who Actually Sees Your Images?
URL: https://bgremover.novusstreamsolutions.com/blog/browser-ai-vs-cloud-api-privacy
Published: 2026-06-14 | Category: Product & Mission | Author: Novus Stream Solutions Editorial Team
"Free online AI tool" usually means one of two very different things. Either the model runs **on a server** and your file is uploaded to it, or the model runs **in your browser** and your file never leaves your device. They look identical on the surface. They are not the same product.
## What "cloud API" actually involves
When a tool uses a cloud API, here is the round trip: your image is uploaded to the tool's server, forwarded to a model host, processed, and the result is sent back. That means:
- Your file sits, however briefly, on infrastructure you do not control.
- The privacy policy, not the technology, is what stands between your image and "used for training" or "retained for analytics."
- There is a per-request cost, which is why these tools gate usage behind sign-ups, credits, or watermarks.
For a meme, fine. For a client's unreleased product shot, a contract, or a photo of a person, that upload is the whole risk.
## What "browser AI" actually involves
Client-side AI flips the model around: the *model* travels to you, not your data to the model. Modern browsers can run neural networks directly via **ONNX Runtime Web** and **WebGPU** (with a WebAssembly fallback). The weights download once, cache on disk, and then inference happens on your own GPU.
The consequences are concrete:
- **Privacy by architecture.** The file is never uploaded because there is no server in the loop. You can verify this in your browser's network tab. No image leaves.
- **No per-use cost.** Once weights are cached, running the tool a thousand times costs the operator nothing, so there is no reason to gate it.
- **Offline.** After the first load, many tools keep working with no connection.
## The honest trade-offs
Client-side is not free of downsides, and pretending otherwise would be dishonest:
- **First-load download.** Real models are tens to hundreds of megabytes; the biggest generative ones are gigabytes. You pay that once (then it is cached), but it is a real wait the first time.
- **Device dependence.** A recent laptop with WebGPU flies; an old phone falls back to slower WASM. Good tools detect this and pick an appropriate tier.
- **Ceiling on model size.** The very largest cloud models will not fit in a browser tab. For most image and video tasks, the client-side models are excellent, but it is a genuine limit.
## How to tell which one you are using
Open your browser's developer tools, go to the Network tab, and run the tool. If your image gets uploaded, you will see the request. If the only downloads are model weights (and they only happen the first time), it is running locally. For anything sensitive, that difference is the whole point.
---
### How to Optimize Video for Web and Social Media: File Size, Format, and Quality Guide
URL: https://bgremover.novusstreamsolutions.com/blog/optimize-video-for-web-and-social-media
Published: 2026-06-14 | Category: Tutorials | Author: Novus Stream Solutions Editorial Team
A 500 MB raw video clip from your camera is not what you upload to Instagram. Getting from raw footage to a publish-ready file means making the right decisions about codec, resolution, bitrate, and container format. Here's the complete guide, and how to do all of it without installing software.
## The three variables: codec, container, bitrate
**Codec** is the algorithm that compresses your video data. Modern codecs include:
- **H.264 (AVC)**: the universal standard; plays on every device and platform
- **VP9**: Google's open codec; similar quality to H.264 at lower bitrates; used natively in WebM
- **H.265 (HEVC)**: 40–50% smaller than H.264 at equivalent quality; not universally supported for upload
For social media and web, **H.264** is the safe choice for maximum compatibility. **VP9/WebM** produces slightly smaller files for the same quality, but some platforms re-encode it anyway.
**Container** is the file wrapper. `.mp4` uses H.264 or H.265. `.webm` uses VP9 or VP8. The container affects compatibility more than quality.
**Bitrate** is how much data per second. Higher bitrate = better quality, larger file. Most platforms (YouTube, Instagram, TikTok) have target upload bitrates that exceed what they deliver to viewers, uploading at higher quality gives their encoder more to work with.
## Platform-specific requirements
| Platform | Recommended format | Max resolution | Target upload bitrate |
|---|---|---|---|
| YouTube | MP4 (H.264) | 3840×2160 (4K) | 20–40 Mbps for 4K |
| Instagram Feed | MP4 (H.264) | 1080×1350 (4:5) | 3.5 Mbps |
| Instagram Reels | MP4 (H.264) | 1080×1920 (9:16) | 3.5 Mbps |
| TikTok | MP4 (H.264) | 1080×1920 (9:16) | 2–5 Mbps |
| Twitter/X | MP4 (H.264) | 1920×1200 | 5 Mbps max |
| Web embed | WebM (VP9) or MP4 | Match display size | 1–3 Mbps |
| Email (linked) | MP4 (H.264) | 1280×720 | 1.5 Mbps |
## Choosing the right resolution for social
This is where most people make mistakes. **Uploading at a higher resolution than the platform serves is wasteful but not harmful.** Uploading at the wrong aspect ratio means the platform crops your content.
**Instagram Feed** cuts portrait images to 4:5 (1080×1350) if taller. Upload at exactly 4:5 to control what's visible. Use the [Video Canvas Extender](/tools/video-canvas-extender) to reformat landscape clips for Instagram.
**TikTok and Instagram Reels** want 9:16 (vertical). If you filmed landscape, you need to either crop to 9:16 or add pillarbox padding. Canvas extender handles the padding case.
**YouTube** is flexible. It accepts any aspect ratio and letterboxes what doesn't match 16:9. Still, 16:9 is the native format for most viewers.
## The codec comparison approach
Before committing to a format, use the [Video Format Comparison](/tools/video-format-comparison) tool. Upload your clip once, and it simultaneously encodes to:
- **WebM VP9**, typically 10–30% smaller than MP4 for the same perceived quality
- **WebM VP8**, similar size to MP4, somewhat older codec
- **MP4 (H.264/AVC)**: universal compatibility
The tool shows you the file size for each output, highlights the smallest, and lets you download any of them. This 5-minute test often reveals that VP9 produces the same visual quality at 60–70% of the MP4 size.
Use VP9/WebM for web embeds (smaller file, no compatibility issue for modern browsers). Use MP4 for social media uploads (widest platform support).
## How to compress without visible quality loss
The [Video Compressor](/tools/video-compressor) re-encodes your video using VP9 at four quality levels:
| Preset | CRF equivalent | Use case |
|---|---|---|
| High | CRF 28 | Social media, web: minimal visible loss |
| Medium | CRF 33 | Email sharing, general distribution |
| Low | CRF 38 | Small files, preview, bandwidth-limited |
| Very Low | CRF 43 | Absolute minimum size, noticeable degradation |
**High quality** is the right choice for almost every social media use case. Files are typically 40–60% smaller than the original while looking identical on a phone screen or laptop.
## The re-encoding reality
Every time you run a video through a compressor, you lose a small amount of quality. Compression algorithms are lossy, even "lossless" re-encoding introduces some rounding. For social media, one pass of lossy compression at High quality is fine. Avoid re-compressing an already-compressed file more than twice.
Avoid:
- Compressing a clip that was already compressed at low quality (compound losses)
- Applying multiple tools in sequence at their lowest quality settings
- Exporting from your video editor at medium quality and then compressing again
Best practice: export from your editor at maximum quality, then apply one compression pass at High quality.
## The workflow for social media delivery
For a typical "film → edit → post" workflow:
1. **Export from editor** at maximum quality (often 1080p or 4K, original bitrate)
2. **Reformat aspect ratio** if needed using [Video Canvas Extender](/tools/video-canvas-extender)
3. **Resize** to platform max if over 1080p using [Video Resizer](/tools/video-resizer) (saves time and reduces encoder load)
4. **Check format**: if exporting WebM, convert to MP4 for social platforms using [Video Format Converter](/tools/video-format-converter)
5. **Compress** using [Video Compressor](/tools/video-compressor) at High quality for the final delivery file
For web embeds, you can skip step 4 and keep the WebM. Modern browsers handle VP9 natively.
## File size targets
| Use case | Target file size |
|---|---|
| Instagram Feed (1 min) | Under 100 MB (platform limit is 300 MB) |
| Instagram Reels (90 sec) | Under 200 MB |
| TikTok (60 sec) | Under 100 MB (platform limit is 287 MB) |
| YouTube (20 min at 1080p) | 1–3 GB is fine: YouTube re-encodes anyway |
| Web autoplay background | Under 5 MB for short loops |
| Email-linked preview | Under 20 MB |
## Related tools
- [Video Compressor](/tools/video-compressor): reduce file size
- [Video Format Converter](/tools/video-format-converter): convert between WebM, MP4
- [Video Format Comparison](/tools/video-format-comparison): compare VP9, VP8, and AVC file sizes
- [Video Canvas Extender](/tools/video-canvas-extender): reformat aspect ratio
- [Video Resizer](/tools/video-resizer): scale to platform target resolution
---
### The Complete Guide to NSS Image Utility Tools: Every Tool Explained
URL: https://bgremover.novusstreamsolutions.com/blog/nss-image-utilities-complete-guide
Published: 2026-06-14 | Updated: 2026-08-08 | Category: Tutorials | Author: Novus Stream Solutions Editorial Team
NSS started as an AI background remover. Over time, it grew into a full image utility suite, every tool running on the same privacy-first, in-browser architecture. This is the complete guide to all of them.
## The principle: everything runs in your browser
Every tool in the NSS suite processes files locally. Your images are never uploaded to any server. The AI models download once and cache in your browser for offline use. There are no accounts, no subscriptions, and no usage limits.
---
## Background Removal
**[Remove Background](/background-remover)**: The flagship tool. Removes backgrounds from images using AI running on your device (WebGPU or WebAssembly). Two models:
- **Fast (ORMBG, ~45 MB)**: 2–5 seconds per image on modern hardware. Great for product photos, simple backgrounds.
- **Best Quality (BiRefNet Lite 512, ~99–192 MB)**: Finer edge detail on hair, fur, and complex subjects. WebGPU-first with a CPU compatibility retry.
Export as PNG (transparent), WebP, or AVIF. Straight alpha: no black halos in Photoshop.
**[Background Removal](/background-remover)**: Queue multiple images and process them one at a time, then download each transparent PNG.
---
## Image Resizing and Canvas
**[Image Resizer](/tools/image-resizer)**: Scale images to specific pixel dimensions or percentage. Options:
- Maintain aspect ratio (default)
- Stretch to exact dimensions
- Common presets (1920×1080, 1280×720, etc.)
Export as PNG or JPEG at adjustable quality.
**[Canvas Extender](/tools/canvas-extender)**: Add padding to change the aspect ratio without cropping. Pick from common presets (1:1, 4:3, 16:9, 9:16, 4:5, 21:9) or enter a custom ratio. Choose any padding color. Ideal for:
- Making portrait photos fit landscape slots
- Adding social media letterboxing
- Creating space for text overlays
---
## Format Conversion and Compression
**[Format Converter](/tools/format-converter)**: Convert between PNG, JPEG, WebP, and AVIF. All conversion happens locally: files of any size, any number of images.
**[Image Compressor](/tools/image-compressor)**: Reduce JPEG and WebP file sizes with quality control. The quality slider maps to JPEG quantization level. Useful when platform file size limits are a factor (email attachments, CMS limits).
**[PNG Optimizer](/tools/png-optimizer)**: Reduces PNG file size without changing visual quality by optimizing the palette, filter heuristics, and compression level. Lossless: bit-for-bit identical pixels.
---
## Metadata and Privacy
**[Metadata Remover](/tools/metadata-remover)**: Strips EXIF, IPTC, and XMP metadata from JPEG and WebP files. Removes: camera make and model, GPS coordinates, creation date, author, copyright tags, and software information.
The removal works by re-encoding the image data into a new container without writing metadata fields. The output pixel data is identical.
Useful for: sharing photos publicly without location data, publishing stock images without camera attribution, stripping client-facing documents of internal metadata.
---
## Color Tools
**[Color Picker](/tools/color-picker)**: Upload an image and click any pixel to extract its exact hex color, RGB, and HSL values. Also generates a 12-color dominant palette from the full image using k-means clustering.
Useful for: matching brand colors from a photo, extracting a color to use in CSS, auditing a design's actual color values.
---
## Filters and Effects
**[Image Filters](/tools/image-filter)**: 22 cinematic LUT (look-up table) presets with intensity control:
| Category | Presets |
|---|---|
| Portrait | Portrait Glow, Skin Tone, Beauty |
| Cinematic | Drama, Golden Hour, Teal & Orange, Blue Steel |
| Vintage | Film Grain, Kodachrome, Faded, Lomo |
| Atmospheric | Moonlight, Mist, Smoke, Dusk |
| Utility | Vivid, Flat, Black & White, Sepia |
Intensity slider from 0–100%. Export at full resolution.
**[Grayscale / Sepia / Invert](/tools/grayscale)**: Simple destructive effects: grayscale, sepia, and color inversion.
---
## Upscaling
**[AI Image Upscaler](/upscale)**: 2× and 4× super-resolution upscaling using the Swin2SR model. Unlike Lanczos (geometric resizing), the AI synthesizes new detail: texture, sharpness, fine structures.
- **AI mode (Swin2SR)**: True detail synthesis. Slow but significantly higher quality. Recommended for photos with faces, text, or fine detail.
- **Instant mode (Lanczos + unsharp mask)**: Fast geometric upscale. Good for large flat-color areas and quick preview.
Output up to 4096×4096 px per pass.
---
## Specialized Tools
**[ICO Creator](/tools/ico-creator)**: Convert any image to a multi-resolution .ico file. Select which sizes to include (16, 32, 48, 64, 128, 256 px). For web favicons, include 16 and 32. For Windows application icons, include all sizes.
**[Image Rotate and Flip](/tools/rotate)**: Rotate 90°, 180°, 270°, or flip horizontally/vertically. Lossless for PNG; re-encodes for JPEG.
---
## The Image Editor
**[Image Editor](/editor)**: The full editing environment that ties everything together. From the editor sidebar you can access:
- Background removal (with model selection)
- Brush editor for manual mask refinement
- Edge refinement (feather, smooth, decontaminate)
- Background replacement (solid, gradient, image, lifestyle scene)
- Adjustments (brightness, contrast, saturation, hue, exposure)
- Image filters
- Canvas extender
The editor maintains a non-destructive edit stack. Adjustments are applied in order and can be toggled.
---
## Privacy-first architecture
Every tool in this list shares the same privacy model:
1. Files are read locally via the browser's File API
2. Processing happens in the same browser tab (or a Worker thread)
3. No file content is transmitted to any server
4. Processed results are generated locally and offered as a download
5. Nothing is stored after you close the tab
The AI models (80–180 MB) are downloaded from Hugging Face and cached by your browser's service worker. After the first use, all tools work offline.
---
## Related
- [Video utilities guide](/blog/optimize-video-for-web-and-social-media)
- [Background remover guide](/how-it-works/background-remover)
- [Image editor guide](/how-it-works/image-editor)
---
### Best Background Removal Tools for Product Photography in 2026
URL: https://bgremover.novusstreamsolutions.com/blog/best-background-removal-tools-product-photography-2026
Published: 2026-06-14 | Category: Industry Guides | Author: Novus Stream Solutions Editorial Team
Product photography is one of the highest-stakes uses of background removal. Buyers make purchasing decisions based on product photos, which means a white-halo artifact or missed stray pixel can cost you conversions.
Here is a direct comparison of the most-used tools in 2026 for product photographers.
## What product photography actually needs
Before comparing tools, it is worth listing what background removal has to do well for product use:
- **Clean edges on complex shapes**: packaging, jewellery, clothing all have intricate silhouettes
- **Preserve fine detail**: fabric texture, product labels, reflective surfaces
- **Consistent batch output**: if you have 200 SKUs, you need the same quality on all of them
- **True transparency**: the output alpha channel must be straight alpha, not premultiplied: otherwise your white PNG will not look right on coloured backgrounds
- **Speed**: a tool that takes 5 minutes per image is not usable at volume
## NSS Background Remover (browser-based)
**Best for**: batches up to 100 images, privacy-sensitive products, no-budget operations
NSS runs ORMBG (Fast) and BiRefNet (Best Quality) fully in your browser. No image ever leaves your device. The batch processor handles up to 100 images at once with PNG, WebP, or AVIF output.
The edge post-processing pipeline includes a guided filter, hair/fur preservation, morphological erosion, and Lab ΔE background decontamination. For studio shots on white or light backgrounds, the background-kill pass removes the halo that the raw AI mask leaves behind.
**Strengths**: true straight-alpha output, 100% private, free, offline-capable, Best Quality mode handles hair and fine fabric well
**Limitations**: browser WASM is slower than server-side GPU for large batches; no API
## Photoshop Remove Background
**Best for**: already in the Creative Cloud workflow, complex manual cleanup
Photoshop's Select Subject + Remove Background uses Adobe Sensei. The raw output is good for simple subjects but needs manual refinement for complex product shapes. The advantage is that you can immediately mask-edit after removal.
**Strengths**: tight integration with existing Adobe workflow, excellent manual correction tools
**Limitations**: costs $20+/month, requires desktop install, no batch API, export workflow is manual
## remove.bg
**Best for**: simple products with clear foreground/background separation, high volume via API
remove.bg uses a server-side model with a clean API. The output quality is good for straightforward subjects. Complex subjects (glass, semi-transparent materials) are hit or miss.
**Strengths**: fast API, simple integration, good quality on common product types
**Limitations**: costs money at volume ($0.05–$0.20 per image), cloud upload means you lose control of your images, rate limits on free tier
## Canva Background Remover
**Best for**: social media marketers already in Canva
Built into Canva Pro. Good enough for most social use cases. Not suitable for print or detailed product photography where edge quality matters.
**Strengths**: zero workflow friction if already in Canva
**Limitations**: Canva Pro costs $15/month, quality is not fine-detail reliable, output is tied to Canva's export
## Choosing the right tool
| Use case | Recommended tool |
|---|---|
| Under 100 images, privacy matters | NSS batch processor |
| Large volume via API | remove.bg API |
| Part of Photoshop workflow | Photoshop + manual cleanup |
| Social content in Canva | Canva Pro |
| Amazon-style white background | NSS (Fast mode + background kill) |
| Hair/fur/fine fabric | NSS Best Quality mode |
## For Amazon and e-commerce
Amazon requires pure white (RGB 255, 255, 255) backgrounds for most product categories. The NSS background remover outputs true transparent PNGs. To get a white background, use the editor's solid colour fill set to #ffffff, then export.
For Shopify, Etsy, or your own site, transparent PNGs give you the most flexibility since you can composite them onto any background colour or texture in the future.
## Checking output quality
Regardless of which tool you use, always check:
1. **Zoom into edges at 100%**: look for white fringe pixels, jagged edges, or missing detail
2. **Check against a coloured background**: paste the PNG onto a dark or mid-tone background in your editor to reveal any remaining halo
3. **Verify straight alpha**: open the file in a tool that shows the alpha channel directly; premultiplied alpha looks correct on white but breaks on other colours
The NSS "Check Transparency" tool at `/tools/check-transparency` will tell you whether your PNG has real transparency or a baked-in white background.
---
### Portrait Blur vs Background Removal, Which One Do You Actually Need?
URL: https://bgremover.novusstreamsolutions.com/blog/portrait-blur-vs-background-removal
Published: 2026-06-14 | Category: Tutorials | Author: Novus Stream Solutions Editorial Team
Portrait blur (bokeh) and background removal are both ways to separate a subject from their surroundings in a photo. But they produce fundamentally different outputs, and the right choice depends on what you are trying to do with the image.
## What each one does
**Background removal** cuts the subject out and makes the background transparent. You can then place the subject on any background: white, solid colour, lifestyle scene, product shot environment.
**Portrait blur** keeps the background but adds a depth-of-field blur effect to it, making the subject appear sharper by contrast. The output is still a flat image with no transparency.
## When to use background removal
### Product photos
Product photography almost always needs true transparency. You want to place the product on a white e-commerce background, or composite it into a lifestyle scene, or use it on multiple coloured pages of a catalogue. Background removal gives you that flexibility.
### Profile photos for web use
A transparent PNG profile photo can be placed on any coloured card, dark header, or branded background. If you use a portrait-blurred photo, it will always carry the original background, just blurred.
### Slack, Discord, and Telegram emoji
Custom emoji need transparent backgrounds. Portrait blur does not help here at all.
### Real estate staging
When adding virtual furniture to a room, you need the furniture image with a removed background, not a blurred background.
### Any use where the background will change
If you ever want to reuse the image with a different background, background removal is the right choice. Portrait blur bakes the background into the image permanently.
## When to use portrait blur
### Keeping the background context
Sometimes you want the viewer to know where the person is (a coffee shop, a home office, a garden), but you want the background to be de-emphasised. Portrait blur achieves this. Background removal would erase that context entirely.
### Natural-looking headshots for LinkedIn
A headshot where the subject is sharp and the background is softly blurred looks natural and professional. Replacing the background entirely can look artificial unless done carefully.
### Video calls
Virtual background replacement on video calls often looks fake because the edge detection is running in real time on compressed video. Portrait blur (background blur) looks more natural because it does not require a perfect mask, it just blurs the area that appears to be at a greater depth.
### Creative photography
Photographers who want to simulate the look of a fast prime lens on a smartphone can use portrait blur to add a realistic shallow depth-of-field effect.
## When to combine both
One useful workflow:
1. Use background removal to get the subject on a transparent PNG
2. Place the transparent PNG over a lifestyle background image
3. Apply a slight blur to the lifestyle background layer to simulate depth-of-field
This gives you a realistic-looking composited photo that retains the depth cue that pure background replacement misses.
The NSS image editor supports this natively: remove the background with AI, switch to the background tool, select a lifestyle scene template, and the scene is rendered at 1200×800 and placed behind your subject. If you want to blur it, use the blur slider in the background panel.
## The technical difference
Portrait blur uses a depth estimation model (Depth Anything) to produce a per-pixel depth map. Pixels that appear far from the camera get a proportionally larger Gaussian blur radius. The depth map is not perfectly precise, it is a model estimate, but for photos where the subject is clearly in the foreground, it produces convincing results.
Background removal uses a salient object segmentation model (ORMBG or BiRefNet) to classify each pixel as foreground or background and produce an alpha mask. The mask quality is higher than depth estimation for the edges of the subject, but it says nothing about depth variation within the background.
## Summary
| | Background Removal | Portrait Blur |
|---|---|---|
| Output | Transparent PNG | Flat image with soft background |
| Best for | Compositing, e-commerce, social media assets | Headshots, natural-looking portraits |
| Keeps background context | No | Yes |
| Usable on multiple backgrounds | Yes | No |
| Works as emoji or sticker | Yes | No |
| Looks natural on video calls | No (sharp edge) | Yes |
| Speed | Depends on model | Fast (no AI inference needed for Lanczos path) |
Use the NSS [Image Editor](/editor) tool for depth-of-field effects, and the [Image Background Remover](/) for true transparency. Both run entirely in your browser with no upload required.
---
### Free 4K Video Upscaling in Your Browser: No Upload, No Software
URL: https://bgremover.novusstreamsolutions.com/blog/free-4k-video-upscaling-browser
Published: 2026-06-14 | Category: Tutorials | Author: Novus Stream Solutions Editorial Team
Video upscaling to 4K used to require dedicated software, a powerful GPU, or an expensive cloud service. In 2026, you can do it entirely in your browser for free: with no account, no upload, and no installation.
The [NSS Video Upscaler](/video-upscale) does exactly this. Here is what you need to know about how it works, what quality to expect, and when 4K upscaling is actually worth doing.
## What video upscaling does
Upscaling takes a lower-resolution video, say 720p (1280×720) or 1080p (1920×1080), and increases its pixel dimensions to a larger size, such as 4K (3840×2160). The basic challenge: you cannot invent detail that was never captured. Upscaling works by interpolating between existing pixels to create plausible new ones, then cleaning and sharpening the result so it holds up at the larger size.
## How the NSS video upscaler works
The video upscaler runs a four-stage filter pipeline on every frame, entirely in your browser through a WebAssembly build of FFmpeg. No frame is ever sent to a server.
1. **Light denoise**: a gentle spatial-temporal denoise (`hqdn3d`) removes the fine sensor grain and compression speckle that would otherwise get amplified into mush by the enlargement step. It is deliberately light so it cleans noise without smearing real detail.
2. **Lanczos scaling**: Lanczos is a sinc-based resampling filter that weights surrounding pixels far more intelligently than bilinear or bicubic interpolation. It is the sharpest widely available scaler and is what gives the enlarged frame its clean edges.
3. **Adaptive sharpening**: an unsharp pass restores the perceptual crispness that any enlargement softens, tuned to add definition to edges and texture without ringing halos.
4. **A small tonal lift**: a subtle contrast and saturation nudge gives the finished clip a little more punch, since upscaled footage can otherwise look slightly flat.
This is a **classical signal-processing pipeline, not a neural network.** It is honest about what it can do: it makes a clean source look genuinely sharper and larger, fast, on any device, but it does not hallucinate detail that was never in the footage. (Per-frame AI super-resolution for video is on our [roadmap](/roadmap); today the AI models power the [image upscaler](/upscale), where a single frame can afford the heavier computation.)
## When 4K upscaling is worth doing
### Archival footage
Old home video, 720p footage from early DSLRs, or archive material that you want to preserve at a higher resolution. The pipeline produces a significantly sharper 4K file than the raw 720p.
### Background video on high-DPI displays
If you have a 1080p background video for a website and your users have Retina or 4K displays, upscaling to 4K means the video fills the display natively rather than getting scaled up, often poorly, by the browser at playback time.
### Talking-head footage for large-format display
Presentations, trade shows, or digital signage render video at 4K. Upscaling your 1080p talking-head footage to 4K will look sharper on these displays than playing the 1080p original.
### When 4K upscaling does NOT help
- **Highly compressed source**: If your source has heavy compression artefacts (blocky areas, ringing around edges), upscaling makes them larger and more visible. The denoise stage tames some of this, but a badly compressed source cannot be rescued. Fix or re-export the source first.
- **Already at 1080p for social media**: Instagram, TikTok, and YouTube re-encode and downscale everything. Uploading a 4K version of a 1080p clip does not meaningfully improve what viewers see.
- **Fast motion**: Enlargement assumes there is edge structure to sharpen. Very fast motion or low-frame-rate footage (15fps) has motion blur that upscaling cannot un-blur.
## How to use the NSS Video Upscaler
1. Go to [/video-upscale](/video-upscale)
2. Drop your video file into the upload zone
3. Select **2×** or **4×** scaling
4. Hit Process and wait
For 4K output from a 1080p source, use 2× scaling. For 4K from 720p, use 4×. Output is capped at a 4096px longest edge to stay within browser decoder limits.
The output downloads as an MP4 (H.264) file that plays everywhere. If you need a different container, the [Video Format Converter](/tools/video-format-converter) can convert it in the same browser tab with no upload.
## Quality expectations
| Source | Scale | Expected output quality |
|---|---|---|
| 1080p clean footage | 2× | Good: noticeably sharper than source, no added artefacts |
| 720p clean footage | 2× (→1440p) | Good for most uses |
| 720p clean footage | 4× | Acceptable for background / large-format use |
| 720p compressed | 2× or 4× | Denoise helps, but compression artefacts still show. Treat the source first |
| 480p | 4× | Large improvement over native 480p playback |
## Technical notes
Every stage runs on your device through FFmpeg compiled to WebAssembly; the enlarged, sharpened frames are re-encoded to H.264 at a high quality setting (CRF 18) and the original audio is preserved. No frame data is sent to any server.
Very large or long clips can hit browser memory limits during encoding. If a clip stalls, try a shorter segment or a lower scale factor. A 2× pass on a 1080p source is the safest starting point.
---
### AI Video Background Removal vs Chroma Key, Which Is Better in 2026?
URL: https://bgremover.novusstreamsolutions.com/blog/ai-video-background-removal-vs-chroma-key
Published: 2026-06-14 | Updated: 2026-08-08 | Category: Industry Guides | Author: Novus Stream Solutions Editorial Team
Green screen and chroma key have been the professional standard for video background removal for decades. AI-based background removal is now a credible alternative for many use cases. Here is a direct comparison.
## How chroma key works
Chroma key works by selecting a specific colour (almost always green or blue) and making those pixels transparent. A calibrated green screen with even lighting produces a very clean key, the entire background disappears cleanly regardless of how complex the foreground is.
The trade-offs are setup costs: you need a physical green screen, even lighting across it, and you cannot wear green. Hair and semi-transparent objects still cause edge bleed unless you use a dedicated keyer with spill suppression.
## How AI background removal works
AI models like ORMBG and BiRefNet are trained to identify foreground subjects and produce soft-edge alpha masks. They work on any background. No green screen required. The model looks at local colour and texture to decide what is foreground and what is background.
AI background removal runs per-frame in video mode, with temporal smoothing applied between frames to prevent mask flicker.
## Direct comparison
### Setup requirements
**Chroma key**: Requires a physical green/blue screen, lighting setup to eliminate shadows and wrinkles, and software that supports keying (Premiere, Final Cut, DaVinci Resolve, OBS).
**AI background removal**: Requires nothing. Upload a video file (or use a live webcam feed) and the model runs in the browser. Works on location, indoors, outdoors, any setting.
### Edge quality
**Chroma key (calibrated)**: Excellent. With proper lighting and a clean key, edges are crisp even on complex hair. Spill suppression handles the green tint on hair edges.
**Chroma key (uncalibrated)**: Poor. Uneven lighting, wrinkled screens, and reflective clothing all cause incomplete keying with visible fringe.
**AI background removal (Best Quality / BiRefNet)**: Good to excellent on distinct subject/background separation. Hair and fine fabric handled well. Challenging cases: complex backgrounds with similar colours to the subject, fast motion.
**AI background removal (Fast / ORMBG)**: Good for clean backgrounds. Less accurate on complex hair in crowded scenes. Temporal smoothing reduces mask flicker but does not fully eliminate it at 30fps.
### What happens with green clothing
**Chroma key**: Green clothing disappears. This is the most common chroma key failure mode.
**AI background removal**: No issue. The model segments by subject identity, not by colour. A person wearing green in front of a concrete wall will key correctly.
### What happens with glass, water, and semi-transparent objects
**Chroma key**: Glass shows green tint, water is completely removed. Without dedicated transparency reconstruction, you lose these materials.
**AI background removal**: The NSS model has a post-processing pass for glass, plastic, and acrylic that attempts to preserve partial transparency. Results vary depending on the subject.
### Speed
**Chroma key in software**: Real-time (OBS, Zoom, etc.) or near-real-time in NLE software.
**AI background removal (NSS live camera)**: ~10fps at 720p on a modern laptop with WebGPU. Suitable for streaming but not for high-motion broadcast production.
**AI background removal (video file)**: Slower than real-time, approximately 1–3 seconds per frame on a mid-range GPU in WASM/WebGPU mode. For a 2-minute video at 24fps, expect 5–30 minutes of processing.
### Privacy
**Chroma key**: Video is processed locally in software (Premiere, OBS). No upload.
**AI background removal (NSS)**: Fully local. Video is processed in your browser with no upload. The model runs on your device using WebAssembly or WebGPU.
### Cost
**Chroma key**: Initial setup cost ($20–$500 for a screen and lights). Software may be free (OBS) or subscription (Premiere).
**AI background removal (NSS)**: Free. No subscription, no account.
## When to use each
| Use case | Recommendation |
|---|---|
| Professional broadcast / film | Chroma key (best quality, proven workflow |
| Streaming from a fixed location | Either) green screen if setup is permanent, AI for flexible setup |
| Location footage with no green screen | AI background removal |
| Wearing green or blue | AI background removal |
| High-volume video production | Chroma key at the production stage |
| One-off video file cleanup | AI background removal via NSS |
| Privacy-sensitive content | AI (local) or chroma key with local NLE |
## The practical bottom line
Chroma key still wins on raw edge quality when the setup is calibrated. But AI background removal has eliminated the barrier to entry. For most content creators, the ability to remove backgrounds from any video without a green screen setup is more valuable than marginal edge quality improvements.
If you have footage shot on a clean, distinct background and need maximum quality, Best Quality (BiRefNet) mode in the NSS video background remover is worth trying before you rent a green screen. For anything shot on a complex background, professional chroma key is still the right answer.
Try the [NSS Video Background Remover](/video-background-remover), it processes your video entirely in your browser.
---
### A Guide to Video Filter Presets: Cinematic LUTs in Your Browser
URL: https://bgremover.novusstreamsolutions.com/blog/video-filter-presets-guide
Published: 2026-06-14 | Category: Tutorials | Author: Novus Stream Solutions Editorial Team
Cinematic filters are used in video production to create mood, consistency, and a distinctive visual style. Professional colourists use LUTs (Lookup Tables): mathematical transformations that map input colours to output colours. The NSS Video Filter Editor brings 34 of these presets to any video file, entirely in your browser.
## What filter presets actually do
A filter preset applies a colour transformation to every pixel in every frame. Depending on the preset, this might:
- Shift the overall colour temperature (warmer or cooler)
- Reduce or boost saturation selectively by hue
- Crush or lift the shadows (affecting how dark areas look)
- Apply a specific colour grade to skin tones
Unlike a simple brightness/contrast adjustment, a cinematic LUT changes different colours differently. This is what gives specific looks their character.
## The NSS filter preset library
The NSS filter editor includes 34 presets, grouped roughly into:
### Clarity and resolution enhancement
- **4K Enhance**: Increases perceived sharpness and micro-contrast. Good for footage that looks slightly soft.
- **2K Enhance**: A lighter version of 4K Enhance.
### Cinema and drama
- **Cinematic**: Classic film colour grade: lifted shadows, slightly desaturated highlights, shifted toward cyan/teal in shadows and warm in highlights. The "movie look."
- **Drama**: High contrast, deeper shadows, more saturated midtones. Works well for action or intense scenes.
- **Golden Hour**: Warm highlights, golden cast throughout. Simulates late afternoon light.
- **Moonlight**: Cold blue-shifted grade. Night scenes, mystery, thriller tone.
- **Sunrise**: Warm pinks and oranges. Dawn light simulation.
### Haze and atmosphere
- **Haze**: Lifts shadows and adds a slight fog-like cast. Popular in fashion video.
- **Matte**: Faded, desaturated look. Popular in Instagram aesthetic video.
- **Fade**: Similar to matte but with a slightly different tonal curve.
### Temperature
- **Warm**: Shifts everything toward amber/orange. Cosy, inviting.
- **Cool**: Shifts toward blue/cyan. Clinical, modern, cold environments.
### Classic film looks
- **Vintage**: Faded, slightly yellow highlights. Old film simulation.
- **Film Grain**: Adds simulated film grain texture along with a slight grade.
### Black and white
- **BW**: Converts to black and white with a standard luminance weighting.
### Specialty
- **Duotone Blue**: Two-colour (blue and near-white) extreme grade.
- **Duotone Purple**: Same but with purple as the main tone.
- **Vignette**: Darkens edges toward the centre. Focuses attention. Can be combined with other presets.
## Which preset for which type of video
| Video type | Recommended preset |
|---|---|
| Talking head / interview | Warm or Cinematic |
| Product showcase | 4K Enhance or Cool (for tech products) |
| Travel vlog | Golden Hour or Sunrise |
| Documentary | Cinematic or Drama |
| Night footage | Moonlight |
| Social media / lifestyle | Matte or Fade |
| Music video | Vivid or Drama |
| Horror / thriller | Drama or Moonlight |
| Wedding | Golden Hour or Film Grain |
## How to apply a filter in the NSS Video Filter Editor
1. Go to [/tools/video-filter](/tools/video-filter)
2. Upload your video (MP4, WebM, MOV)
3. Click through the preset thumbnails: a preview appears in the right panel
4. Use the intensity slider (0–100%) to control how strongly the filter is applied
5. Click Export to process and download
Processing works by seeking each frame, applying the filter via canvas pixel manipulation, and re-encoding with `MediaRecorder`. The output is WebM. If you need MP4, use the [Video Format Converter](/tools/video-format-converter) after downloading.
## Intensity control
The intensity slider blends between the unfiltered frame (0%) and the fully-filtered frame (100%). This is useful when a preset looks too strong at full strength:
- Cinematic at 100%: heavy grade, very stylised
- Cinematic at 40–60%: subtle, professional, less obvious
- Film Grain at 100%: very visible grain, looks retro
- Film Grain at 20–30%: subtle texture, adds perceived depth without looking like a filter
For most talking head and interview footage, 50–70% intensity produces the most natural-looking results.
## Combining filters with other edits
The [Video Editor](/video-editor) supports more advanced colour work: brightness, contrast, saturation, temperature, vignette, and fade transitions. If you want to apply a preset filter as a starting point and then fine-tune, use the standalone video filter tool to produce a filtered WebM, then open it in the video editor for manual adjustments.
All processing runs in your browser. Your video file is never uploaded to any server.
---
### How to Stabilize Shaky Video in Your Browser: No Software Download Required
URL: https://bgremover.novusstreamsolutions.com/blog/how-to-stabilize-shaky-video-in-browser
Published: 2026-06-14 | Category: Tutorials | Author: Novus Stream Solutions Editorial Team
Shaky footage is one of the most common video problems, and it used to mean buying dedicated stabilization software or paying for a video editing subscription. Now you can fix it directly in your browser. Here is everything you need to know.
## Why video gets shaky
Camera shake comes from a few sources:
**Handheld movement**: Even a "steady" hand introduces micro-vibrations from breathing, pulse, and muscle tension. At focal lengths above 50mm, this becomes very visible.
**Walking while filming**: The classic bounce pattern from footsteps creates a rhythmic up-down oscillation that is hard to eliminate in post without dedicated stabilization.
**Mounted vibration**: Cameras attached to vehicles, bikes, or unstable surfaces pick up mechanical vibration that appears as high-frequency jitter.
**Zoom lens instability**: Longer zoom lenses amplify all of the above. A 200mm shot is inherently shakier than a 24mm shot of the same scene.
## How the NSS stabilizer works
The stabilizer analyzes your clip before touching a single pixel of output:
**Step 1: Frame extraction**
Every frame of your video is captured to an offscreen canvas. This collection phase runs first. No output is written while frames are being read.
**Step 2: Block-matching motion estimation**
Adjacent frames are divided into a grid of tiles. For each tile, the tool searches neighboring positions in the next frame to find the best match. This gives a translation vector (how much the camera moved) for each frame transition.
**Step 3: Trajectory smoothing**
The accumulated per-frame motion is integrated into a camera trajectory path, then smoothed using a sliding-window average. The Strength slider controls the window size (3 to 25 frames). Larger windows = more aggressive smoothing.
**Step 4: Compensated replay**
Each frame is re-rendered with the inverse of its smoothed offset applied. If the camera drifted 8 px right in a given frame, the output frame is shifted 8 px left, canceling the drift.
## Choosing the right Strength
The Strength slider is the most important control:
| Footage type | Recommended strength |
|---|---|
| Light tripod jitter | 20–30% |
| Handheld talking head | 50–70% |
| Walking while filming | 70–80% (default) |
| Bike or vehicle mount | 80–90% |
| Intentional handheld pan | 30–40% (avoid over-smoothing pans) |
The default 80% works well for most handheld footage. Only push to 100% for severe mechanical vibration, at maximum strength, intentional slow camera pans may look slightly motion-blurred.
## Scene cuts and the stabilizer
If your clip contains an abrupt cut (edit point), the stabilizer detects the cut automatically by comparing inter-frame motion magnitude to the running average. When the motion is more than 3× the expected value, the trajectory accumulator resets. This prevents the stabilizer from trying to smooth across a cut and introducing incorrect offsets.
If you have a long edited clip with many cuts, the tool handles each segment independently.
## The crop trade-off
Stabilization works by shifting frames. The maximum shift needed = the maximum amount of crop applied. For a typical 80% strength setting with moderate handheld footage:
- Expect roughly 2–5% crop on each edge
- A 1920×1080 input might produce an effective viewing area of ~1840×1034 before cropping, then scaled back to 1920×1080
For most web and social media use, this crop is invisible. For footage where you need to preserve edge content (titles, graphics near the frame edges), keep them at least 8% from the edges.
## Tips for best results
**Shoot at a slightly wider angle than you need.** The stabilizer will crop slightly. If you're planning to use the full frame, build in extra room when shooting.
**Work with short clips.** Processing time scales linearly with clip length. For a 5-minute video, processing might take 10–15 minutes in the browser. If you need to stabilize a long piece, trim it into segments first.
**Combine with in-camera OIS.** If your camera or phone has optical image stabilization, leave it on. The software stabilizer handles the remaining shake that OIS missed.
**Use 1080p source material.** The browser-based motion estimation is most efficient at 1920×1080. 4K clips process 4× more data without proportionally better stabilization results.
## Output format
Stabilized output is exported as **WebM (VP9)**. If you need MP4, use the [Video Format Converter](/tools/video-format-converter) as the next step.
## Related tools
- [Video Format Converter](/tools/video-format-converter): convert the WebM output to MP4
- [Video Resizer](/tools/video-resizer): scale to 1080p, 720p, or custom
- [Video Compressor](/tools/video-compressor): reduce file size after stabilization
---
### Why Our Best-Quality Background Remover Runs on WASM, Not WebGPU
URL: https://bgremover.novusstreamsolutions.com/blog/why-best-quality-bg-removal-runs-on-wasm
Published: 2026-06-08 | Category: Technical Deep Dives | Author: Novus Stream Solutions Editorial Team
Running a model in the browser is not only a question of whether the weights fit in memory. The intermediate tensors created during inference can be much larger than the download itself. That distinction explained a stubborn Best Quality failure in our background remover.
## Why the 1024px graph failed after loading
Our earlier BiRefNet Lite ONNX model accepted a fixed 1024 × 1024 input. Its 224 MB fp32 weights downloaded and the ONNX session could initialize, but the decoder created enough multi-scale intermediate data to exceed ONNX Runtime Web's working heap during the first forward pass.
The browser reported numeric-only errors such as `240595976`. Those numbers were not input names or corrupt image data. They were the visible symptom of a native allocation failure inside the WASM runtime. Switching that same graph to fp16 did not solve the problem on CPU because several required fp16 operators lacked WASM kernels.
## The browser-ready 512px export
Best Quality now uses the `studioludens/birefnet-lite-512` ONNX export. It is built from the same BiRefNet Lite checkpoint but uses a fixed 512 × 512 input. Halving both dimensions reduces the largest image-shaped intermediate tensors by roughly four times.
The smaller graph provides two useful runtime variants:
- **WebGPU fp16 (~99 MB):** the preferred path on a healthy hardware adapter.
- **WASM fp32 (~192 MB):** a CPU compatibility path for browsers without usable WebGPU or for a GPU execution failure.
The output is still expanded to the source image dimensions before our edge-guided cleanup runs. Exports retain their original resolution; 512px is the segmentation model's working resolution, not the final image size.
## The fallback order is deliberate
Selecting Best Quality now starts one BiRefNet worker and follows a bounded sequence:
1. Detect whether the browser exposes a healthy WebGPU adapter.
2. Run the 512px fp16 graph on WebGPU when available.
3. If GPU loading or inference fails, dispose that session and retry the 512px fp32 graph on WASM.
4. Only if both Best Quality paths fail does a fresh worker run the Fast model.
This matters because a computer can have a powerful GPU while the browser still loses a WebGPU device, rejects an operator, or applies a platform-specific limit. Hardware specifications alone cannot prove that a browser execution provider will complete a particular ONNX graph.
## Honest diagnostics
The processor records the requested and bound execution provider and reports both Best Quality errors if WebGPU and WASM fail. A Fast result is still delivered as a final safety net, but it is labelled as a fallback rather than presented as a successful Best Quality run.
That is the practical rule for client-side ML: choose a graph that fits the browser first, use the GPU when it is genuinely available, and keep a separate CPU path that is known to execute.
---
### We Run the Model in Your Browser Instead of Our Server. Here's the Real Tradeoff.
URL: https://bgremover.novusstreamsolutions.com/blog/client-side-vs-server-background-removal
Published: 2026-06-08 | Updated: 2026-08-08 | Category: Technical Deep Dives | Author: Novus Stream Solutions Editorial Team
"100% in your browser" is easy to put on a landing page. The interesting part is what that architecture actually costs us as builders, because every one of those costs is a decision a server-based competitor never has to make.
## What client-side buys you
- **Your images never leave the device.** There is no upload step, so there's no copy of your photo on our infrastructure to leak, subpoena, or accidentally log. For product shots under embargo or personal photos, that's the whole point.
- **Zero marginal cost per image.** A server tool pays GPU-seconds for every background removed. We pay once to ship the model file; your device does the compute. That's why we can offer it free without a "10 images/month" gate.
- **It works offline.** Once the model is cached, the tool runs on a plane.
## What it costs us, and how we handle each
**1. The model has to be downloaded.** A server keeps the weights; we have to send them. Our fast model is ~80 MB; best-quality (BiRefNet) is far heavier. We mitigate with: download-on-demand (you only fetch best-quality if you choose it), Cache Storage so it's a one-time cost, and **honest size labels** in the consent UI. During this sprint we caught our own catalog mislabeling the SD-Turbo text-encoder as 1.7 GB when it's actually ~650 MB (and the U-Net as 640 MB when it's ~1.65 GB). The sizes were transposed. Wrong sizes erode trust and break the download progress bar, so we fixed them against the real byte counts.
**2. Device variance is now *our* problem.** A server runs one known GPU. We run on whatever the visitor has: including machines with no real GPU, where WebGPU can expose a software fallback adapter that's slower than WASM. We detect adapter quality and refuse silently degraded GPU runs, routing to the single-threaded WASM path instead.
**3. A failed download looks different.** On a server, a truncated model fetch fails loudly in your own logs. In a browser, ONNX Runtime will happily build a *session with no inputs* from a partial file, and the error only surfaces three tools downstream as a cryptic `undefined`. We added byte-length validation before session creation and a hard assertion that the session actually has input and output names, so a dropped connection fails at the source with a clear message, not as a mystery later.
## The tradeoff, stated plainly
Server-side is simpler to operate and gives you one predictable runtime. Client-side gives the *user* privacy and free unlimited use, and hands the *builder* a harder job: model delivery, device detection, and failure handling all move into the browser. We think that trade is worth it, but only if you do the unglamorous parts (integrity checks, EP telemetry, honest sizing) instead of just shipping the weights and hoping.
---
### The Math Behind Upscaling a 176px Thumbnail to 2048px
URL: https://bgremover.novusstreamsolutions.com/blog/incremental-upscaling-math-small-images
Published: 2026-06-08 | Category: Technical Deep Dives | Author: Novus Stream Solutions Editorial Team
A user drops a 176×176 thumbnail into a "2× upscale" tool and expects a poster. They get 352×352: technically 2×, practically still a thumbnail. The naive reading of "2×" is the problem. Here's how we think about scaling small inputs so the output is actually useful.
## Why "2×" is the wrong contract for small inputs
A fixed multiplier is fine for large inputs (2× a 2000px image is a meaningful 4000px). For small inputs it's almost useless: 2× of anything under ~500px is still small. What the user actually wants is a **target resolution**, not a multiplier.
So our upscaler plans toward minimum output sizes:
- **2× tier → at least 2048px** on the long edge
- **4× tier → at least 4096px (4K)** on the long edge
## The pre-scale plan
Given a 176px input and a 2048px target, the required factor is:
```
2048 / 176 ≈ 11.6×
```
No single super-resolution pass does 11.6× well. Transformer/GAN upscalers (Swin2SR, Real-ESRGAN) are trained for fixed small factors (typically 2× or 4×). Asking one for 11.6× produces mush. So we split the work:
1. **Pre-scale** the tiny input with a fast, artifact-free interpolation (WebGL Lanczos) up to the point where a learned pass can finish the job cleanly.
2. **AI pass(es)** for the final factor, where the model's learned detail actually helps.
3. **Unsharp mask** at the end to recover edge crispness lost to interpolation.
For larger inputs that already exceed the target, we scale proportionally instead of forcing a fixed multiple. There's no reason to push a 3000px image to 4× if 2048px is the goal.
## Why we cascade instead of one big pass
A 4× result built as **two 2× passes** beats a single 4× pass on most content: each pass operates in the factor range it was trained for, and errors don't compound the way they do when you ask a 2× model to hallucinate 4× of new detail in one shot. The cost is a second pass of compute, which is why this lives behind a tier choice, not on by default for every image.
## Two numbers that bit us
- The progress timer **counted up** instead of down on long jobs. That's two bugs: the ETA baseline being exceeded (so it showed elapsed), and a missing `content-length` header breaking the denominator the progress bar divides by. Fixing model delivery (so byte totals are known) is what makes a real countdown possible.
- A "90-second tile stall": a single tile that never reported progress would hang the whole job until an 8-minute timeout. We added a per-tile health check that fails fast at 90s with an actionable message instead of a silent wait.
## The takeaway
"Upscale" isn't multiplication; it's *reaching a target resolution without inventing detail that wasn't earned.* For small inputs that means a pre-scale plan and cascaded passes; for the UI it means honest ETAs that need real byte totals to compute. Get the arithmetic right and a 176px thumbnail becomes a genuinely usable 2048px image instead of a slightly-bigger thumbnail.
---
### The "White Flash" Bug: What Running Out of RAM Looks Like in a Browser Tab
URL: https://bgremover.novusstreamsolutions.com/blog/white-flash-browser-out-of-memory-video
Published: 2026-06-08 | Category: Technical Deep Dives | Author: Novus Stream Solutions Editorial Team
A user processes a 30-second clip for background removal. Two-thirds through, the tab flashes white, reloads itself, and the job is gone. "I think I ran out of RAM," they reported. They were exactly right, and the fix isn't a `try/catch`, because by the time it happens your JavaScript is already dead.
## Why you can't catch it
When a browser tab exceeds its memory budget, the browser doesn't throw a JavaScript exception you can handle. It kills the renderer process and reloads the tab. There is no `catch` block for "the process that was running your `catch` block no longer exists." The only fix is to **never allocate that much in the first place.**
## The shape of the bug
The naive way to process video frames is intuitive and fatal:
```
decode ALL frames → array of N bitmaps → process each → encode
```
For a 30-second 30fps clip that's ~900 full-resolution `ImageBitmap`s held in memory simultaneously before processing even starts. At 1080p, each frame is ~8 MB of pixel data; 900 of them is ~7 GB. The tab dies long before frame 900.
## The fix: stream, don't hoard
The bounded-memory version processes in a pipeline and releases as it goes:
```
for each frame:
decode 1 frame → process → encode/append → release the bitmap
```
The discipline that makes this work:
- **`bitmap.close()` per frame.** `ImageBitmap` holds memory outside the JS heap; it isn't freed by garbage collection alone. You must explicitly close each one the moment you're done drawing it.
- **Transfer, don't copy, to workers.** When sending a frame to an inference worker, transfer the bitmap (move ownership) rather than clone it.
- **Worker isolation.** Run the heavy work in a worker so that if *it* hits a memory wall, the worker dies, not the whole page. The page can then surface a real error instead of vanishing.
- **A bounded GIF decoder.** Our GIF path keeps one running canvas buffer and composites each frame onto it, rather than allocating one full canvas per frame.
## The honest limit
Streaming gets you a long way, but a browser tab still has a hard memory ceiling that a server doesn't. So we also cap input dimensions before the pipeline (a crisp 1024–1536px result beats a tab crash on a 12-megapixel phone photo), and we surface a clear message when a clip is genuinely too large for this device, instead of letting it flash white and pretend nothing happened.
## The takeaway
The "white flash" isn't a bug in your code; it's the browser defending itself from your memory usage. You don't fix it with error handling: you fix it by never holding the whole clip at once, closing every bitmap you create, and isolating the heavy work so a failure is recoverable instead of catastrophic.
---
### Why We Made Our AI Tools Fail Loudly Instead of Returning Your Original Image
URL: https://bgremover.novusstreamsolutions.com/blog/fail-loudly-not-silent-fallback
Published: 2026-06-08 | Category: Product & Mission | Author: Novus Stream Solutions Editorial Team
The worst failure mode in an AI tool isn't an error message. It's a tool that *looks* like it worked: you click "make sticker," it spins, and hands back your original photo with rounded corners. You can't tell the model failed. You just think the tool is bad. We adopted a hard rule to kill this class of bug: **no silent fallback.** A failed model path must surface a typed, visible error: never the input image, never a stub, never a classical no-op dressed up as success.
Auditing our own code against that rule caught three real offenders.
## 1. The sticker that wasn't a cutout
The sticker generator took an image, added padding and rounded corners, and returned it. It assumed the input was *already* a cut-out subject. Drop in a normal photo and you got the whole photo with rounded corners on a white background: "sticker complete!" The fix wires a real background-removal cutout *before* the framing step, so a sticker is an actual die-cut subject. If the cutout fails, it throws. It doesn't hand back the framed original.
## 2. Source separation that returned the input twice
Our audio source-separation tool was supposed to split a track into stems. The implementation returned the **input audio as both the "vocals" stem and the "other" stem**: i.e. nothing was separated, but the result shape looked successful. That's the rule violated exactly: a no-op presented as success. Until the real Demucs model is wired, it now surfaces an honest "not available yet" error instead of pretending. An error you can act on beats a fake result you can't trust.
## 3. `[object Object]` in the answer
Ask-Image returned `"answer": "[object Object]"`. The model's result was an object, and somewhere it got `String()`-ed instead of having its `.answer`/`.text` field extracted. We added one shared text-coercer that pulls the real string out of whatever shape the model returns (string, `{answer}`, `[{generated_text}]`, nested), and *never* yields `[object Object]`. Every text tool now routes through it.
## The guardrail that makes it systematic
Catching these one by one isn't enough; you want the architecture to make silent success hard. So we added a guard layer between the model call and the post-processor:
- **Result-shape assertions** (`assertDims`, `assertMaskData`) turn a degenerate model output into one loud, typed error naming the tool, instead of a `Cannot read properties of undefined (reading 'width')` deep in a canvas call.
- **Session integrity**: a model session with no input names (the signature of a truncated download) throws at load time, not three tools later.
- **EP telemetry**: we log which execution provider actually bound, so "it silently ran on the slow path" is observable instead of suspected.
## Why this matters to you
A loud failure respects your time: you know to retry, switch modes, or use a different image. A silent fallback wastes it: you ship the "sticker," notice later it's just your photo, and blame yourself. We'd rather show you an honest error once than a fake success you discover at the worst moment.
---
### One Bug, Seven Queues: How a Copy-Pasted State Machine Made Us Refresh the Page
URL: https://bgremover.novusstreamsolutions.com/blog/one-bug-seven-queues-state-machine
Published: 2026-06-08 | Category: Technical Deep Dives | Author: Novus Stream Solutions Editorial Team
A user reported: process one image, then try to add another. Nothing happens until you refresh the page. Cancel a job, same thing. We'd seen versions of this before and patched it in one place. It came back, because the bug existed in **seven** places.
## The duplicated flaw
We have seven queue stores: image, batch, video, video-upscale, gif, pdf, upscale. Each was written independently but converged on the same shape, including the same cancel logic:
```ts
isProcessing: isActive ? false : state.isProcessing
```
Read that carefully. When you cancel an item, it only clears the `isProcessing` flag *if the cancelled item was currently active*. But there's a race: if an item finishes its work a microtask before the cancel lands, it's no longer "active", so `isActive` is false, and `isProcessing` is left at its previous value: **stuck on `true`.** The UI gates "can I add another?" on `isProcessing`, so the queue refuses new items until a full page reload resets everything.
Because the line was copy-pasted into seven stores, fixing it in one never fixed the others. That's the real lesson: *duplicated logic means duplicated bugs, and a fix that doesn't reach all copies isn't a fix.*
## Don't track state you can derive
The deeper problem is that `isProcessing` was being **tracked**, toggled by hand at every transition, when it should be **derived**. A queue is processing if and only if some item is in an active state. That's not a fact to maintain; it's a fact to compute:
```ts
function deriveProcessing(items) {
return items.some(i => isActiveStatus(i.status))
}
```
There is no code path that can leave a *derived* value stuck, because it's recomputed from the source of truth every time. We extracted one canonical queue machine, the `queued → active → (done | error | cancelled)` lifecycle plus this `deriveProcessing` helper, and had all seven stores consume it. The stuck-flag class of bug is now structurally impossible across every queue tool, not just the one we happened to test.
## The general principle
State you toggle by hand drifts. State you derive can't. Any time you find yourself writing "set this flag to false here, and also here, and also in the cancel handler," that's a signal the flag should be a computed function of something more fundamental, and that the something should live in one place every consumer shares.
The symptom was "I have to refresh to add another file." The cause was one clever-looking ternary, copied six times. The fix was to stop tracking and start deriving, once.
---
### No "Bring Your Own Model": How We Source Client-Side AI Models
URL: https://bgremover.novusstreamsolutions.com/blog/no-bring-your-own-model-sourcing-onnx
Published: 2026-06-08 | Category: Technical Deep Dives | Author: Novus Stream Solutions Editorial Team
A pattern shows up in browser-based AI tools when a feature gets hard: **bring your own model.** The tool ships a text box where you paste a model URL, and if you don't have one, the feature simply doesn't work. It's a way to claim a capability without actually delivering it. We made a rule against it: every tool gets a **real, self-hostable, permissively-licensed model**: or it's honestly gated, never faked.
That rule turns "source a model" into a concrete research checklist. Here's how we evaluate one.
## The four questions for every model
1. **Does a web-ready ONNX export exist?** Not a PyTorch checkpoint, an ONNX file that ONNX Runtime Web or Transformers.js can actually load. Many famous models have no clean web export, which quietly kills them as client-side options.
2. **Is the license permissive enough to self-host?** We need to serve the weights ourselves (MIT/Apache and similar). A research-only or non-commercial license is a non-starter for a free public tool.
3. **Does it fit the browser's constraints?** Download size that's honest to gate, and, critically, a compute graph that fits WebGPU's limits or runs acceptably on WASM. (A model that needs 33+ storage buffers per shader stage won't survive WebGPU's 8-buffer floor on many devices.)
4. **What's the exact I/O contract?** Input tensor shape, normalization, output decoding. Without this you can load a model and still get garbage.
## What that yielded this round
- **Florence-2** (`onnx-community/Florence-2-base-ft`): one model that upgrades captioning, OCR, alt-text and VQA, replacing weaker single-task models. MIT. The catch we documented: it's quantization-sensitive in the encoder, so you must set per-module dtypes (keep the vision encoder higher precision) or OCR comes out garbled.
- **MediaPipe Tasks Vision** (`@mediapipe/tasks-vision`): fully client-side pose, hand, and face-mesh landmarks. Apache-2.0. This is the honest path for pose-conditioned generation and for constraining eye-colour edits to the actual iris instead of recolouring the whole image.
- **Demucs v4 ONNX**: a self-contained ONNX export (STFT/ISTFT rewritten to be ONNX-compatible) for audio stem separation, runnable via ONNX Runtime Web. MIT.
For each, we recorded the URL, license, size, and I/O contract in our model catalog *before* wiring, so "does this tool use the right model?" has one audited answer instead of being scattered across modules.
## The honest-gate fallback
Sometimes the answer to the four questions is "not yet". No clean export, or it's too heavy to ship responsibly. In that case the tool shows a clear "not available yet" state. What it never does is return your input and call it a result. A feature that says "coming soon" is honest; a feature that fakes its output is not.
## Why this is more work, and worth it
"Bring your own model" is easier for us and worse for you: it offloads the genuinely hard part (finding a model that's web-ready, licensed, and fits the device) onto the user. Doing that work ourselves is the difference between a tool that lists a capability and a tool that has one.
---
### How We Finally Proved Which GPU Path Our Models Actually Use
URL: https://bgremover.novusstreamsolutions.com/blog/proving-which-gpu-path-models-use
Published: 2026-06-08 | Category: Technical Deep Dives | Author: Novus Stream Solutions Editorial Team
For a long stretch of this project, performance debugging went like this: a tool felt slow, someone said "it's probably silently falling back to WASM instead of WebGPU," someone else patched a symptom, and nobody could confirm whether the theory was even true. We were debating a fact we'd never measured.
## The missing instrument
ONNX Runtime Web and Transformers.js both take an execution-provider preference like `['webgpu', 'wasm']`. They try WebGPU, and if it's unavailable or the graph doesn't fit, they fall back to WASM. That fallback is *silent* by design. It's a feature, so your model still runs. But it means the single most important performance question, *which provider actually bound?*, had no answer in our logs.
So a 3–6× slowdown could be "WebGPU is busy" or "we've been on WASM this whole time" and we genuinely could not tell them apart.
## The probe
The fix wasn't a rewrite. It was a small telemetry module that records, per model session: the provider requested, the provider we believe actually bound, the adapter's reported info (vendor, whether it's a software fallback, its real limits), and the dtype. For the Transformers.js path the bound provider is *exact*, an explicit `device: 'webgpu'` either binds or throws, so the device of the successful attempt is ground truth. For the raw ONNX path we infer it from adapter health and mark it as inferred rather than guessed.
You read it by adding `?debug=ep` to any tool URL. The console then shows lines like:
```
[EP] transformers · birefnet-lite-512 · requested=webgpu = bound=webgpu (fp16) | adapter hw storageBuffers/stage=10
[EP] transformers · ormbg-ONNX · requested=wasm = bound=wasm (q8), forced WASM compatibility path
```
## What it immediately revealed
Two things stopped being arguments and became facts:
1. **Provider choice is model-specific.** Fast is deliberately pinned to WASM because its q8 graph is compact and its MaxPool contract is not supported by our current WebGPU path. Best Quality uses the browser-ready 512px BiRefNet graph on WebGPU/fp16 and can retry WASM/fp32. Telemetry distinguishes each real binding.
2. **Degenerate adapters were real.** On some devices WebGPU exposes a software fallback adapter that reports nonsense limits (the source of the infamous "createBuffer size 1536 is too large" error). We detect that and refuse the GPU path, routing Best Quality to its WASM variant on purpose, and the log says so.
## The broader lesson
You cannot optimize what you cannot observe, and "silent fallback" is the enemy of observation. The cheapest, highest-leverage thing we did for performance this round wasn't a faster code path. It was making the existing behavior *visible*. One probe turned ~50 rounds of guessing into a question with a printed answer, and it's now part of how we'll catch any future regression to the slow path automatically instead of by feel.
---
### "Session Has No Input Names": The Anatomy of a Truncated Model Download
URL: https://bgremover.novusstreamsolutions.com/blog/session-has-no-input-names-truncated-download
Published: 2026-06-08 | Category: Technical Deep Dives | Author: Novus Stream Solutions Editorial Team
One of the most-reported, longest-lived errors in our background remover was `BiRefNet: session has no input names`. It looks like a model problem. It's actually a *delivery* problem, and tracing it taught us a general lesson about how silent corruption propagates.
## The failure chain
Here's what actually happens:
1. The model file fetch is interrupted: a flaky connection, a 503 on the route, a cache entry that was written partially. You now have a truncated buffer of bytes.
2. You hand those bytes to `InferenceSession.create()`. **ONNX Runtime does not throw.** It builds a session object from whatever it got. That session's `inputNames` is an empty array `[]`.
3. Nothing notices. The broken session gets cached as if it were fine.
4. Later, sometimes in a different tool entirely, code tries to feed an input to `session.inputNames[0]`, reads `undefined`, and crashes with a message that has nothing to do with the real cause: a download that dropped.
The error surfaces far from where it was born. That distance is what made it feel unfixable for ~50 update rounds: people debugged the *tool that crashed* instead of the *download that failed*.
## The fix: validate at the boundary
The cure is to refuse a bad buffer the moment it arrives, before it can become a poisoned cached session:
- **Byte-length validation.** Compare the received byte count against the response's `content-length`. If they don't match, the download was truncated. Throw immediately with "got X of Y bytes," not a cryptic `undefined` later. (A missing `content-length` header is its own tell, and it also breaks download progress bars, so we ensure it's present.)
- **Non-empty I/O assertion.** Right after `InferenceSession.create()`, assert `inputNames.length > 0` *and* `outputNames.length > 0`. If either is empty, the model is corrupt or incomplete: release it, **evict the bad cache entry**, and throw a clear typed error telling the user to reload to re-download.
That last step matters: without evicting the cache, a corrupt session gets reused forever, and "reload the page" doesn't help because the broken bytes are still on disk. Evict-then-fail is what makes a retry actually re-fetch.
## We verified the delivery, too
Before assuming the code was the whole story, we audited the live model URLs from the browser with our real origin. Every model file returned HTTP 200 with a correct `content-length`, proper CORS, and range support. So the network layer was healthy: meaning the surviving occurrences were exactly the transient-truncation and cache-poisoning cases the two checks above are built to catch.
## The general lesson
Silent corruption is worse than a crash because it travels. A library that "helpfully" doesn't throw on bad input hands you a broken object that detonates later, somewhere unrelated. The defense is to validate at the boundary where the data enters, byte count and structural assertions, so the failure happens at the source, names its real cause, and cleans up after itself.
---
### The Bug That Was Already Fixed: A Lesson in Deployment Integrity
URL: https://bgremover.novusstreamsolutions.com/blog/the-bug-that-was-already-fixed-deployment-integrity
Published: 2026-06-08 | Category: Product & Mission | Author: Novus Stream Solutions Editorial Team
We started a major round with a list of ~55 reported failures and four console-log captures dated that day. The plan was root-cause first: fix the shared infrastructure, then each tool. Then we did the unglamorous step the plan demanded, *confirm each hypothesis against the actual code before writing a fix*, and found something humbling.
## Most of the bugs were already fixed
Tool after tool, the fix the report asked for was already in the repository:
- The upgraded vision model? Already wired, with a fallback.
- The editor canvas not re-rendering on background colour change? The corrected effect was already there.
- The video editor "opening to an upload wall"? It already mounted the editor program.
- The "tool that just blurs the image"? It already applied a real transform.
The live console errors were real, but they weren't proof those fixes were *absent*. They were proof the **deployed build was running behind the code**. Fixes were committed but not fully shipped, or a CDN was serving stale bundles. We were about to re-debug, for the Nth time, code that was already correct.
## How we proved it
Two checks settled it:
1. **A live delivery audit.** We fetched every model URL and runtime asset against production, with our real origin header. All returned HTTP 200, correct `content-length`, proper CORS. The "dead CDN / 404 / 503" theory behind the headline bug was disproved at the network layer. The model delivery was healthy.
2. **A code-vs-symptom diff.** For each reported symptom, we located the code path and checked whether the guard/fix existed. Overwhelmingly, it did.
Conclusion: the highest-value action wasn't another round of per-tool patches. It was **redeploy the current code and purge the cache**, then re-test against a build that actually contains the fixes.
## The process change that ends the cycle
A bug that's "fixed" in the repo but not live will get re-reported, and re-debugged, indefinitely. So we wrote the rule into our postmortem: **after every deploy, before concluding a fix "didn't work," verify it's actually live.** Concretely:
- Run the live delivery audit (assets 200 with correct sizes).
- Open the tool with execution-provider telemetry on and confirm the new code path actually ran.
- Only *then*, if the symptom persists on a confirmed-fresh build, treat it as an open bug.
We also added the observability to make this fast: per-session EP telemetry, loud typed errors at failure boundaries, and integrity probes for model assets. The point is to make "is this fixed and live?" a question you can answer in seconds, not a thing you assume.
## The takeaway
The most expensive bugs aren't always in the code. Sometimes they're in the gap between the code and what's actually serving. If you find yourself fixing the same thing repeatedly, check that your last fix is *deployed* before you write the next one. The cheapest fix in this entire round was a redeploy and a habit.
---
### Grayscale, Sepia, and Invert: Classic Photo Effects in Your Browser
URL: https://bgremover.novusstreamsolutions.com/blog/grayscale-sepia-invert-effects-free
Published: 2026-05-27 | Category: Technical Deep Dives | Author: Novus Stream Solutions Editorial Team
Grayscale, sepia, and invert are three of the most enduring effects in photography, and each has a precise technical definition that determines how it behaves on different images. Here's what's happening at the pixel level, and when each effect is most useful.
## Grayscale: Luminance Weighting
The naive approach to grayscale (averaging R, G, and B channels) produces correct-looking results for some images but looks washed out for others. The reason: human vision is not equally sensitive to red, green, and blue light.
The standard (ITU-R BT.601) luminance formula is:
```
L = 0.299 × R + 0.587 × G + 0.114 × B
```
Green contributes the most to perceived brightness; blue contributes the least. This formula is used in CSS's `filter: grayscale()`, in Photoshop's desaturation, and in the NSS Grayscale Converter.
The result: green areas appear lighter than you might expect; blue areas appear darker. A photo with green foliage and a blue sky will show clear tonal separation in grayscale even when the original colors had similar brightness.
## Sepia: The Warm Tone Matrix
Sepia tone reproduces the warm brownish colour of old silver halide prints that have oxidised over time. It's applied as a matrix transformation that shifts all three channels:
```
R_out = R×0.393 + G×0.769 + B×0.189
G_out = R×0.349 + G×0.686 + B×0.168
B_out = R×0.272 + G×0.534 + B×0.131
```
Output values are clamped to 0–255. The matrix adds warm (red-orange) tones while reducing blue: matching the appearance of aged photographs.
Sepia works best on portraits and outdoor photography. Very dark images (underexposed photos) can look murky in sepia; the effect is most attractive on well-exposed images with good tonal range.
## Invert: Complementary Colours
Invert replaces every channel value with `255 - value`. Black becomes white, white becomes black, and every colour becomes its complement on the colour wheel (red → cyan, blue → yellow, green → magenta).
Common uses:
- Creating negative-style art effects
- Dark-mode versions of icons or logos
- Making white-on-transparent elements visible on dark backgrounds before export
- Creating X-ray or thermal imagery effects for illustration
Transparency (alpha channel) is preserved in all three modes. The effect is applied only to the RGB channels.
## Preserving Alpha
Unlike many online tools that flatten to white before applying grayscale or sepia, the NSS Grayscale Converter preserves the alpha channel from the original image. A transparent PNG remains transparent after the effect. The colour values of transparent pixels are set to zero regardless of the mode.
This matters when working with background-removed images: grayscale or sepia applied to a cut-out preserves the clean edge transparency for compositing.
## Related Tools
- [Grayscale Converter](/tools/grayscale): Grayscale, sepia, and invert effects with alpha preservation
- [Image Background Remover](/): Remove backgrounds before applying colour effects
- [Add Background](/tools/add-background): Composite grayscale cut-outs onto coloured backgrounds
- [Image Compressor](/tools/image-compressor), Grayscale images compress well, reduce file size after converting
---
### How to Create a Multi-Size Favicon .ICO from a PNG (Free, No Photoshop)
URL: https://bgremover.novusstreamsolutions.com/blog/create-favicon-ico-from-png
Published: 2026-05-27 | Category: Technical Deep Dives | Author: Novus Stream Solutions Editorial Team
The `.ico` file format is older than the web itself, but it's still the standard format for browser favicons. Understanding why it exists, and how to create one correctly, saves a lot of confusion when setting up a new site.
## What Is an ICO File?
An `.ico` file is a container format that bundles multiple images of different sizes into a single file. When a browser requests `/favicon.ico`, it picks the most appropriate size for the current display context:
- **16×16**, browser tab favicon (standard display)
- **32×32**, browser tab on high-DPI displays, Windows taskbar, browser shortcuts
- **48×48**, Windows application icon at standard size
- **64×64**, Some Windows display contexts
- **128×128** (macOS Dock icons, Windows Jump List
- **256×256**) High-DPI desktop shortcut icons
A properly built ICO file includes all of these sizes so the OS and browser can always pick the sharpest version for the current context.
## ICO vs PNG for Favicons
Modern browsers support `