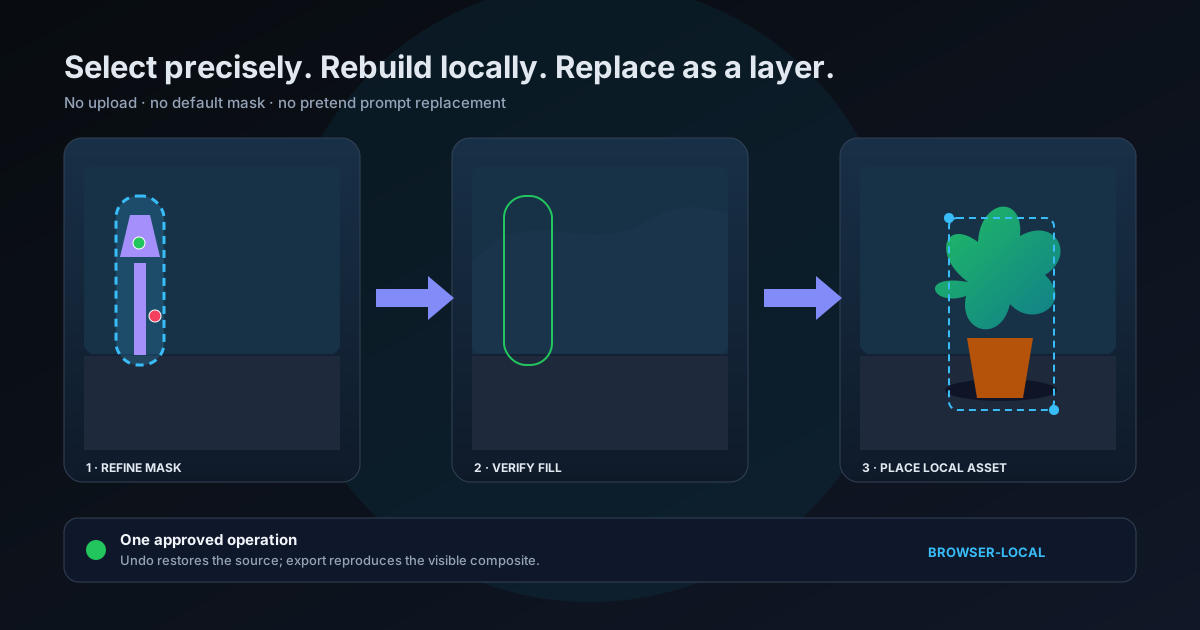
How to Remove and Replace Objects in Photos Without Uploading Them
A precise browser-local workflow for selecting an object, refining its mask, reconstructing the space it occupied, and placing a real replacement asset as an editable layer — without sending the photo to a server.
By Novus Stream Solutions Editorial Team · Part of the Browser-local editing workflows topic cluster
Removing an object and replacing an object are two different jobs that are too often hidden behind the same magic-looking button.
Removal needs a trustworthy answer to two questions: which pixels belong to the object, and what should occupy the hole after those pixels are gone? Replacement adds a third: how should a real new subject sit in that scene? If any one of those answers is guessed silently, the polished preview can conceal a weak edit.
The Object Remove & Replace tool keeps those decisions visible. You select and refine the mask, choose the fill path, inspect the result, then optionally import a separate local asset as a transformable layer. The source photo and replacement asset remain in your browser.
Selection comes before inpainting
The old failure mode was simple: draw a rough shape in the middle of the image, call an inpainting model, and hope the intended object happened to be inside it. Sometimes the output looked like paint smeared across the subject because that was effectively what the mask asked the model to do.
The rebuilt workflow uses Google MediaPipe’s stateful Interactive Image Segmenter. A positive stroke says “include this”; a negative stroke says “exclude this.” The segmenter returns a confidence mask matching the image, and each additional stroke refines the same selection rather than starting over.
That first result is still a draft. The tool also provides:
- a lasso for objects with a clear silhouette;
- a brush for adding missed areas;
- an erase brush for removing spill from the background;
- mask expansion to reach beneath the object edge; and
- feathering to make the final composite meet the original pixels gradually.
No mask means no run. An empty selection never becomes a default ellipse, and a mask with the wrong dimensions is rejected rather than stretched over the photograph.
Why the hole is processed as a crop
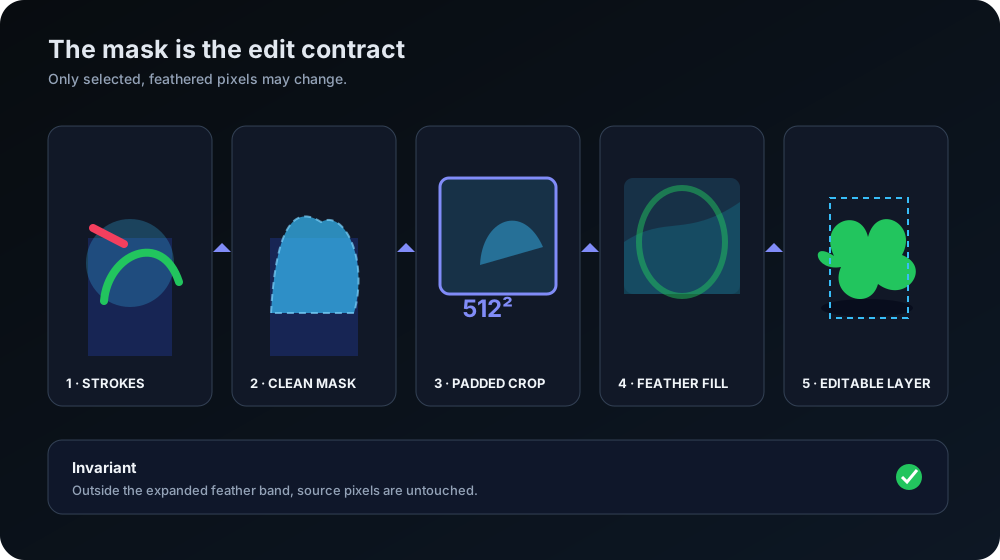
The consent-gated removal path uses LaMa, an inpainting network whose browser ONNX port has a fixed 512 × 512 input. The naive implementation resizes the entire photograph to that square, processes it, and stretches the answer back. A landscape photo becomes temporarily distorted, fine detail outside the object is needlessly resampled, and the output can change pixels nowhere near the selection.
This workflow takes a tighter route:
- Find the mask bounds.
- Expand them enough to show the surrounding texture the fill must continue.
- Pad that region to a square without distorting its contents.
- Resize only that crop to 512 × 512 for inference.
- Return the result to the original crop size.
- Composite only through the expanded, feathered mask.
Pixels outside that feather band remain byte-for-byte source pixels. A very large selection may be refused or flagged because a small fixed model asked to invent most of a full-resolution photograph is not a robust edit.
The one-time LaMa download is requested only after explicit consent and then cached locally. The model is based on the fixed-input Carve LaMa ONNX port. If you decline or the model cannot run, the tool offers a clearly named boundary-inward neighbour fill. That no-download fallback is limited to tiny marks surrounded by simple, repetitive colour or texture; it can smear structure, is not PatchMatch, and is not represented as equivalent AI reconstruction.
Removal is plausible reconstruction, not recovery
An inpainting result is invented from context. Over sky, plaster, foliage or soft depth of field, that invention can be nearly invisible. Across text, faces, repeated architecture or the edge of another object, it can be confidently wrong.
The useful test is not “does the hole look smooth?” It is:
- Do repeated lines continue with the right spacing?
- Did the fill duplicate a nearby object?
- Does grain and noise match at 100%?
- Is there a soft halo around the mask?
- Did anything outside the selection change?
If the hidden content matters as evidence, do not remove it. Crop, blur, or preserve the original instead.
Replacement means importing a real asset
Typing “put a red vase here” would require a large generative model and would still make the edit depend on a prompt interpretation. The free browser workflow deliberately does not pretend a palette-based patch is prompt generation.
Instead, replacement is a dependable layer operation:
- Remove the original object and approve the fill.
- Import a photograph or graphic of the replacement from your device.
- Remove that asset’s background locally when it needs a cutout.
- Place it as a separate editor layer.
- Adjust position, scale and rotation.
- Tune edge softness, colour balance, lighting and shadow until it belongs in the scene.
Because the replacement stays a layer, you can move it after seeing the composition, lower its opacity to align perspective, and undo it without running removal again. The source asset is not flattened until export.
Matching the scene is the real work
A technically clean cutout can still look pasted in. Work through the mismatch in this order:
Perspective and scale. Compare the replacement to objects sitting on the same plane, not to the whole frame. Converging lines and horizon height usually expose the wrong scale first.
Contact shadow. A small, soft shadow under the object tells the eye where it touches the surface. Its direction must agree with other shadows in the photograph.
Colour temperature. A cool studio product dropped into a warm room needs colour adjustment before more edge work.
Edge character. A sharp product cutout in a motion-soft phone photo looks synthetic. Match the source sharpness and grain instead of maximising crispness.
Occlusion. If part of the new asset should sit behind a foreground object, use layer order and a mask. Shrinking the whole asset until it avoids the overlap breaks the composition.
One apply, one undo point
Experimentation is only safe when the editor records clear boundaries. Applying the removal or the replacement creates one history operation after the result succeeds. Cancelling, switching tools, replacing the file or navigating away invalidates the in-flight run so a late model response cannot overwrite newer work.
Before export, use undo and redo once. That is a practical integrity test: the original state should return exactly, the approved state should return exactly, and the exported pixels should match the visible composite rather than an earlier preview buffer.
A reliable sequence
- Open the best available source in Object Remove & Replace or launch it from the Image Editor.
- Mark the object with a positive stroke, then use negative strokes and the brush to clean the mask.
- Expand the mask enough to cover the object edge; add feather only after the silhouette is correct.
- Approve LaMa if you want the model path, or choose the labelled neighbour fill only for a tiny, simple repair.
- Inspect the full-resolution result outside and inside the feather band.
- If replacing, import a real local asset and treat it as a layer.
- Match perspective, shadow, colour and edge character.
- Apply once, verify undo/redo, and export the visible result.
The expensive-looking part is the fill. In practice, the mask and the scene match determine whether the edit holds up. Keeping both visible is what turns object removal from a one-click gamble into a controlled editing workflow.
Applies to NSS Background Remover v2.4.0 — the release that was current when this article was published.
Was this article helpful?
Your answer is saved in this browser only. This control makes no network request and does not send the answer to an NSS feedback endpoint.