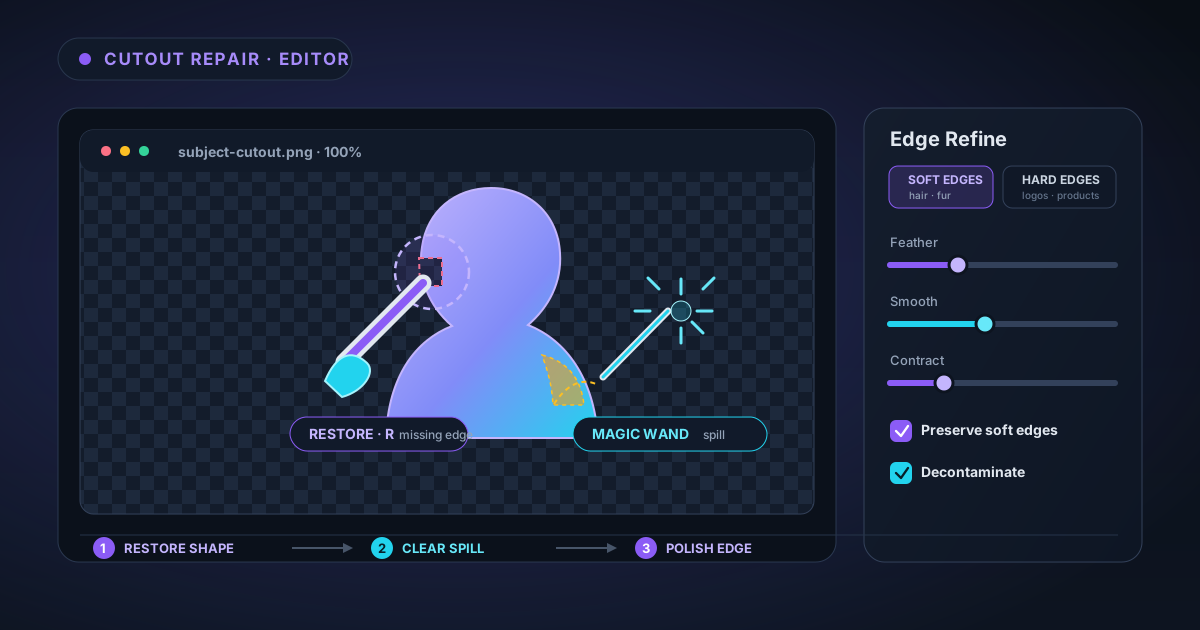
Fixing an Imperfect AI Cutout: Brush, Magic Wand, and Edge Refine
An AI cutout is a strong first pass, not a locked result. Learn how to diagnose missing subject, leftover background, halos, and rough edges, then repair each problem with Erase, Restore, Magic Wand, and Edge Refine in the NSS image editor.
By Novus Stream Solutions Editorial Team · Part of the Browser-local editing workflows topic cluster
The first preview after background removal can feel like a verdict. Either the subject looks perfect, or you spot a missing finger, a pale rim, a patch of old wall between two chair legs, and assume the answer is to run the AI again. Usually it is not.
The model has already done the expensive part: it has separated most of the subject from most of the background. What remains is a mask-editing problem. A mask is simply a greyscale map attached to the original image. White keeps a pixel, black removes it, and grey keeps it partly transparent. Repair the map and the original detail is still there underneath; you are not painting fake pixels over the photo.
NSS gives you three different repair tools because the defects are different. The Brush handles local, irregular mistakes. Magic Wand handles larger regions whose colours are similar. Edge Refine changes the character of the whole boundary. The quickest workflow is knowing which problem belongs to which tool.
Diagnose the defect before touching a control
Open the processed result in the image editor, zoom to 100 per cent, and inspect it on both a light and a dark background. A checkerboard shows that transparency exists, but it can hide a white halo; a white canvas can hide pale leftover background. Switching the preview background makes the boundary tell the truth.
Most imperfect cutouts fall into four groups:
| What you see | What actually happened | Start with |
|---|---|---|
| A piece of the subject is missing | The mask marked foreground as background | Restore Brush |
| Old background remains inside or around the subject | The mask marked background as foreground | Erase Brush or Magic Wand |
| The shape is right but the outline looks crunchy or stepped | The boundary changes too abruptly | Edge Refine |
| A coloured or pale rim follows the subject | Background colour contaminated the soft edge | Decontaminate, then a small Contract if needed |
Do not treat all four with one aggressive slider. Heavy feathering will not bring back a missing finger. A hard erase stroke will not make hair blend naturally. Diagnose first, then make the smallest correction that fits.
Restore what the AI removed
Choose Restore in the Brush tool, or press R. A restore stroke raises the mask where you paint, revealing the original pixels that were always under it. This is the right tool for clipped ears, fingers, handles, straps, jewellery, thin chair legs, or a bite taken out of a product edge.
Start with a brush slightly smaller than the feature. Use the bracket keys ([ and ]) to resize without leaving the canvas. Keep Hardness high for a geometric object and lower it for hair, fabric, or motion blur. If you are uncertain about the exact boundary, reduce Opacity and build the restoration over two or three strokes. A low-opacity stroke makes a partial-alpha repair instead of snapping every touched pixel to fully opaque.
Work from the solid interior toward the edge. Restoring from the transparent side inward makes it easy to overshoot and bring back a strip of the old background. Starting inside the known subject gives your hand a safe anchor. If you go too far, switch to Erase with E and trim it back; the two modes are meant to be used together.
One useful rule: preserve recognisable structure before chasing softness. A complete glasses arm with a slightly firm edge reads better than a beautifully feathered arm with a missing section. Rebuild the shape first. Edge Refine can settle the transition later.
Erase the leftovers without shaving the subject
Choose Erase or press E when the mask has kept something that should be transparent. Common examples are a wedge of wall under an arm, floor visible between furniture legs, a loose island beside the subject, or a shadow the model mistook for part of a shoe.
For a small isolated patch, use a firm brush and remove it directly. For a narrow space, shrink the brush and trace the middle of the unwanted region before working toward the subject. That order gives you room to correct. A huge brush seems faster, but it puts the real edge under the cursor where you cannot see it.
Soft Erase is useful for wispy spill, not for definite holes. If the old background is clearly visible, remove it completely. Leaving a low-opacity fog often creates a dirtier composite than either keeping or deleting the pixel. Save partial opacity for genuine mixed pixels: hair, fur, motion blur, translucent fabric, and antialiased edges.
Use Magic Wand for colour-shaped mistakes
The Brush follows your hand. Magic Wand follows colour. Click a leftover region and the editor selects pixels similar to the colour you clicked, then erases or restores them according to the selected mode.
The Tolerance control decides how similar is similar. Start low. Raise it until the unwanted region is selected, then stop before it crosses into the subject. A high tolerance on a beige product against a beige wall can remove both because the colour evidence cannot distinguish them. In that case the Brush is slower but safer.
Keep Contiguous on when you want only the connected region under the cursor: the patch of wall between an arm and a torso, for example. Turn it off when the same unwanted colour appears in many separate places and you genuinely want all of them. Hold Shift to add another region without losing the first selection.
Magic Wand also has a Restore mode. It is useful when the model punched several holes through a flat-colour logo or product label. Click inside the missing colour, keep tolerance conservative, and restore the connected region. It is less suitable for photographs with textured detail, where similar colours may belong to unrelated objects.
Refine the boundary after the shape is correct
Brush and Wand repair where the boundary runs. Edge Refine adjusts how that boundary behaves. Use it after the large mask mistakes are fixed, because every edge setting operates across the result.
The two presets are sensible starting points. Soft edges keeps partial alpha for hair, fur, feathers, and fabric. Hard edges tightens products, logos, icons, and geometric subjects. From there, use the individual controls sparingly:
- Feather spreads the transition over more pixels. One or two pixels can settle a hard photographic edge. Large values create a visible blur and should be reserved for genuinely soft material.
- Smooth reduces small bumps and stair steps. It helps a noisy mask, but too much rounds corners and erases deliberate detail.
- Contract pulls the boundary inward; Expand pushes it outward. A one-pixel contract can remove a stubborn rim. Large contractions make the subject look shaved, especially around hair and fabric.
- Preserve soft edges keeps the grey values that make strands and motion blur composite naturally. Turn it off for a deliberately hard-edged icon, not as a universal cleanup switch.
- Decontaminate edges reduces colour spill inherited from the old background. Adjust its strength before you start cutting the outline inward. A coloured fringe is often an RGB problem, not a shape problem.
If you want the mechanics behind that last control, why cutouts get a coloured fringe explains why semi-transparent pixels can carry the old background colour even when their alpha is correct.
Use a large-to-small repair order
A reliable sequence is faster than random clicking:
- Run the photo through the background remover and choose the mode that fits the subject.
- At 100 per cent zoom, Restore any missing structural pieces.
- Remove large retained background regions with Magic Wand where colour separation is clear.
- Use Erase and Restore for the remaining local corrections.
- Switch between light and dark preview backgrounds and inspect the full outline.
- Apply a Soft or Hard Edge preset, then tune Feather, Smooth, Contract, and Decontaminate in small amounts.
- Zoom out. A technically perfect edge at 800 per cent can look too sharp at the size people will actually see.
- Export a transparent PNG and verify it with Check Transparency if the destination is strict.
This order matters. If you feather first and then make hard brush corrections, the new strokes can look pasted onto the softened boundary. Shape first, edge character second, export last.
Know when the source has run out of information
Manual refinement is powerful because it lets you tell the mask what the subject is. It cannot recover detail the camera never recorded. A strand blurred into a same-coloured wall has no recoverable boundary. A heavily compressed thumbnail may have replaced a fine outline with square JPEG blocks. A blown highlight can erase the distinction between a white product and a white backdrop.
Try Best Quality or Glass mode when the subject deserves a different first pass. Restore an important feature when you can still see it in the original. But if you are drawing an entire edge from imagination, stop and ask whether a better source or a quick reshoot would be faster and more honest.
The goal is not to spend twenty minutes proving you can rescue every upload. It is to turn a strong automatic result into a clean finished asset with a few deliberate corrections. Let the model cover the broad image, let the editor handle the exceptions, and keep your attention for the places where a human eye is still better than a probability map.
Start with NSS Background Remover, open the result in the editor, and treat the first cutout as exactly what it is: an editable first draft that never left your device.
Applies to NSS Background Remover v2.3.0 — the release that was current when this article was published.
Was this article helpful?
Your answer is saved in this browser only. This control makes no network request and does not send the answer to an NSS feedback endpoint.