The AI Mask Is Only the First Draft: Inside Our Cleanup Pipeline
The neural network is only the first stage of a clean cutout. See how NSS validates the raw mask, protects openings and thin structures, restores full-resolution edges, preserves hair, removes studio spill, and branches safely for glass.
By Novus Stream Solutions Editorial Team · Part of the Image processing and on-device AI topic cluster
It is tempting to describe background removal as one operation: an AI model looks at a photograph and returns a transparent subject. That is the convenient version. The real version has a middle.
The model returns a mask: one floating-point value per pixel, somewhere between background and foreground. It is a prediction made at the model's working resolution, not a finished export. The prediction can be soft around a studio backdrop, uncertain in the gap between two chair legs, too firm around hair, or simply broken because a browser inference backend failed. Turning that answer directly into a PNG would make the quality of every cutout depend on the raw quirks of one network.
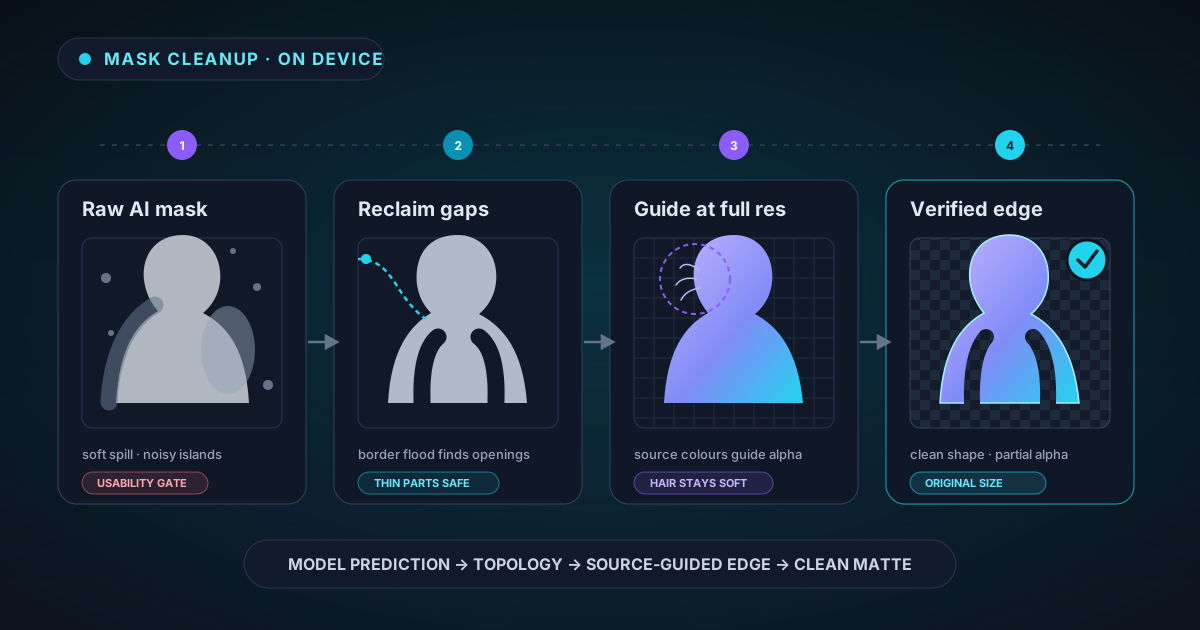
NSS treats the model output as a first draft. A bounded cleanup pipeline checks that the answer is usable, repairs topology without shaving off thin structures, returns it to the source dimensions, and then uses evidence from the original pixels to decide what to tighten and what to preserve. Here is that middle, in order.
Stage 1: reject a broken answer
Before polishing anything, the worker checks whether the returned mask is structurally usable. An all-zero array, non-finite values, an impossible shape, or another obviously corrupt result is not a difficult photograph; it is a failed inference run.
That distinction matters. If a broken result were accepted, the page could show an empty canvas and call the job complete. Instead, the current worker stops and the host follows a short, deterministic plan. A transient download interruption can retry the chosen model once in a clean worker. A graph, session, or memory failure moves to one compatibility fallback. Each worker is terminated before the next starts so a failed runtime does not leave a second copy of the model and image in memory.
The fallback is bounded rather than an endless loop. It also reports when the requested model could not run. That is the same philosophy described in why our AI tools fail loudly: a slower or different result can be useful, but pretending it came from the selected path is not.
Stage 2: recover openings connected to the border
A raw mask often leaves a faint amount of foreground probability in obvious holes: the space between a person's arm and torso, between chair legs, inside a mug handle, or around a cable. A conventional cleanup trick is to erode the whole mask until those uncertain pixels disappear. It works on the hole, but it also attacks the thin foreground structure surrounding it.
Our first topology pass takes a different route. It starts from pixels along the image border that already lean toward background, then follows connected background inward. Confident background can cross colour changes. Uncertain pixels are followed only when the local colour transition stays smooth, which helps the flood move through a real backdrop without stepping across a visible subject boundary.
Every reached pixel becomes background. Opaque chair legs, fingers, stems, straps, and wires are never globally replaced by their transparent neighbours. The pass removes the connected haze while leaving confident foreground alone.
This is a small distinction with a large visual effect. People notice a mysteriously missing chair leg long before they notice the mathematics that protected it.
Stage 3: close speckle, not real holes
After the border-connected cleanup, a one-pixel morphological close removes tiny pinholes and isolated speckle. The radius is deliberately small. Older, wider close operations could fill the legitimate opening between legs and then require aggressive erosion to reopen it, damaging the surrounding shape twice.
Glass and clear-plastic mode skips this close. An opening inside a transparent bottle may be meaningful, not noise, and transparent materials need their own interpretation. A generic "fill the holes" rule cannot tell a dust speck from the view through a glass interior.
The pipeline therefore branches early enough to preserve the evidence that the glass-specific pass will need later.
Stage 4: return the mask to the original image
Neural networks usually reason at a fixed working size. Your source photo does not. A 3000-pixel product photo may be reduced for inference, while the final export still needs to match the source dimensions.
NSS upsamples the cleaned model mask to the original image width and height before the fine-edge passes. That scaling is not allowed to be the final word. A plain enlarged probability map can blur a one-pixel transition into several uncertain pixels, so the resize includes edge sharpening and is followed by a guided filter that consults the full-resolution source colours.
The guided filter asks a local question: does the colour evidence at this position support foreground or background? It pushes uncertain alpha toward a clearer answer while respecting boundaries visible in the actual photograph. Fast mode receives a somewhat stronger pull because its raw edges are typically softer; Best Quality starts from a more detailed mask and needs less correction.
This is how an inference mask and a full-resolution export can be different sizes without the outline simply becoming a scaled blur.
Stage 5: keep fine detail soft where it should be soft
Not every uncertain pixel is a mistake. Hair, fur, feathers, fine fabric, foliage, and motion blur genuinely occupy only part of a pixel. Force those pixels to zero or one and the edge becomes clipped or crunchy.
The hair-preservation pass looks at high-frequency detail in the source image around the mask transition. Where the image contains strand-like or textured evidence, it resists snapping the alpha to a hard threshold and keeps a softer value. Where there is no fine structure, the normal guided cleanup can be firmer.
This is not strand generation. It does not invent hair the camera failed to record. It preserves mixed pixels the source and model already found. The distinction between a binary segment and a soft matte is covered in more depth in segmentation versus matting.
Stage 6: remove light-backdrop spill selectively
Uniform white, grey, cream, and pale studio backdrops are common because they make products easy to shoot. They also leave a faint light rim when the model assigns a low but non-zero alpha to pixels that closely match the background.
The background-kill pass samples patches around the corners and edge midpoints. It activates only when those samples describe a light, reasonably uniform backdrop. Low-alpha pixels close to that sampled colour are reduced or removed; a textured, dark, or non-uniform scene bypasses the pass.
There is a second guided pass afterward, then a narrow fringe trim when the mask contains enough ambiguous pixels and the border looks near-white. Crucially, the trim touches only semi-transparent values. Pixels already judged confidently foreground are protected, so a thin wire does not disappear merely because transparent pixels sit beside it.
This replaced the blunt global-erosion approach that could make a clean object look shaved. A hard boundary is not automatically a good boundary; it is only good when it follows the subject.
Stage 7: separate shape cleanup from colour cleanup
The next smart-edge pass samples background colour from transparent areas and compares it with pixels in the transition band. Pixels that resemble the old background are pushed outward; pixels that carry distinct subject colour are preserved.
Then fringe decontamination handles the stubborn halo that can remain on hard-edged products and logos. It considers both colour similarity and neighbourhood: a background-coloured pixel mostly surrounded by transparency is a stronger removal candidate than the same colour embedded inside the subject. This is why edge cleanup can reduce a white rim without erasing every white pixel in a white object.
Shape and colour are related but not identical. Alpha says how much of a pixel is present. RGB says what colour that pixel carries. The companion article on edge decontamination explains why a correct-looking mask can still composite with the wrong colour at its border.
Stage 8: take a separate path for transparent materials
Glass mode avoids the ordinary fringe pass, estimates see-through interiors, and then polishes the partial-alpha edge band. Pixels that resemble the sampled background can become translucent instead of disappearing completely. Bright, low-saturation highlights can remain more visible so bottle glints and clear rims survive.
This branch is intentionally opt-in. Run it on an opaque subject and it can interpret background-coloured areas inside the object as transparency. Run the opaque cleanup on glass and it can turn a clear bottle into a solid silhouette. The same input pixels require different assumptions, which is why Fast, Best Quality, and Glass are separate choices.
What still belongs to the human
At the end, the worker records useful mask signals such as overall coverage, ambiguous-edge fraction, and how much foreground touches the border. The result is now at the original dimensions and has passed through the correct cleanup branch. It is still an estimate.
A model cannot know that a beige strap against a beige wall matters more than the wall. It cannot recover a finger hidden by motion blur or decide that a soft shadow should stay because it grounds a product. Those are semantic and creative choices. That is why the result can be opened in the editor and repaired with the workflow in Brush, Magic Wand, and Edge Refine.
The important point is that the editor starts from more than a raw neural-network tensor. By the time you see the preview, the app has validated the run, protected the topology, restored the source dimensions, consulted the original colours, preserved fine detail, and chosen the opaque or glass path. All of it happens in the same browser worker pipeline as the model itself; the image is never sent to a cleanup server.
Try the background remover with a photo containing real openings or thin structures, then inspect the result at full size. The clean space between those details is not an accident. It is the part after the AI.
Applies to NSS Background Remover v2.3.0 — the release that was current when this article was published.
Was this article helpful?
Your answer is saved in this browser only. This control makes no network request and does not send the answer to an NSS feedback endpoint.