You Upscaled to 4x and It's Still Soft: Pick the Right Source Mode
You set the upscaler to 4x and the result still looks soft. Usually the fix is not more sharpening. It is telling the tool what kind of image it is looking at. A practical guide to the Source modes, and the honest limit no upscaler can beat.
By Novus Stream Solutions Editorial Team · Part of the Browser-local editing workflows topic cluster
You bumped it to 4x, waited for the model to run, and the result came back... soft. Not pixelated, not blocky: just vaguely smeared, like someone wiped a thumb across the fine detail. So you reach for the sharpening slider, crank it, and now it looks soft and crunchy.
Here is the thing most people get wrong: when an upscale looks mushy, the fix is almost never more sharpening. It is telling the upscaler what it is looking at. A photo and a logo want completely different treatment, and until recently the tool had no way to know which one you fed it. That is what the Source selector on the Upscale tool fixes, and this post walks through when to pick each mode.
The misconception: a bigger number means a sharper picture
4x is not a sharpness dial. It is a size multiplier. It tells the model to output four times the width and four times the height, sixteen times the pixels. Whether those extra pixels look sharp depends entirely on whether the model guessed the right detail to put in them.
And here is the honest part, up front: upscaling invents plausible detail. It does not recover detail that was never captured. If the fine texture of a brick wall was smeared into a beige blur in your source, no upscaler is reading the original bricks back out of it. A good model paints on convincing bricks. That is a different thing, and it is worth being clear-eyed about. We go deeper on the gap between "invented" and "recovered" in the piece on why AI upscalers leave seams and soft edges.
So when 4x comes back soft, the question is not "how do I sharpen it". It is "did I point the right model at this image?"
The Source selector, one mode at a time
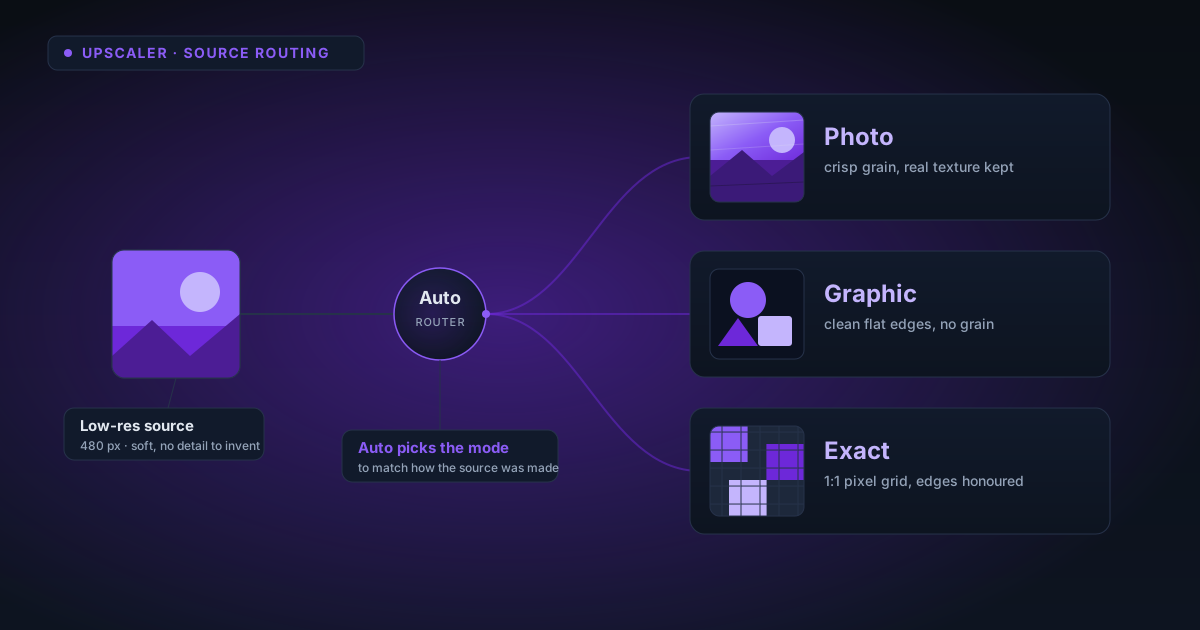
The Source dropdown has four options. Each routes your image to a different processing path built for a different kind of picture.
Auto
Auto analyses the image and picks the path for you. It looks at the characteristics of what you dropped in. Is this a continuous-tone photograph, or a flat-shaded graphic with hard edges?, and routes accordingly. If you are not sure what your image counts as, start here. It is the safe default, and for most everyday photos it lands on the right choice without you thinking about it.
Use Auto when you genuinely do not know, or when you are batching a mixed pile of images and cannot hand-classify each one.
Photo
Photo runs a real-world super-resolution model (Swin2SR real-world / BSRGAN-trained). "Real-world" is the important word. These models were trained on images that have been through the wringer (JPEG compression, resizing, the soft haze a phone camera leaves), so they expect that damage and work to undo it.
This is the mode for anything that came out of a camera: portraits, product shots, landscapes, screenshots of photos, and especially images that have already been compressed or downscaled somewhere along the way (saved off social media, pulled from a chat thread, exported small years ago). If your source is a real photograph and the result looks soft, and you were on Graphic or Exact, this is very likely your fix.
Graphic
Graphic is an edge-preserving path for flat art: logos, icons, screenshots of interfaces, diagrams, flat illustration. It is built to keep hard edges hard and flat colour flat.
Why does this deserve its own mode? Because feeding a graphic to a photo model gives you mush. A photo model expects texture and gradient everywhere; hand it a crisp logo with dead-flat fills and razor edges, and it "helpfully" invents micro-texture that was never there and softens the edges it should have kept knife-sharp. The output looks like your logo got wet. The Graphic path avoids that smeary "SR mush" by treating the edges as edges instead of as blurry photo detail to be reinterpreted.
If your clean logo came back looking soft and slightly organic, you were almost certainly on a photo path. Switch to Graphic.
Exact / Faithful
Exact runs classical Swin2SR and stays faithful to the source pixels: minimal invention. This is the one for pixel art and clean screenshots where every pixel is deliberate and you do not want the tool to hallucinate anything new into the gaps. Where Photo is happy to imagine detail and Graphic protects edges while smoothing, Exact keeps things honest and literal. If invention is the enemy (you want a bigger version of exactly this, not a reinterpretation), pick Exact.
Your source looks like X, pick Y
A quick lookup for the common cases:
| Your source looks like... | Pick | Why |
|---|---|---|
| Phone or camera photo, portrait, product shot | Photo | Real-world model, trained on camera-style images |
| Photo saved off social media / already compressed | Photo | Built to undo JPEG and downscale damage |
| Logo, icon, app screenshot, flat illustration | Graphic | Keeps hard edges hard, avoids SR mush |
| Pixel art, clean UI screenshot, sprite | Exact / Faithful | Faithful, minimal invention, no hallucinated texture |
| Genuinely not sure / mixed batch | Auto | Analyses and routes for you |
If a result disappoints, the first move is not the sharpening slider. It is trying the next most likely mode from this table. A soft logo? Try Graphic. A soft photo? Try Photo. Very often that single switch is the whole fix.
The hard limit nobody's Source mode can beat
Picking the right mode gets you the best possible result for your source. It cannot get you a better result than your source can support.
A very small source cannot gain real detail. This is not a limitation of one mode. It is physics. If the information was never captured, no amount of clever routing conjures it back. That is why the tool enforces roughly an 8x effective-scale cap and shows you a warning as you approach it. Past that point you are not enhancing a picture, you are asking the model to make one up almost from scratch, and it shows.
The classic failure: a 64px icon blown up to 4096px through a photo model. That is a photo path being asked to invent texture across an enormous gap with almost nothing to go on, the definition of mush. Two lessons live inside that one example:
- It was the wrong mode (an icon is a Graphic, not a Photo).
- It was also too big a jump from too little source. The Graphic path and the scale cap both exist precisely to keep you out of this territory.
4x is the multiplier where mode choice starts to matter most, because you are asking for four times the linear size and the model has more blank space to fill. If you want the fuller picture on how 2x and 4x actually differ in what they demand of your source, the 2x vs 4x upscaler guide breaks it down.
Practical tips that beat cranking the sharpener
- Upscale from the largest original you have. This is the single highest-leverage move. Do not upscale the small export when the big original is sitting in a folder. More captured detail going in means less invented detail coming out, and invented detail is what reads as soft.
- 2x twice is not the same as one clean 4x, and it is not magic. Chaining passes stacks each pass's guesses on top of the previous pass's guesses; errors compound and edges get progressively softer. We ran the actual maths on this in the incremental-upscaling piece. Worth reading before you reach for a second pass on a tiny image.
- Match the mode to the content, not the file type. A screenshot of a photograph is a Photo, even though it is technically a screenshot. A photo of a logo on a billboard is a Photo (it has real-world lighting and texture). Ask what the pixels are, not what the extension says.
- If it is soft, change the mode before you change the sliders. Sharpening a mode mismatch does not fix the mismatch. It just adds crunch on top of mush.
Try it on the image that disappointed you
If you have a 4x result sitting in your downloads that came back soft, this is a two-minute experiment. Open the Upscale tool, drop the original (the biggest version you own) back in, and this time set the Source deliberately: Photo for a camera shot, Graphic for a logo or screenshot, Exact for pixel art, or let Auto route it. Everything runs on your own device; the image never uploads anywhere, and the model weights download once and cache for next time.
You will not always get a miracle. A tiny source is still a tiny source, and we would rather tell you that than pretend otherwise. But the difference between the wrong mode and the right one is usually the difference between "still soft" and "actually usable."
Applies to NSS Background Remover v1.9.0 — the release that was current when this article was published.
Was this article helpful?
Your answer is saved in this browser only. This control makes no network request and does not send the answer to an NSS feedback endpoint.